Connect Securely with VPNs
The VPN section enables secure remote connectivity between devices and users through encrypted tunnels. Atra RMS VPN supports both peer-to-peer and peer-to-site connections for secure access to remote devices and networks.
- View VPN Tunnels
- VPN Tunnel Creation Guide
- Manage and View VPN Tunnel Profiles
- VPN Tunnel Workflow Examples
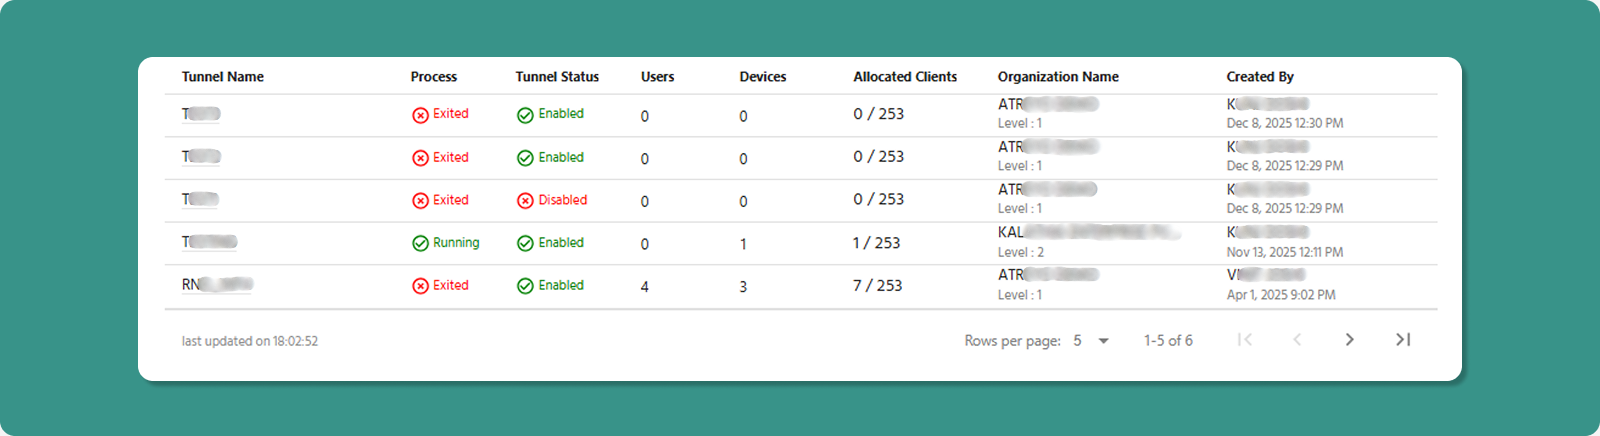
View VPN Tunnels
The main VPN interface displays all VPN tunnels under your management.
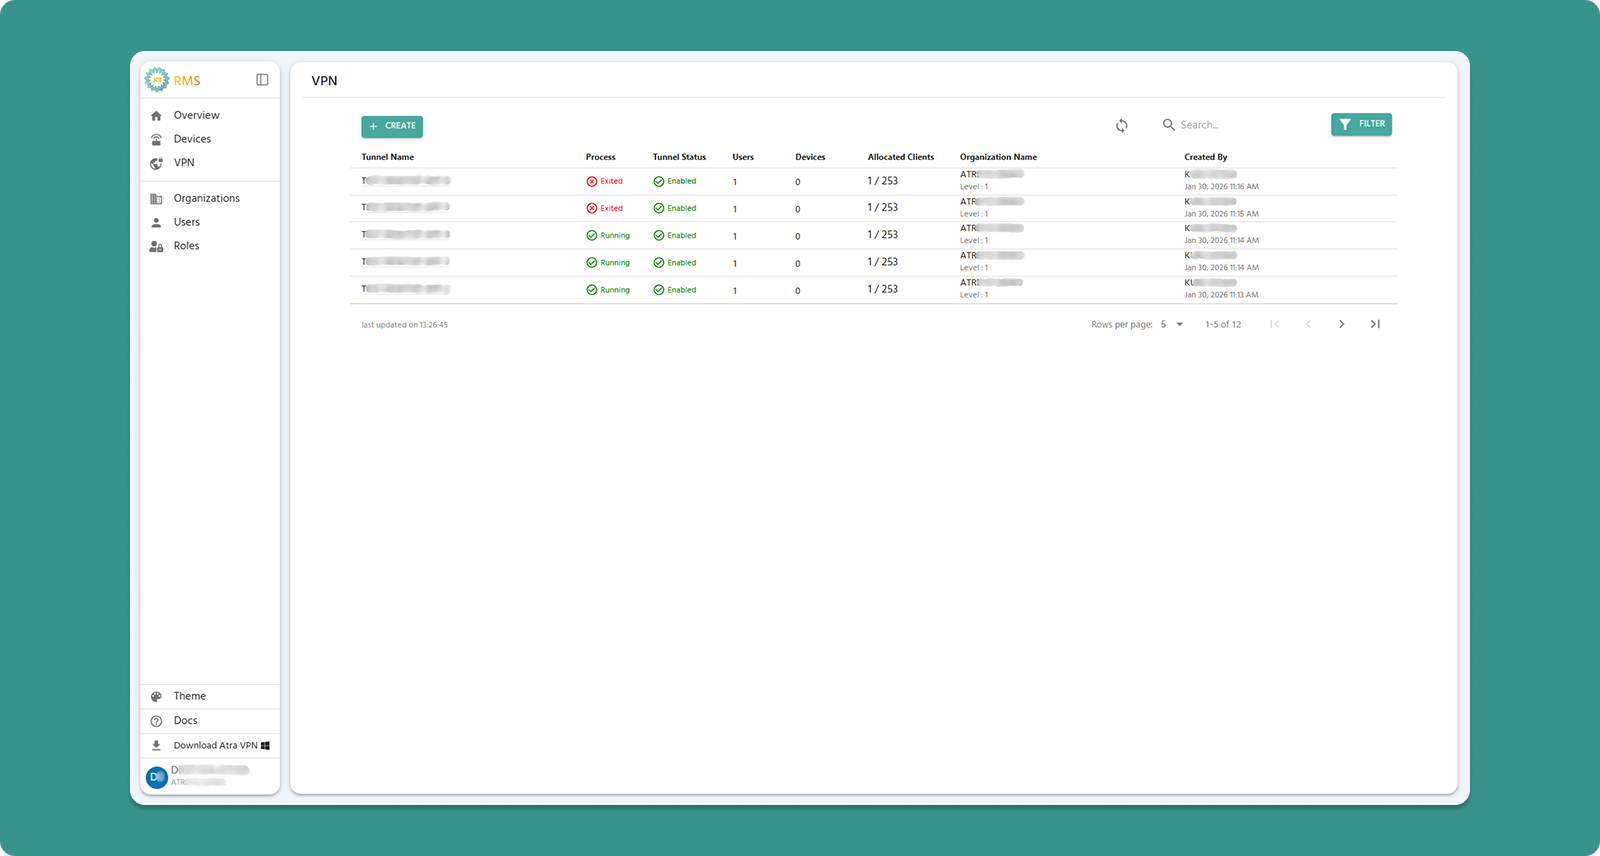
Interface Actions (Top Bar)

|
Action |
Location |
Purpose |
|
+CREATE Button |
Primary action area (Left) |
Click to navigate to the VPN tunnel creation form and establish a new tunnel. |
|
Refresh Button |
Primary action area(Right) |
Manually update tunnel list (also auto-refreshes every 5 seconds) |
|
Search Bar |
Search area(Right) |
Filter by tunnel name, organization or creator |
|
Filter |
Primary action area (Right) |
Filter by Creator,Organization Name and Process Status(Running/Exited) |
Column Definitions
|
Column |
Description |
Values |
|
Tunnel Name |
Custom name assigned during creation (click to open VPN Tunnel Overview page) |
Production_Tunnel, Office_VPN |
|
Process |
Indicates the operational state of the VPN server process. |
Running, Exited |
|
Tunnel Status |
Management/activity state |
Enabled, Disabled |
|
Users |
Count of users allocated to tunnel |
10 |
|
Devices |
Count of devices allocated to tunnel |
5 |
|
Allocated Clients |
Total users + devices in tunnel |
15 |
|
Organization Name & Level |
name of the organization and its level under which the tunnel was created or assigned |
ATREYO Level-1 |
|
Created By |
Username who created tunnel |
admin@company.com |
|
Created At |
Date/time of tunnel creation |
Dec 28, 2025, 9:30 AM |
Understanding VPN States
Process State
The Process indicates the VPN server operational state.
|
State |
Meaning |
User/Device Impact |
|
Running |
VPN tunnel is active |
✅ Users and devices CAN connect securely |
|
Exited |
VPN tunnel is inactive |
❌ Users and devices CANNOT connect. |
Common Causes of "Exited":
-
Administrator manually stopped the process
-
Tunnel was disabled (automatically stops process)
-
Inactivity timeout (no connections for extended period)
-
Technical error or crash (rare)
💡 Troubleshooting: If process shows "Exited" unexpectedly, check Tunnel Status. If "Disabled", enable it. If "Enabled", manually start the process.
Tunnel Status
The Tunnel Status determines management capabilities.
|
Status |
Meaning |
What You Can Do |
|
Enabled |
Tunnel is active and fully manageable |
✅ Start/Stop process |
|
Disabled |
Tunnel is inactive and locked down |
❌ Cannot start process |
When to Disable:
-
Temporarily suspend VPN access without deleting tunnel
-
Maintenance period requiring no connections
-
Security incident requiring immediate access cutoff
-
Preparing tunnel for deletion
Effect of Disabling:
-
Process automatically stops (becomes "Exited")
-
All connected users/devices are disconnected
-
No new connections possible until re-enable
Auto-Refresh Feature
🔄 Automatic Update: The VPN tunnel table refreshes every 5 seconds to show real-time status.
Benefits:
-
Monitor process state changes automatically
-
See when users/devices connect or disconnect
-
Immediate visibility into tunnel health
Manual Override:
Table Navigation
|
Control |
Purpose |
Options |
|
Rows per page |
Adjust visible tunnels |
5, 10, 15, 20,25 |
|
Total Count |
Display total tunnels |
"Showing 1-5 of 25" |
|
Page Navigation |
Move between pages |
Previous, Next, Last, First |
What is Atra RMS VPN?
-
Secure Virtual Private Network service
-
Encrypted tunnels connecting users and devices
-
Remote access to devices and their local networks
-
Built on OpenVPN protocol for enterprise-grade security
Use Cases:
-
Remote Device Access: Connect to IIoT gateways from anywhere
-
Network Access: Access devices on remote local networks
-
Secure Connectivity: Encrypted communication for sensitive data
-
Troubleshooting: Remote diagnostics without site visits
VPN Tunnel Creation Guide
Create a new VPN tunnel to enable secure remote access for users and devices.
Prerequisites
Before creating VPN tunnel:
✅ You have "VPN Create" permission
✅ You have "Devices View" permission (required dependency)
✅ You understand which devices/users need VPN access
✅ You know the network topology (especially for network forwarding decisions)
Step 1: Navigate to Creation Form
-
Click "VPN" in left sidebar menu
-
Click "+CREATE" button (teal, top-left)
-
VPN Tunnel creation form loads
Step 2: Complete Tunnel Form
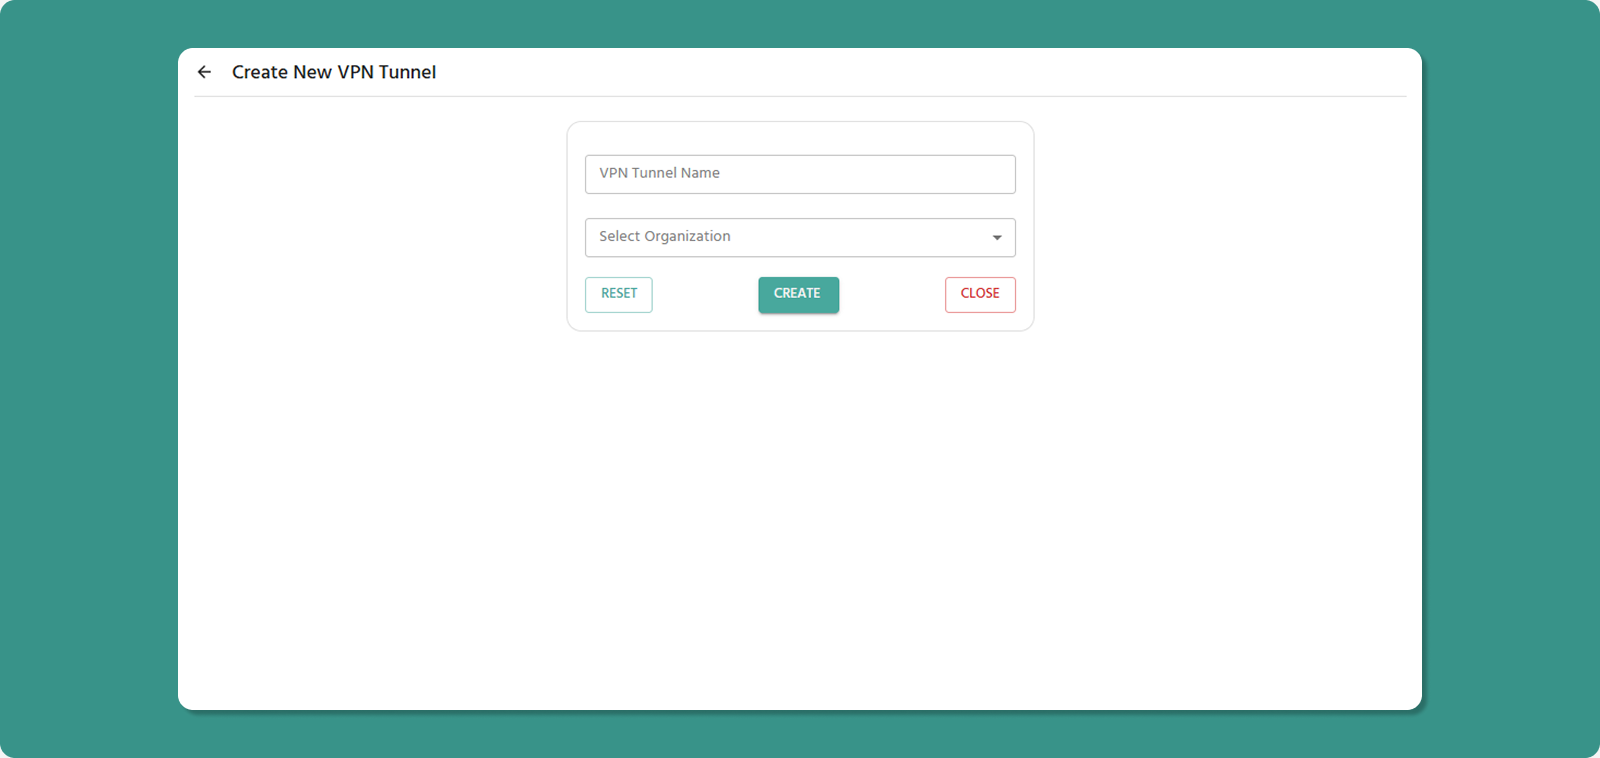
Tunnel Name (Required)
Naming Conventions:
-
Length: 3-50 characters
-
Allowed: Letters, numbers, spaces, hyphens (-), underscores (_)
-
Not allowed at start/end: Hyphen, underscore
-
No consecutive special characters
Examples:
-
✅ Production Tunnel 01
-
✅ Office_VPN
-
✅ Remote-Access-Main
-
❌ _Tunnel (starts with underscore)
-
❌ VPN--Tunnel (consecutive hyphens)
💡 Naming Best Practices:
-
Indicate purpose: "Production", "Development", "Support"
-
Include location if relevant: "Mumbai_Office_VPN"
-
Use consistent naming: "Site_Function_Number"
Organization (Required)
Select the organization where the tunnel will be created.
Dropdown Options:
-
Your current organization
-
Child organizations under your management
Important:
-
Only devices/users from selected organization (and its children) can be added
-
Cannot add devices/users from parent organizations
Step 3: Review and Create
Before submitting, review:
✅ Tunnel name is descriptive
✅ Correct organization selected
Form Actions:
After Creation
Immediate Effects:
-
New tunnel appears in VPN Tunnel List
-
Tunnel Status: Disabled
-
Process State: Exited (not running yet)
Next Steps:
-
Start the VPN Process (see Tunnel Overview page)
- Add devices and users to tunnel
-
Users download VPN client (if not already installed)
-
Users connect via VPN Desktop Application
Manage and View VPN Tunnel Profiles
The Tunnel Overview page is your control center for managing an individual VPN tunnel, its process, and its connected clients.
Accessing Tunnel Overview
Page Layout
Two-Panel Design:
Left Panel: Tunnel details, status, and management actions
Right Panel: Client management tabs (Devices and Users)
Left Panel: Tunnel Details & Actions
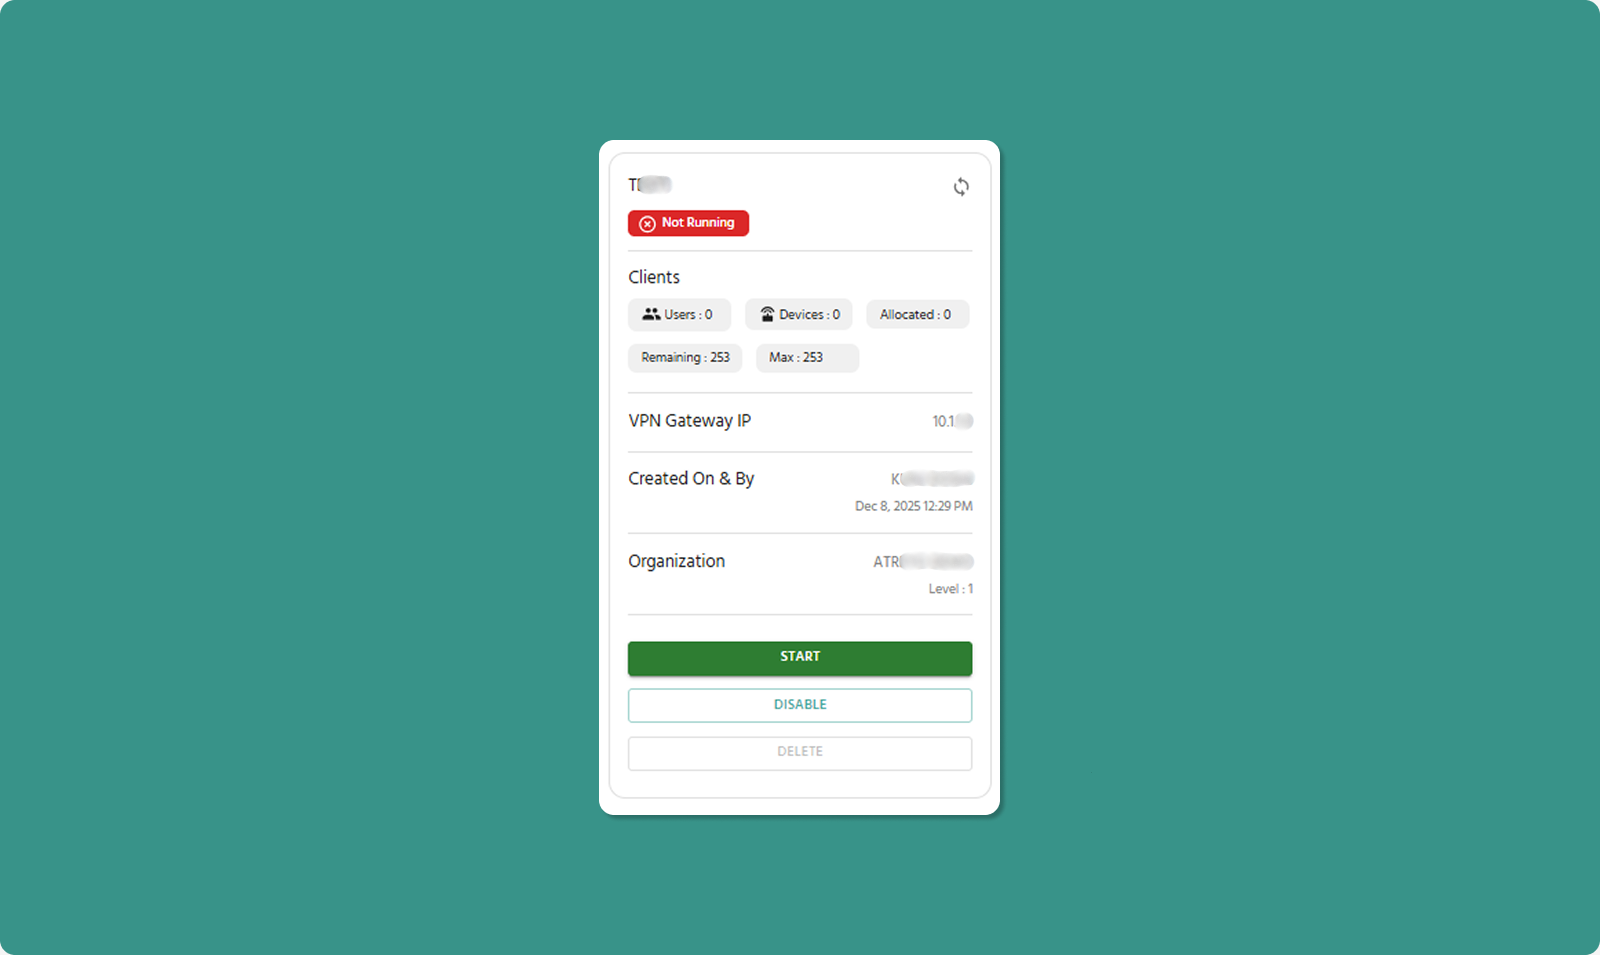
Core Status Information
|
Field |
Description |
Example |
|
Name of Tunnel |
Custom tunnel identifier |
Production_Tunnel_01 |
|
Status of Process |
Current VPN server state |
Running, Not-Running (Exited) |
|
VPN IP |
Gateway IP address for tunnel |
10.8.0.1 |
VPN IP Significance:
-
All traffic for this tunnel routes through this IP
-
First IP in tunnel's subnet
-
Cannot be modified
Client Information
|
Field |
Description |
Limit |
|
Number of Users |
Total users allocated to tunnel |
No specific limit (within Max) |
|
Number of Devices |
Total devices allocated to tunnel |
No specific limit (within Max) |
|
Allocated Clients |
Sum of users + devices currently in tunnel |
Max 253 |
|
Remaining Clients |
Available slots for additional users/devices |
253 - Allocated |
|
Max |
Absolute maximum clients supported |
253 (fixed) |
Example Calculation:
Users: 10
Devices: 5
Allocated Clients: 15
Remaining Clients: 253 - 15 = 238
Tunnel Metadata
|
Field |
Information |
|
Created By |
Username who created tunnel + date/time |
|
Organization |
Org name and level where tunnel exists |
Management Actions
Start/Stop Button
Purpose: Manually control VPN tunnel process
When Process is "Exited":
When Process is "Running":
⚠️ Important: Stopping process disconnects all active users/devices immediately. Use during maintenance windows only.
💡 Use Case for Stopping: If you need to add/remove devices or users and process is running, you CAN do so. However, stopping first ensures clean state management.
Enable/Disable Button
Purpose: Control tunnel's manageability and activity
When Status is "Enabled":
When Status is "Disabled":
⚠️ Critical Warning: If tunnel is Running and you click Disable:
-
Process automatically stops
-
All active connections immediately terminate
-
Users may lose work or# Atra RMS - User Guide
Delete Button
Purpose: Permanently remove tunnel from system
Important Restrictions:
⚠️ Cannot delete Enabled tunnel
Deletion Process:
-
Ensure tunnel is Disabled
-
Click DELETE button
-
Confirmation dialog appears
-
Click CONFIRM to permanently delete
-
Tunnel and all its configuration removed
What Gets Deleted:
-
Tunnel configuration
-
User/device associations
-
Process state
-
Historical connection logs (may be retained for audit)
What's NOT Affected:
-
Devices remain in system (not deleted)
-
Users remain in system (not deleted)
-
Other tunnels unaffected
⚠️ Deletion is Permanent: Cannot be undone. Must recreate the tunnel from scratch if needed again.
Refresh Button
Location: Top-right corner of Left Panel
Purpose: Manually update displayed information
When to Use:
-
After starting/stopping process (verify state change)
-
After adding/removing devices/users
-
To check current connection status
-
When expecting status change
💡 Note: Page auto-refreshes periodically, but manual refresh ensures immediate update.
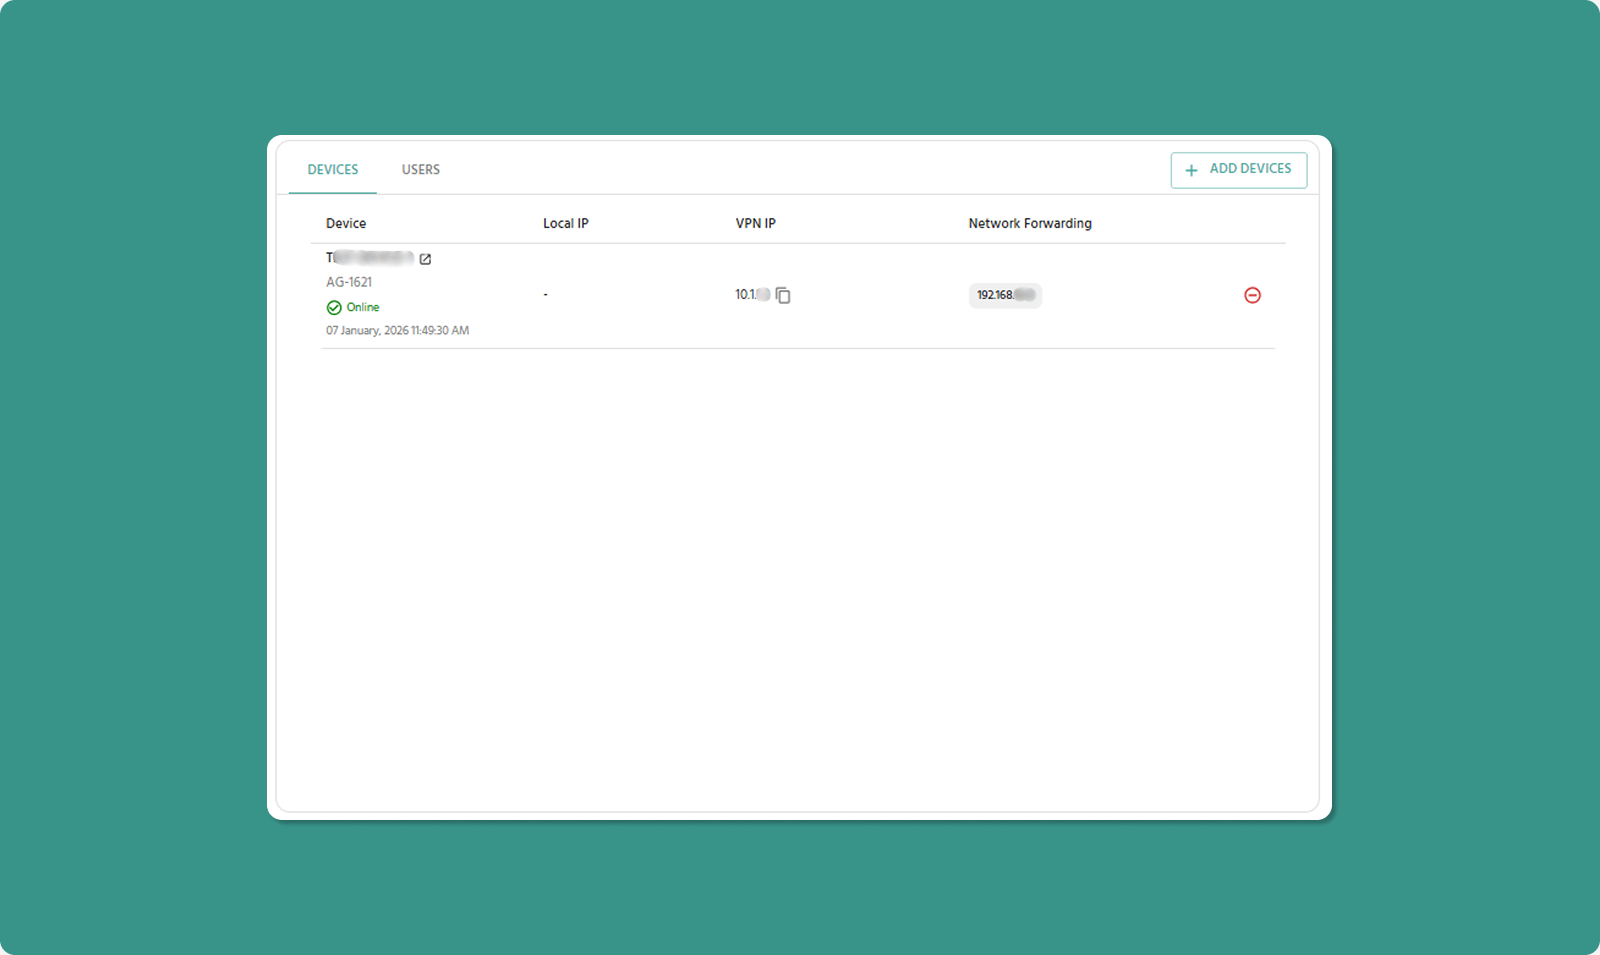
Right Panel: Client Management Tabs
The right panel manages users and devices associated with the tunnel through two tabs.
Tab 1: Devices
Tab 2: Users
Both tabs have an "Add" button in the top-right corner of the tab header.
Tab 1: Devices
Displays all devices allocated to this VPN tunnel with their network configuration.
Adding Devices
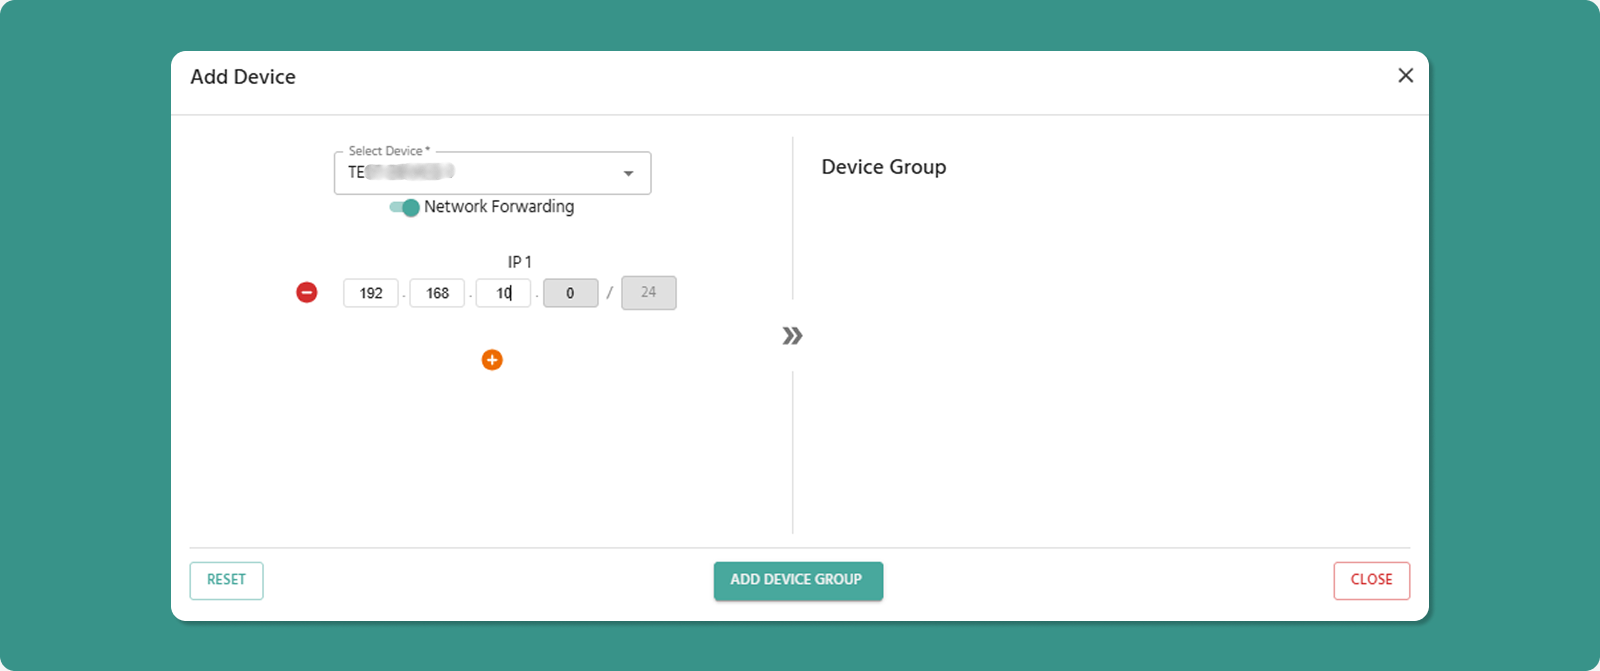
To Add Devices:
-
Click "Add Devices" button
-
Device selection dialog opens
-
Select devices from list (checkbox for each)
-
Configure Network Forwarding for each device
-
Click Add to confirm
Available Devices:
-
All devices from tunnel's organization
-
Devices from child organizations
Limit Check: System prevents adding devices if it would exceed 253 total clients (users + devices).
Network Forwarding Setting
Critical Decision: For each device added, choose Network Forwarding state.
|
State |
Effect |
Use When |
|
Enabled |
VPN users can access the device AND other devices on its local network |
Need to reach PLCs, sensors, or computers on device's LAN |
|
Disabled |
VPN users can ONLY access this specific device |
Only need device itself, not its local network (security/isolation) |
Example Scenarios:
Scenario 1: Factory with PLC Network
-
Device: IIoT Gateway in factory
-
Local Network: 10 PLCs on 192.168.10.x
-
Network Forwarding: ENABLED
-
Result: VPN users can connect to gateway AND all 10 PLCs
Scenario 2: Remote Sensor
-
Device: Standalone temperature sensor gateway
-
Local Network: None (device only)
-
Network Forwarding: DISABLED
-
Result: VPN users can only access sensor gateway itself
💡 Security Best Practice: Enable Network Forwarding only when necessary. Disabled provides better isolation and security.
Devices Table Columns
|
Column |
Description |
Details |
|
Device |
Device Name, Model, and Status |
Status shows Online/Offline with timestamp |
|
Local IP |
Device's IP on its physical LAN/WAN |
Example: 192.168.1.50 |
|
VPN IP |
Unique IP assigned by tunnel |
Example: 10.8.0.10 |
|
Network Forwarding |
Access to device's local network |
Enabled or Disabled (toggle switch) |
Device Name Link
The Device Name is a clickable link.
Action: Click device name
Result: Opens Device Detail Page in new browser tab
Use Case: Quick access to device monitoring without leaving VPN page
Local IP vs VPN IP
Local IP:
-
IP address on device's physical network
-
Example: 192.168.1.50 (factory LAN)
-
Used for communication within local site
-
Not accessible from internet
VPN IP:
-
IP assigned when device added to tunnel
-
Example: 10.8.0.10
-
Unique within this tunnel
-
Used for VPN communication
-
How users connect to device through VPN
Connection Flow:
User's Computer (10.8.0.25)
↓ VPN Tunnel
VPN Gateway (10.8.0.1)
↓Device VPN IP (10.8.0.10)
↓ If Network Forwarding Enabled
Device's Local Network (192.168.1.x)
Network Forwarding Toggle
Enabled State:
-
Toggle switch: ON (green)
-
Effect: VPN users can access device AND its local network
-
Routing: Traffic forwarded through device to local network
-
Access: Can reach 192.168.1.x devices (if device is on that network)
Disabled State:
-
Toggle switch: OFF (gray)
-
Effect: VPN users can ONLY access this specific device
-
Routing: No traffic forwarding to local network
-
Access: Can only reach device's VPN IP (10.8.0.10)
Changing Setting:
-
Click toggle switch
-
State changes immediately (Enabled ↔ Disabled)
-
Effect applies to all connected users
⚠️ Live Changes: You can toggle Network Forwarding while tunnel is running. Changes apply immediately without restarting the process.
Removing Devices
To Remove Device from Tunnel:
-
Locate device in table
-
Click Remove button (red, right side of row)
-
Confirmation dialog appears
-
Click CONFIRM to remove device
-
Device disappears from tunnel (but remains in system)
Effects:
-
Device's VPN IP deallocated
-
Allocated Clients count decreases
-
Remaining Clients increases
-
Device can be re-added later with different VPN IP
Tab 2: Users
Displays all users allocated to this VPN tunnel.

Adding Users

To Add Users:
-
Click "Add Users" button
-
User selection dialog opens
-
Select users from list (checkbox for each)
-
Click Add User to confirm
Available Users:
-
All users from selected organization
-
Users from child organizations (if any)
Available Users:
-
All users from tunnel's organization
-
Users from child organizations
Limit Check: System prevents adding users if it would exceed 253 total clients (users + devices).
Users Table Columns
[INSERT SCREENSHOT: Users_Table_Columns.png]
|
Column |
Description |
Example |
|
Name |
User's full name |
Jane Doe, Rajesh Kumar |
|
User VPN IP |
Unique IP assigned to user |
10.8.0.25 |
|
Status |
Shows whether the user is connected to the tunnel in the ATRA VPN client. |
Connected/Disconnected |
|
Organization Name |
User's organization |
ATREYO Level-1 |
|
|
User's login email |
jane.doe@company.com |
User VPN IP Assignment
How It Works:
-
Each user gets unique VPN IP when added to tunnel
-
IP automatically assigned from tunnel's subnet
-
Format: 10.8.0.x (where x = 2-254)
-
IP remains consistent until user removed
Usage:
-
User's VPN Desktop Application connects using this IP
-
Other users/devices can reach this user via this IP
-
Used for logging and access control
Removing Users
To Remove User from Tunnel:
-
Locate user in table
-
Click Remove button (red, right side of row)
-
Confirmation dialog appears
-
Click CONFIRM to remove user
-
User disappears from tunnel (but remains in system)
Effects:
-
User's VPN IP deallocated
-
Allocated Clients count decreases
-
Remaining Clients increases
-
User's VPN client disconnects (if currently connected)
-
User cannot reconnect to this tunnel
-
User can be re-added later with different VPN IP
⚠️ Active Connections: Removing user while they're connected immediately terminates their VPN session. Warn users before removal.
VPN Tunnel Workflow Examples
Example 1: Creating Production Tunnel
Scenario: Factory needs VPN access to 5 gateways and 10 users
Steps:
-
Gateway_A (Network Forwarding: ENABLED - has PLCs on LAN)
-
Gateway_B (Network Forwarding: ENABLED - has sensors on LAN)
-
Gateway_C (Network Forwarding: DISABLED - standalone)
-
Gateway_D (Network Forwarding: ENABLED - has HMI on LAN)
-
Gateway_E (Network Forwarding: DISABLED - standalone)
-
Add 10 users (engineers and managers)
-
Click CREATE
-
Navigate to Tunnel Overview page
-
Click START button (process begins running)
-
Notify users to download VPN client and connect
Result: 15 allocated clients (5 devices + 10 users), 238 remaining slots
Example 2: Maintenance Procedure
Scenario: Need to add 2 new devices during maintenance window
Steps:
Result: Clean device addition without disrupting other connections
Example 3: Emergency Disable
Scenario: Security incident requires immediate VPN shutdown
Steps:
-
Tunnel Status → Disabled
-
Process → Exited
-
All users disconnected
-
No new connections possible
-
Investigate security issue
-
When resolved:
Result: Complete VPN access shutdown in seconds
---⚠️ Critical Warning: If tunnel is Running and you click Disable:
-
Process automatically stops
-
All active connections immediately terminate
-
Users may lose work or experience disruption
-
Use only during maintenance windows or emergencies
Common Use Cases:
-
Temporary Suspension: Disable tunnel during security incident
-
Maintenance: Disable before major configuration changes
-
Preparation for Deletion: Must disable before deleting tunnel