Controlling Access with Roles
Roles define what actions users can perform in Atra RMS. Each role is a set of permissions that controls access to Devices, Users, Organizations, VPN, and Roles features.
Key Benefits:
- Security through least-privilege access
- Easy permission management
- Organization-specific customization
View Roles
View all roles in your organization and child organizations.
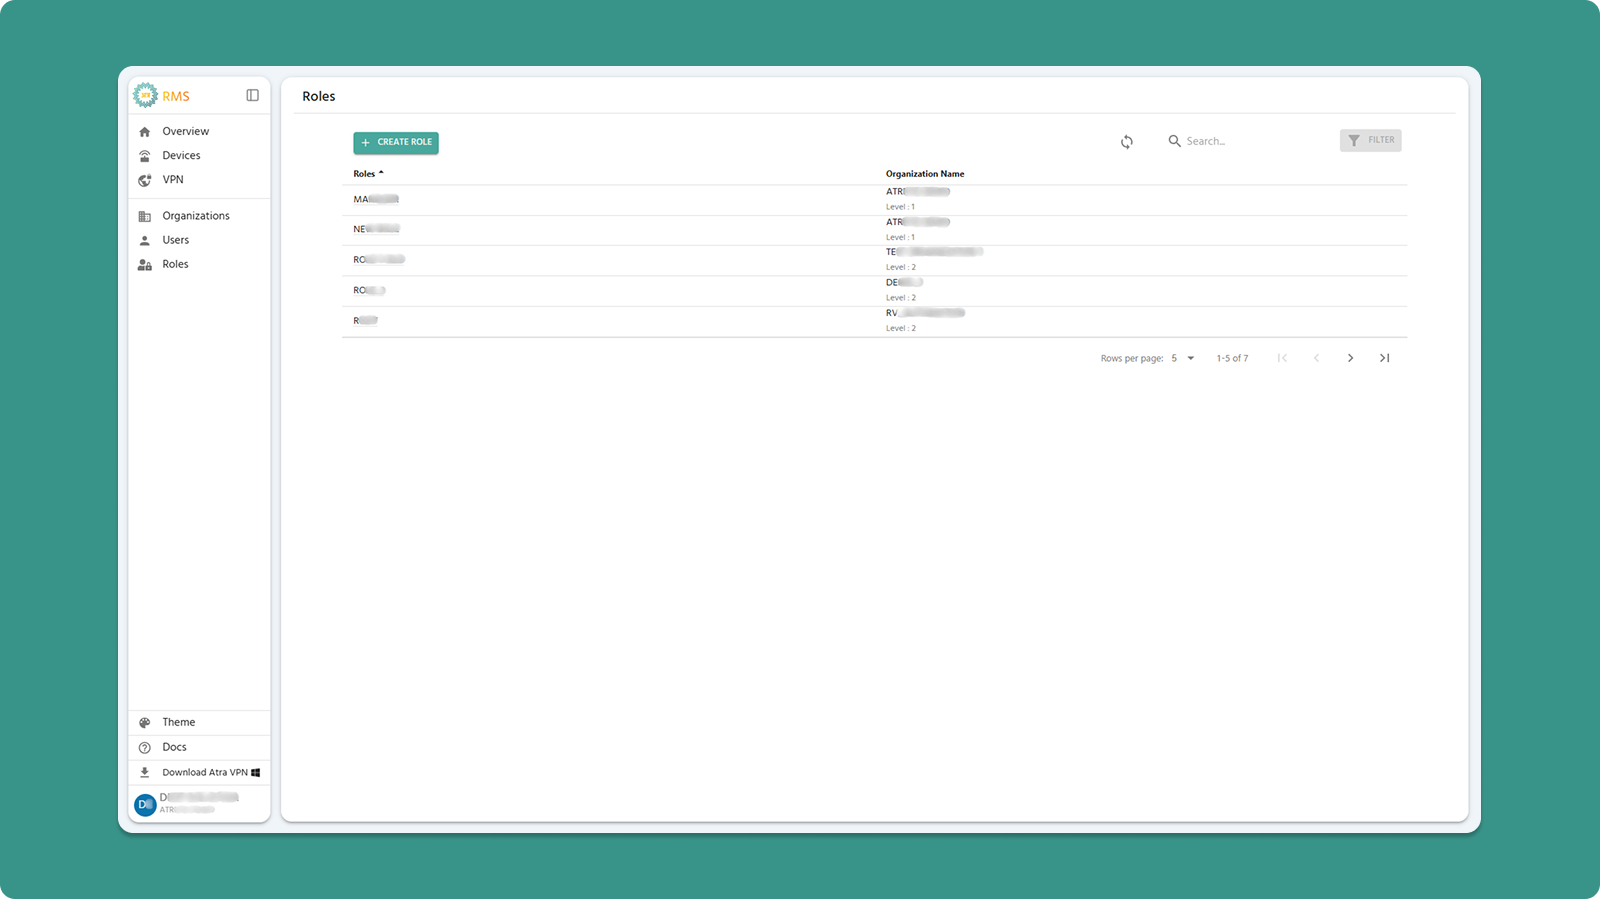
Actions:
-
+CREATE ROLE (Teal button) - Create new role
-
Search Bar - Filter by role name or organization
-
Refresh - Update list
Table Columns:
-
Roles - Role name (click to view details)
-
Organization Name - Where role exists
Role Creation Guide
Quick Steps
-
Click +CREATE ROLE button
-
Enter Role Name (3-50 characters, letters/numbers/spaces/-/_)
-
Select Organization
-
Check permissions for each section
-
Click CREATE
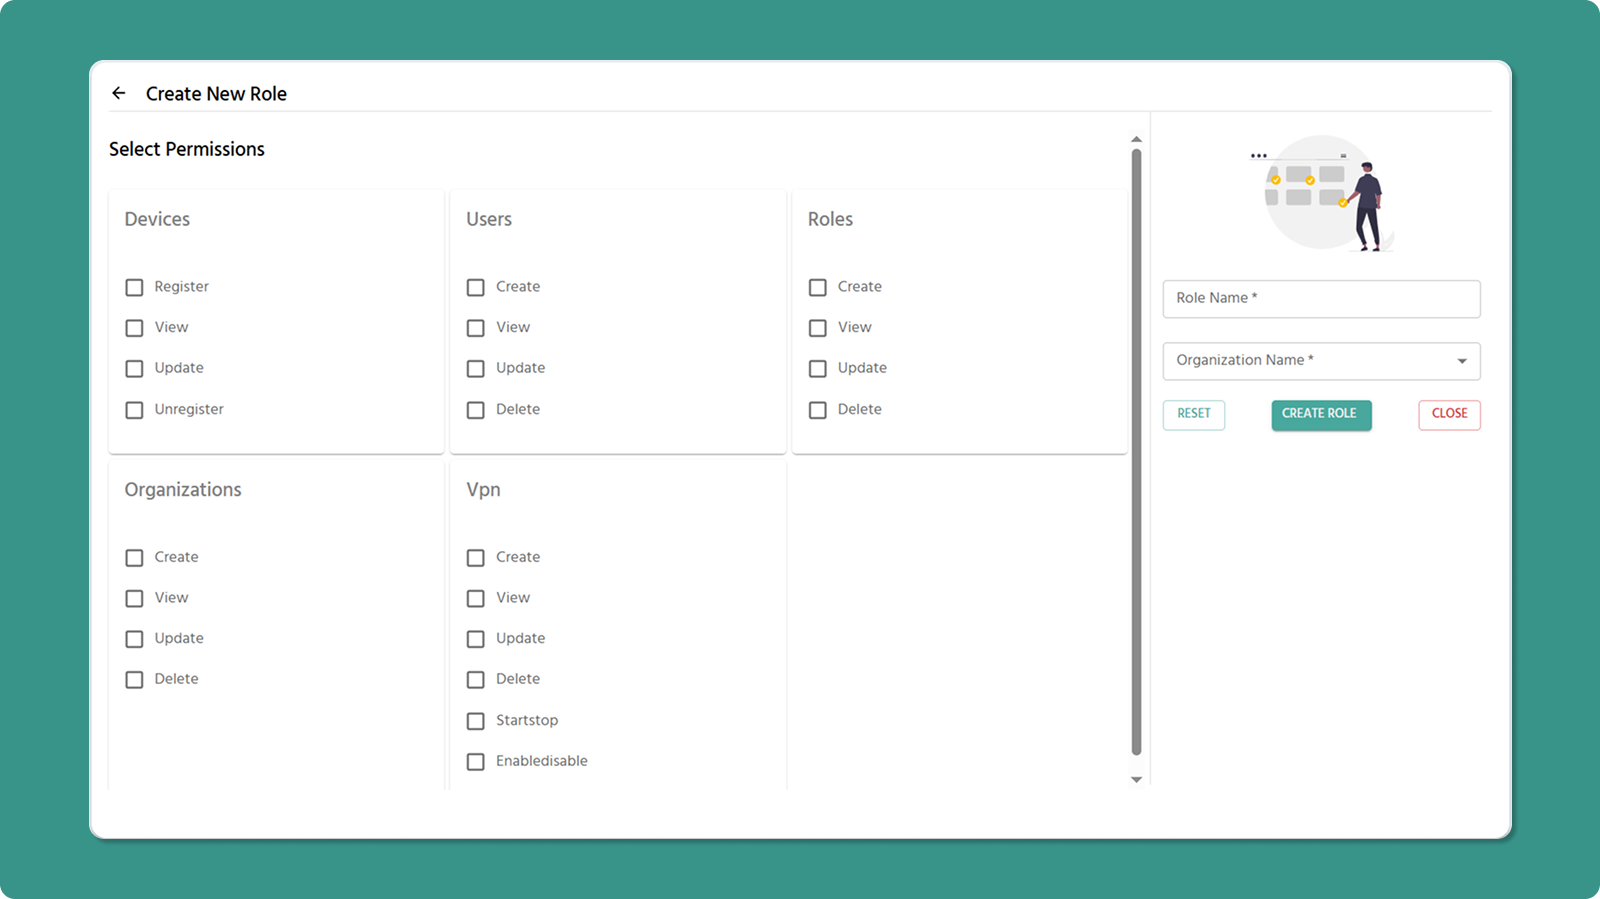
Role Name Rules
✅ Valid: Company Admin, Device_Manager, Field-Technician
❌ Invalid: _Admin (starts with _), Role- (ends with -), Admin__Role (consecutive __)
Permissions by Section
1. Devices
-
Register - Add new devices
-
View - See device list and details
-
Edit - Modify device info
-
Unregister - Remove devices
2. Users
-
Create - Invite new users
-
View - See user list
-
Edit - Change names/roles
-
Delete - Remove users
3. Roles
-
Create - Define new roles
-
View - See role list
-
Edit - Modify permissions and name
-
Delete - Remove roles
4. Organizations
-
Create - Add child organizations
-
View - See organization list
-
Edit - Change names
-
Delete - Remove organizations
5. VPN
-
Create - Make VPN tunnels
-
View - See VPN list
-
Edit - Change tunnel names
-
Delete - Remove tunnels, and remove devices and users from tunnel
-
Start/Stop - Control VPN process
-
Enable/Disable - Manage tunnel status
Permission Rules
⚠️ View Dependency
Must check View permission when checking any other permission in that section.
✅ Valid: Devices View + Register
❌ Invalid: Devices Register only (system auto check View)
⚠️ VPN Dependency
Must check Devices View when checking any VPN permission.
✅ Valid: VPN View + Devices View
❌ Invalid: VPN View only (system auto check Devices View)
Common Role Templates
System Administrator
✓ All permissions in all sections
Device Manager
✓ Devices: Register, View, Edit
✓ Users: View
✓ Organizations: View
Field Technician
✓ Devices: Register, View
Network Administrator
✓ Devices: View
✓ VPN: All permissions
Read-Only Viewer
✓ All sections: View only
Understanding Role Permissions
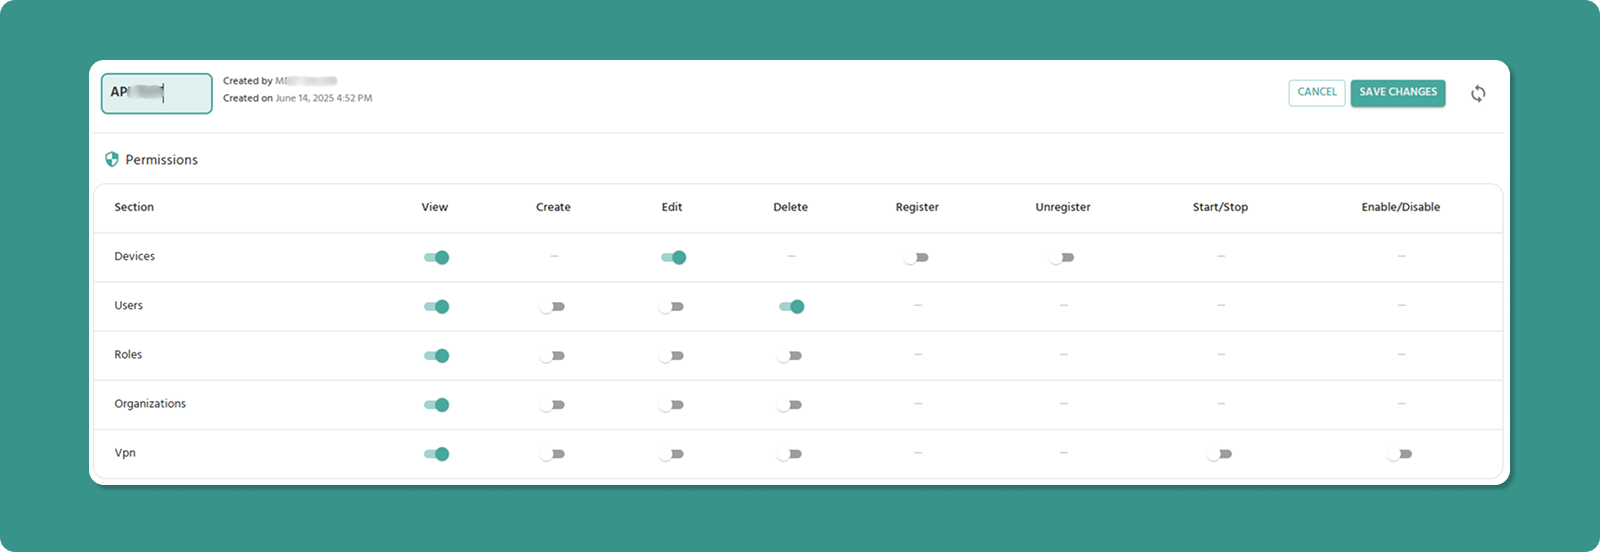
Click any role name in the list to open the Role Detail Page.
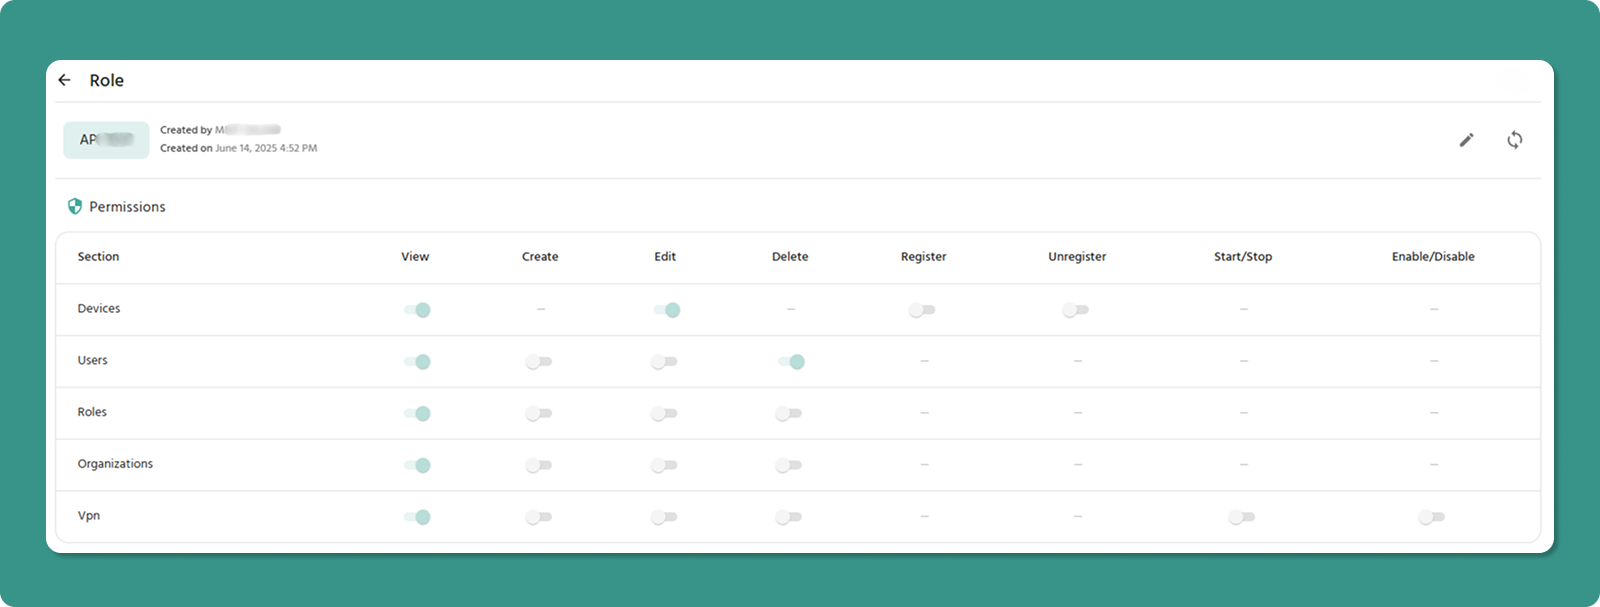
Role Detail Page Shows:
-
Role name and metadata (Created By, Created On)
-
Permissions table with all sections
-
Edit button (✏️) to modify role
-
Refresh button (🔄) to update data
Permissions Table
Displays all permissions in table format with toggle switches.
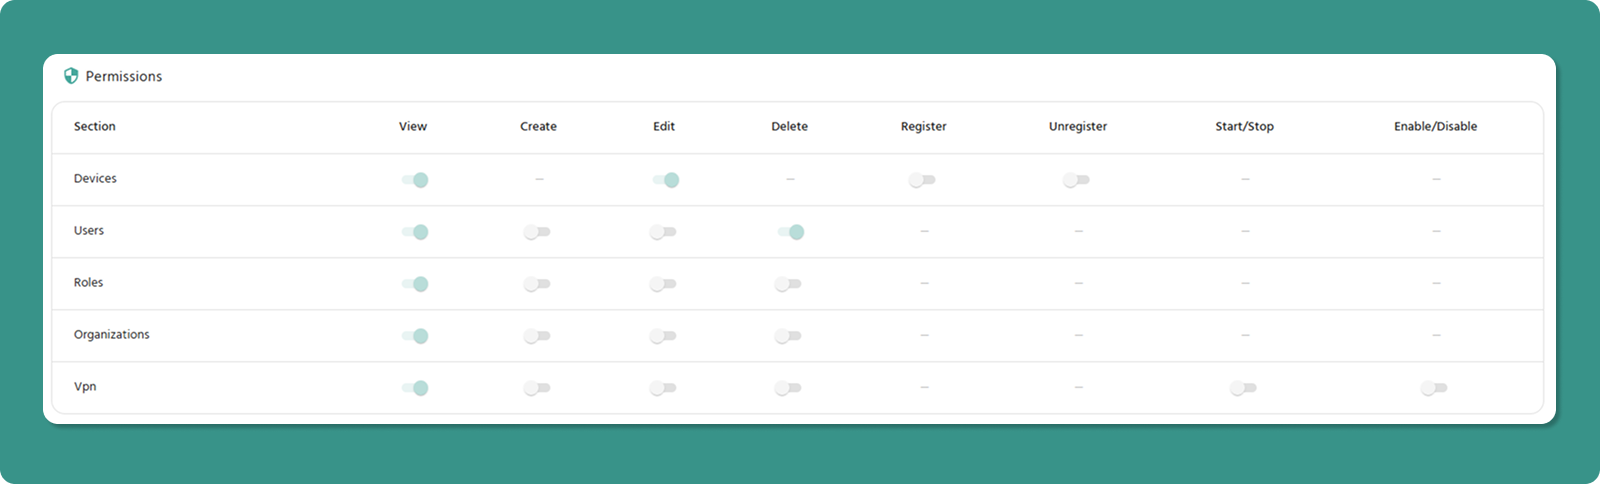
Columns: Section | View | Create | Edit | Delete | Register | Unregister | Start/Stop | Enable/Disable
Toggle States:
-
ON (Teal/Green, right position) - Permission granted
-
OFF (Gray, left position) - Permission not granted
Section-Specific Columns:
-
Register/Unregister - Devices only
-
Start/Stop, Enable/Disable - VPN only
-
Dashes (-) - Not applicable
Editing a Role
Entering Edit Mode
-
Open Role Detail Page (click role name)
-
Click Edit button (✏️) in header
-
Page becomes editable
What Changes in Edit Mode
Role Name: Becomes text input field (editable)
Toggle Switches: Become active (clickable)
Buttons: SAVE CHANGES and CANCEL appear
Modifying Permissions
To Grant Permission:
-
Click toggle switch (currently OFF/gray)
-
Switch moves right, turns teal/green
-
Permission granted when saved
To Revoke Permission:
-
Click toggle switch (currently ON/teal)
-
Switch moves left, turns gray
-
Permission revoked when saved
Dependency Enforcement
System automatically maintains dependencies:
View Dependency:
-
Turning ON any permission → Auto-enables View
-
Turning OFF View → Auto-disables other permissions in that section
VPN Dependency:
-
Turning ON any VPN permission → Auto-enables Devices View
-
Turning OFF Devices View → Auto-disables all VPN permissions
Saving Changes
-
Review all modifications
-
Click SAVE CHANGES button (teal)
-
Changes apply immediately to all users with this role
To Discard Changes: Click CANCEL button (red)
Important Notes
Company Admin Role
⚠️ Cannot be edited - System-protected role with full access. Edit button is hidden.
Need custom admin? Create a new role with desired permissions.
Permission Changes
✅ Take effect immediately after saving
⚠️ Users may need to refresh browser to see changes
💡 Best practice: Notify users before major permission changes
Browser Refresh
⚠️ Refreshing browser in Edit Mode loses all unsaved changes
Roles & Permissions FAQs
Quick Troubleshooting
Can't see Edit button?
-
Check you have "Roles Edit" permission
-
Verify not trying to edit Company Admin role
Can't toggle switches?
Changes not saving?
-
Check role name follows rules (3-50 chars)
-
Verify dependencies satisfied
-
Check internet connection
Role not appearing when inviting users?
-
Verify role created in correct organization
-
Refresh page
Permission Matrix
|
Section |
View |
Create |
Edit |
Delete |
Register |
Unregister |
Start/Stop |
Enable/Disable |
|
Devices |
✓ |
- |
✓ |
- |
✓ |
✓ |
- |
- |
|
Users |
✓ |
✓ |
✓ |
✓ |
- |
- |
- |
- |
|
Roles |
✓ |
✓ |
✓ |
✓ |
- |
- |
- |
- |
|
Organizations |
✓ |
✓ |
✓ |
✓ |
- |
- |
- |
- |
|
VPN |
✓ |
✓ |
✓ |
✓ |
- |
- |
✓ |
✓ |
Legend: ✓ = Available | - = Not applicable
Summary
Role Management Workflow:
-
Create role → Define permissions
-
View role details → Check permissions table
-
Edit role → Modify permissions as needed
-
Assign to users → Permissions apply immediately
Key Points:
-
Always enable View when enabling other permissions
-
Enable Devices View when enabling VPN permissions
-
Company Admin role cannot be edited
-
Changes take effect immediately upon saving
-
Test roles before production deployment