User Management
The Users section enables complete user lifecycle management: inviting new users, assigning roles, editing user information, and managing access to Atra RMS.
Key Capabilities:
- Invite new users to join Atra RMS
- Assign users to specific organizations
- Define user permissions through roles
- Edit user names and roles
- Remove users from the system
View and Manage Users
The main Users interface provides a comprehensive view of all users in your organization and immediate child organizations.
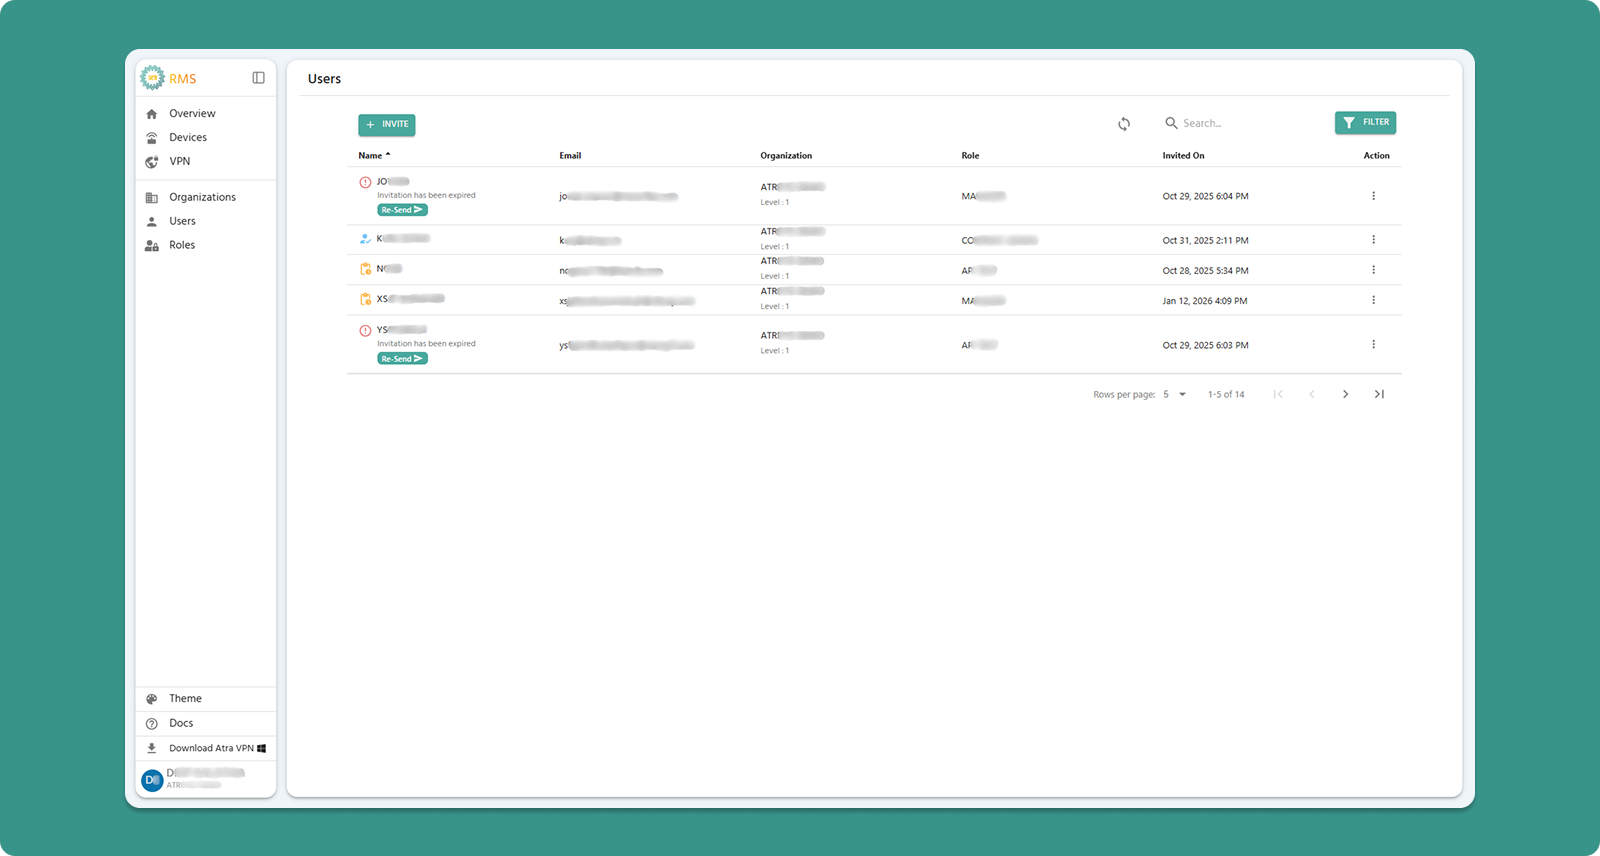
Interface Actions

|
Action |
Location |
Purpose |
|
+INVITE Button |
Top-left (Teal) |
Invite new user to Atra RMS |
|
Refresh Button |
Top-right |
Manually update user list |
|
Search Bar |
Center |
Filter by name, email, organization, or role |
|
Filter |
Top-right |
Filter users by invitation status, role, and organization |
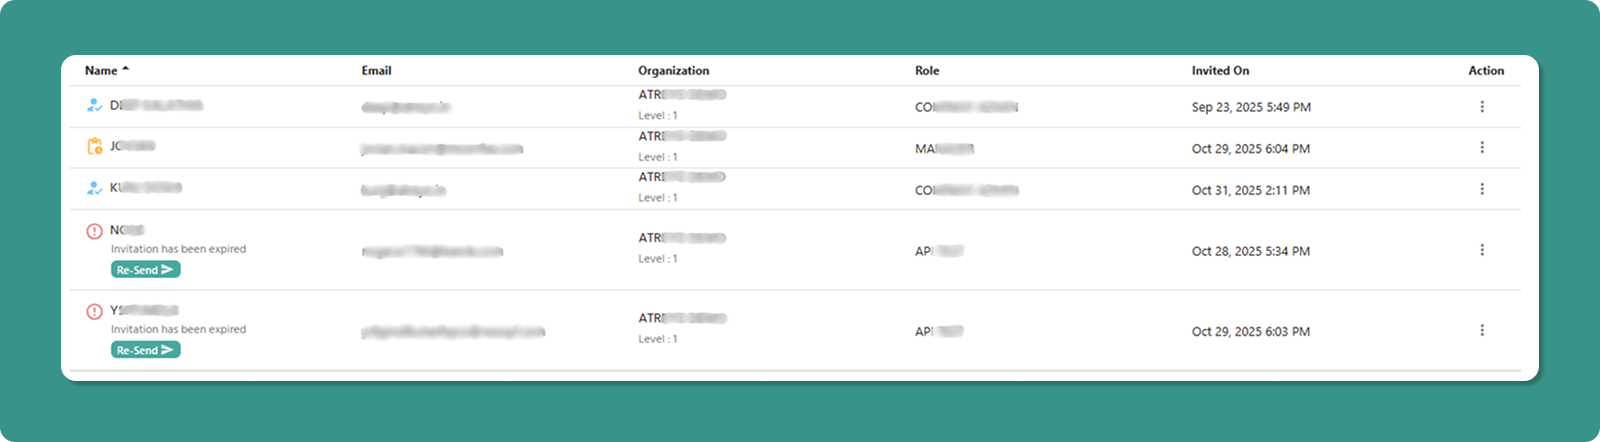
Table Columns
|
Column |
Description |
Example |
|
Name |
User's name with status icon |
👤 Jane Doe, ⏳ John Smith, ⚠️ Mike Johnson |
|
|
User's login email address |
jane.doe@company.com |
|
Organization |
Org name with level |
ATREYO Level-1 |
|
Role |
Assigned permission set |
COMPANY ADMIN, MANAGER |
|
Created On |
Invitation date/time |
Dec 20, 2025, 3:45 PM |
Scope: Data includes users from your current organization and all immediate child organizations.
Name Column with Status Icons
The Name column displays user status through visual icons alongside the user's name.
Icon Types and Meanings
Icon 1: Account Active (✓ User Icon - Blue)
Appearance:
-
Blue user icon (👤)
-
User name displayed normally
-
No additional text below name
Meaning:
-
User successfully created their account
-
Account setup completed
-
User can log in to Atra RMS
Icon 2: Account Creation Pending (⏳ Clock Icon - Yellow)
Appearance:
-
Yellow clock icon (⏳)
-
User name displayed normally
-
No additional text below name
Meaning:
-
User has been invited
-
Invitation email sent successfully
-
User has NOT yet completed account setup
-
Invitation link still valid (within 24 hours)
What Happens Next:
-
User receives invitation email
-
User clicks "Set Up Password" link
-
User creates password
-
Icon changes to ✓ (Account Active)
Icon 3: Invitation Expired (⚠️ Warning Icon - Red)
Appearance:
-
Red warning icon (⚠️)
-
User name displayed
-
Text below name: "Invitation has been expired"
-
Re-Send button below caption (teal button with arrow →)
Meaning:
-
User was invited but did not complete setup
-
24-hour invitation validity period has expired
-
User cannot use old invitation link
-
Administrator/User must resend invitation
Re-Send Button Functionality

When invitation expires, a Re-Send button appears below the user's name.
-
Label: "Re-Send →" (with arrow symbol)
-
Colour: Teal
-
Location: Directly below "Invitation has been expired" text
-
Purpose: Send new invitation email to user
How to Resend Invitation
Steps:
-
Locate Expired User
-
Find user with ⚠️ warning icon
-
Look for "Invitation has been expired" text
-
Click Re-Send Button
-
Click the "Re-Send →" button below user name
-
System Processing
-
New invitation email sent to user's email address
-
New 24-hour validity period starts
-
User status updates in table
-
Visual Update
-
Icon changes from ⚠️ (expired) to ⏳ (pending)
-
"Invitation has been expired" text disappears
-
Re-Send button disappears
-
User now shows as "invited, pending account setup"

What Happens After Resending
User Receives:
-
New invitation email with fresh link
-
Subject: "Invitation to Join Atra RMS"
-
New 24-hour validity period
Old Invitation Link:
-
Previous invitation link becomes invalid
-
User cannot use old link even if they still have the email
-
Only new link will work
User Must:
-
Check email for new invitation
-
Click "Set Up Password" button in new email
-
Complete account setup within 24 hours
-
Create password and activate account
If User Completes Setup:
-
Icon changes to ✓ (Account Active)
-
User can now log in
-
Invitation system complete
Individual User Actions
Each user row has an Action button (three vertical dots ⋮) that opens a menu with management options.

|
Action |
Purpose |
Permission Required |
|
Edit Name |
Modify user's display name |
Users Update |
|
Change Role |
Assign different role |
Users Update |
|
Delete User |
Permanently remove user |
Users Delete |
Action: Edit Name
Modify a user's display name (does not affect email/login).

Steps:
Input Rules:
-
Length: 3-40 characters
-
Allowed: Letters, numbers, spaces, periods (.), underscores (_), hyphens (-)
-
Not allowed at start/end: Period, underscore, hyphen
-
No consecutive special characters
Examples:
-
✅ Jane Doe
-
✅ Product-Manager
-
✅ User_123
-
❌ _Jane (starts with underscore)
-
❌ User..Name (consecutive periods)
Action: Change Role
Assign a different role to modify user's permissions.

Steps:
Available Roles:
-
Displays all roles created for the user's organization
-
Examples: ADMIN, MANAGER, VIEWER, custom roles
Effect:
-
User's permissions immediately update
-
User may need to refresh browser to see new capabilities
-
Previous role's permissions are revoked
⚠️ Caution: Changing a user's role affects their access to devices, VPN, and other resources. Verify the new role has appropriate permissions before saving.
Action: Delete User
Permanently remove a user account from Atra RMS.

Steps:
⚠️ Critical Warnings:
Deletion is Permanent:
-
User account is immediately deleted
-
User cannot log in after deletion
-
Action cannot be undone
-
User must be re-invited to regain access
VPN Tunnel Restriction:
-
Cannot delete users currently in any VPN tunnel
-
Must first remove user from all VPN tunnels
-
Then deletion will be allowed
Audit Trail Preserved:
-
User's name remains in "Created By" and "Registered By" fields
Self-Management Prevention:
-
Logged-in user cannot delete their own account
-
Logged-in user cannot change their own role
-
Prevents accidental self-lockout

|
Control |
Purpose |
Options |
|
Rows per page |
Adjust visible users |
5, 10, 15, 20,25 |
|
Total Count |
Display total users |
"Showing 1-5 of 25" |
|
Page Navigation |
Move between pages |
Previous, Next, Last, First |
User Invite Guide
Invite new users to join your Atra RMS organization through a secure email invitation process.
Step 1: Navigate to Invite Form
-
Click "Users" in left sidebar menu
-
Click "+INVITE" button (Teal, top-left corner)
-
"Invite New User" page loads
Step 2: Complete Invitation Form

[INSERT SCREENSHOT: User_Invite_Form.png]
Fill out all required fields:
1. Name (Required)
User's full name (can be edited later).
Input Rules:
-
Length: 3-40 characters
-
Allowed: Letters, numbers, spaces, periods (.), underscores (_), hyphens (-)
-
Not allowed at start/end: Period, underscore, hyphen
-
No consecutive special characters
Examples:
-
✅ Jane Doe
-
✅ Rajesh Kumar
-
✅ Product-Manager
-
✅ User_123
2. Email (Required)
User's email address (used for login and communication).
Input Rules:
-
Must be valid email format
-
Must include @ symbol and domain
-
Case-insensitive
Examples:
-
✅ user@company.com
-
✅ jane.doe@organization.co.in
-
✅ admin@example.org
-
❌ usercompany.com (missing @)
-
❌ user@ (incomplete domain)
⚠️ Email Uniqueness:
-
Email must be unique across entire Atra RMS platform
-
Cannot invite user with email already in system
-
If email exists, system shows error: "Email already registered"
3. Organization (Required)
Select the organization this user will belong to.
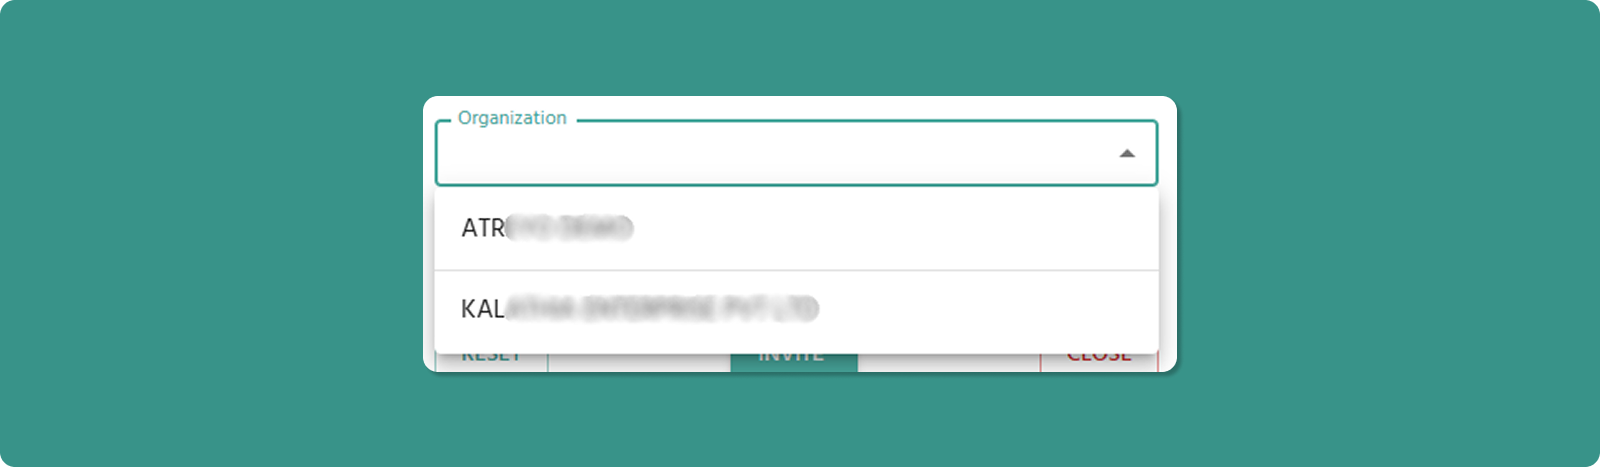
[INSERT SCREENSHOT: Organization_Dropdown_Invite.png]
Dropdown Options:
-
Your current organization
-
All child organizations under your management
Organization Impact:
-
User's access scope limited to assigned organization
-
User inherits organizational hierarchy visibility based on role
-
User can only manage resources within their organization
4. Role (Required)
Select the role that defines user's permissions.
Important: Role dropdown only activates after organization is selected.
Why?
-
Roles are organization-specific
-
Different organizations may have different available roles
-
System must know organization to display correct role options
Available Roles:
-
All roles created for the selected organization
-
Examples: ADMIN, MANAGER, VIEWER
Step 3: Submit Invitation
Step 4: Invitation Email Sent
After clicking INVITE:
-
System generates secure invitation token
-
Email sent to provided address containing:
-
Invitation message
-
"Set Up Password" button/link
-
User appears in Users List with "Invited" Yellow clock icon (⏳)
-
You are redirected back to Users List
Email Delivery Time: Usually instant, but may take up to 5 minutes.
⚠️ If User Doesn't Receive Email:
-
Check spam/junk folder
-
Verify email address was entered correctly
-
Wait 10 minutes, then resend the invitation. To do this, delete the user and re-invite them via the "Invite User" form. Only perform this process if the user needs an account but the email address was entered incorrectly, or if they haven’t received the email within 10 minutes.