Atra RMS
- Purpose: This user guide provides comprehensive instructions for using the Atra RMS platform for IIoT device management, monitoring, and VPN connectivity.
- Intended Audience: End users, administrators, and technical staff managing devices and organizations within Atra RMS.
- Quick Start Guide
- Account Setup Guide
- Getting Started with Atra-RMS
- Manage Your Devices
- View and Monitor Your Devices
- Device Registration Guide
- Understanding Device Details & Status
- Device Management FAQs
- Connect Securely with VPNs
- View VPN Tunnels
- VPN Tunnel Creation Guide
- Manage and View VPN Tunnel Profiles
- VPN Tunnel Workflow Examples
- Structure Your Organization
- User Management
- Controlling Access with Roles
- Atra VPN Desktop Application
- Installation
- Signing In to the Atra VPN App
- Getting Started with the Atra VPN App
- Key Features of the Atra VPN App
- Troubleshooting Common Atra VPN App Issues
- Atra VPN Desktop App FAQs
- Password Recovery Guide
- Account Profile
- Comprehensive Troubleshooting
- Accessing Industrial Systems Remotely
Quick Start Guide
New to Atra RMS? Start here!
Your First 5 Minutes
-
Log In → Use credentials
-
View Dashboard → See all your devices at a glance
-
Register Your First Device → Add Atreyo gateway to Atra RMS
-
Invite Team Members → Add users to your organization
-
Connect via VPN → Secure remote access in minutes
Most Common Tasks
|
Task |
Quick Reference |
|
Register a new device |
Devices → Register button |
|
Check device status |
Devices → Click device name |
|
Invite a user |
Users → Invite button |
|
Create a role |
Roles → Create Role button |
|
Set up VPN tunnel |
VPN → Create button |
|
Add device to VPN |
VPN → Tunnel name → Devices tab → Add Devices |
|
Add user to VPN |
VPN → Tunnel name → Users tab → Add Users |
|
Start VPN tunnel |
VPN → Tunnel name → Start button |
|
Download Atra-VPN-Client |
Navigation panel→ Download Atra VPN |
|
Connect to VPN tunnel |
Atra-VPN-Client → Tunnel name → Click Connect button |
|
Access remote device |
Use device's VPN IP address |
Account Setup Guide
This section guides new users through the account activation process after receiving an invitation email.
Invitation Email Overview
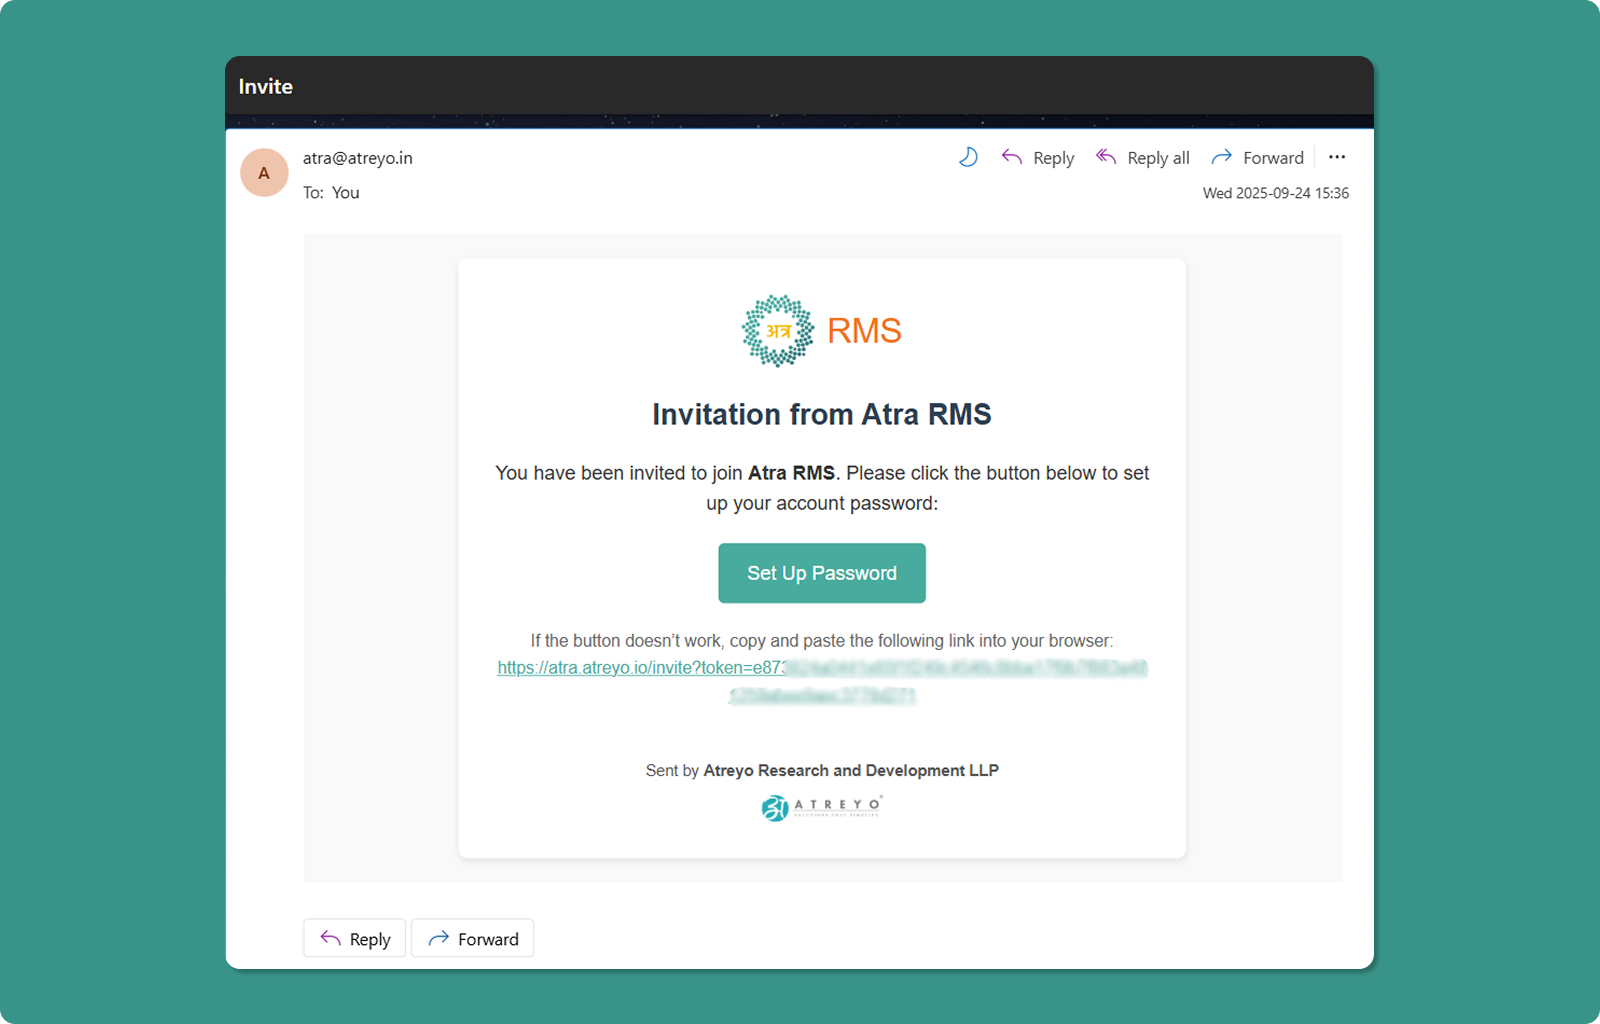
The invitation email contains:
Header:
-
Subject: "Invitation to Join Atra RMS"
-
Sender: Atra
Body:
-
Welcome message
Primary Action:
-
"Set Up Password" button (teal)
-
Clicking opens account setup page in browser
Alternative Access:
-
Full invitation URL provided below button
-
Format: https://atra.atreyo.io/invite?token=...
-
Use if button doesn't work (copy and paste into browser)
Expiration Notice:
-
Invitation valid for 24 hours from the time you are invited.
-
After 24 hours, link becomes invalid.
-
Must request new invitation from organization administrator or the person who invited you.
Account Setup Steps
Step 1: Click Setup Link
Method A: Click Button
-
Open invitation email
-
Click "Set Up Password" button
-
Browser opens account setup page
Method B: Copy/Paste URL
-
Locate full URL in email (below button)
-
Copy entire URL
-
Paste into browser address bar
-
Press Enter
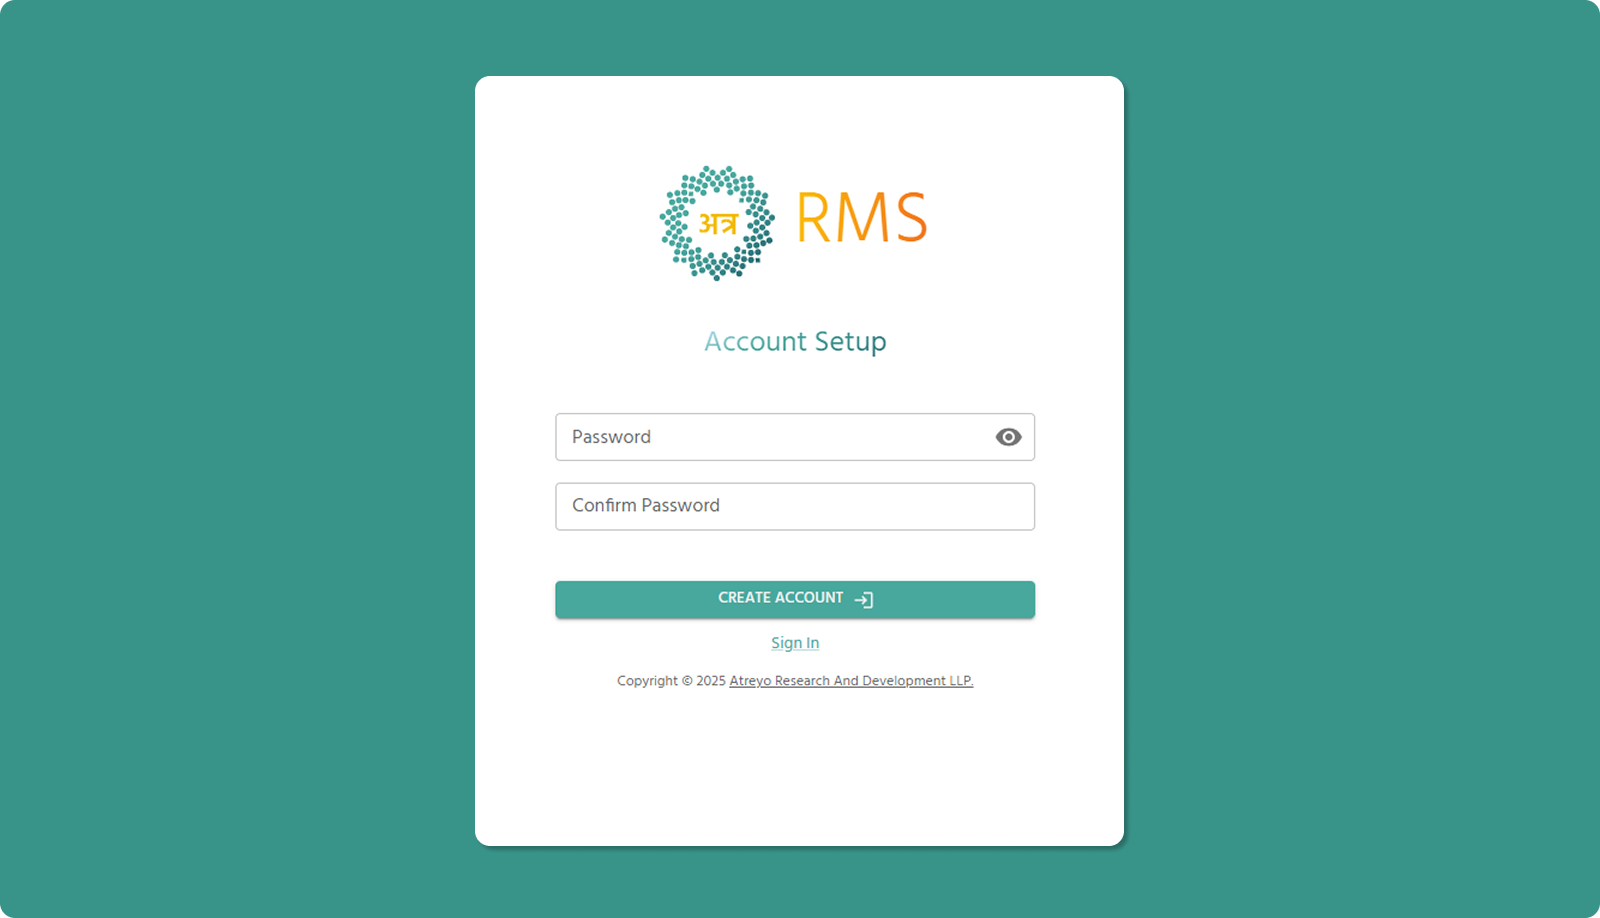
Step 2: Account Setup Page
The Account Setup page allows you to create a password for your new Atra RMS account.
Step 3: Password Requirements
Your new password must meet all of the following security requirements:
Mandatory Requirements:
|
Requirement |
Description |
Example |
|
Length |
Minimum 8 characters |
MyP@ssw0rd (10 chars ✓) |
|
Lowercase |
At least one lowercase letter (a-z) |
myPassword1! ✓ |
|
Uppercase |
At least one uppercase letter (A-Z) |
MyPassword1! ✓ |
|
Numeric |
At least one number (0-9) |
MyPassword1! ✓ |
|
Special Character |
At least one symbol (!@#$%^&*) |
MyPassword1! ✓ |
Additional Restrictions:
❌ Cannot start with hyphen (-): -MyPassword1! is invalid
❌ Cannot contain parentheses ( ): MyPass(word)1! is invalid
Password Examples:
✅ Valid Passwords:
-
SecurePass123!
-
W0rk@Home2025
-
MyStr0ng#Pass
-
$ecure123Work
❌ Invalid Passwords:
-
password (no uppercase, number, or special char)
-
Password1 (no special character)
-
PASSWORD1! (no lowercase)
-
-Password1! (starts with hyphen)
-
Pass(word)1! (contains parentheses)
-
Pass1! (too short, only 6 characters)
Step 4: Enter Password and Confirm Password
Password Field:
-
Click in "Password" input field
-
Type your chosen password meeting all requirements
-
Click eye icon (👁️) to toggle visibility (optional)
Confirm Password Field:
-
Click in "Confirm Password" input field
-
Re-type the exact same password
-
System validates both passwords match
Step 5: Create Account
-
Verify all password requirements satisfied
-
Confirm both password fields match
-
Click "CREATE ACCOUNT →" button
System Processes:
-
Validates password meets all requirements
-
Validates passwords match
-
Creates account in Atra RMS
-
Expires invitation link
-
Sends confirmation email
Success:
-
Account created successfully
-
Confirmation email sent to your address
Error:
-
If validation fails, error message displays
-
Correct the issue and try again
Account Creation Success Email

Shortly after account creation, you'll receive a confirmation email.
Email Contents:
-
Subject: "Atra RMS Account Creation Successful"
-
Confirmation message
-
"Go to Atra RMS" button linking to login page
-
Backup URL for login page
Purpose:
-
Confirms account is active and ready
-
Provides easy access to login page
-
Serves as confirmation record
Important Notes on Expiration
⏰ 24-Hour Validity:
The invitation link is valid for 24 hours from the time you are invited.
After 24 Hours:
-
Link expires automatically
-
"Invitation link has expired" page displays
-
Cannot complete account setup with expired link
✅ Post-Setup Expiration:
Once you successfully set up your password:
-
Invitation link expires immediately
-
This prevents reuse of the invitation
-
Security measure to protect your account
Invitation Expired
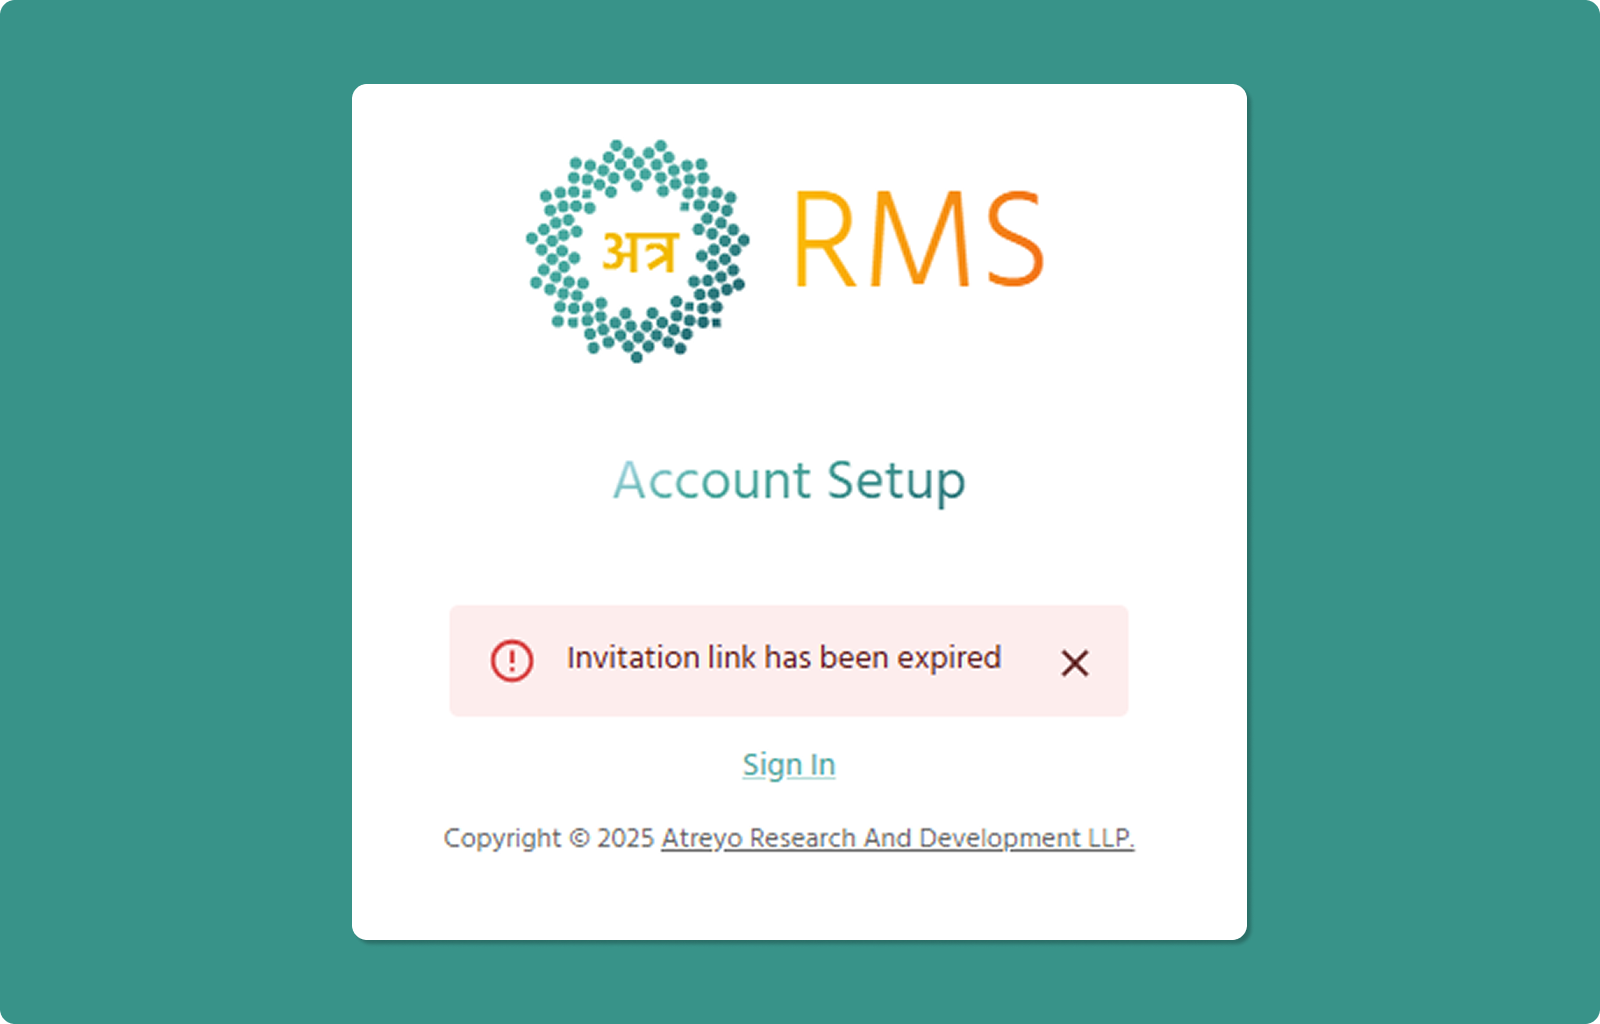
If you try to access an expired invitation link, you'll see:
Message:
"Invitation link has expired"
Common Reasons:
Time Limit: 24 hours passed since invitation was sent
Next Steps:
If Account Already Created:
-
Click "Sign In" link
-
Go to login page
-
Use your email and password
If Account Not Yet Created:
-
Contact the person who invited you
-
Request a new invitation email
-
Complete setup within 24 hours of new invitation
Login Page Guide
The login page is your entry point to the Atra RMS platform.
Accessing the Login Page
Direct URL:
https://atra.atreyo.io/login
From Emails:
-
Click "Go to Atra RMS" button in any system email
-
Backup URL provided in emails
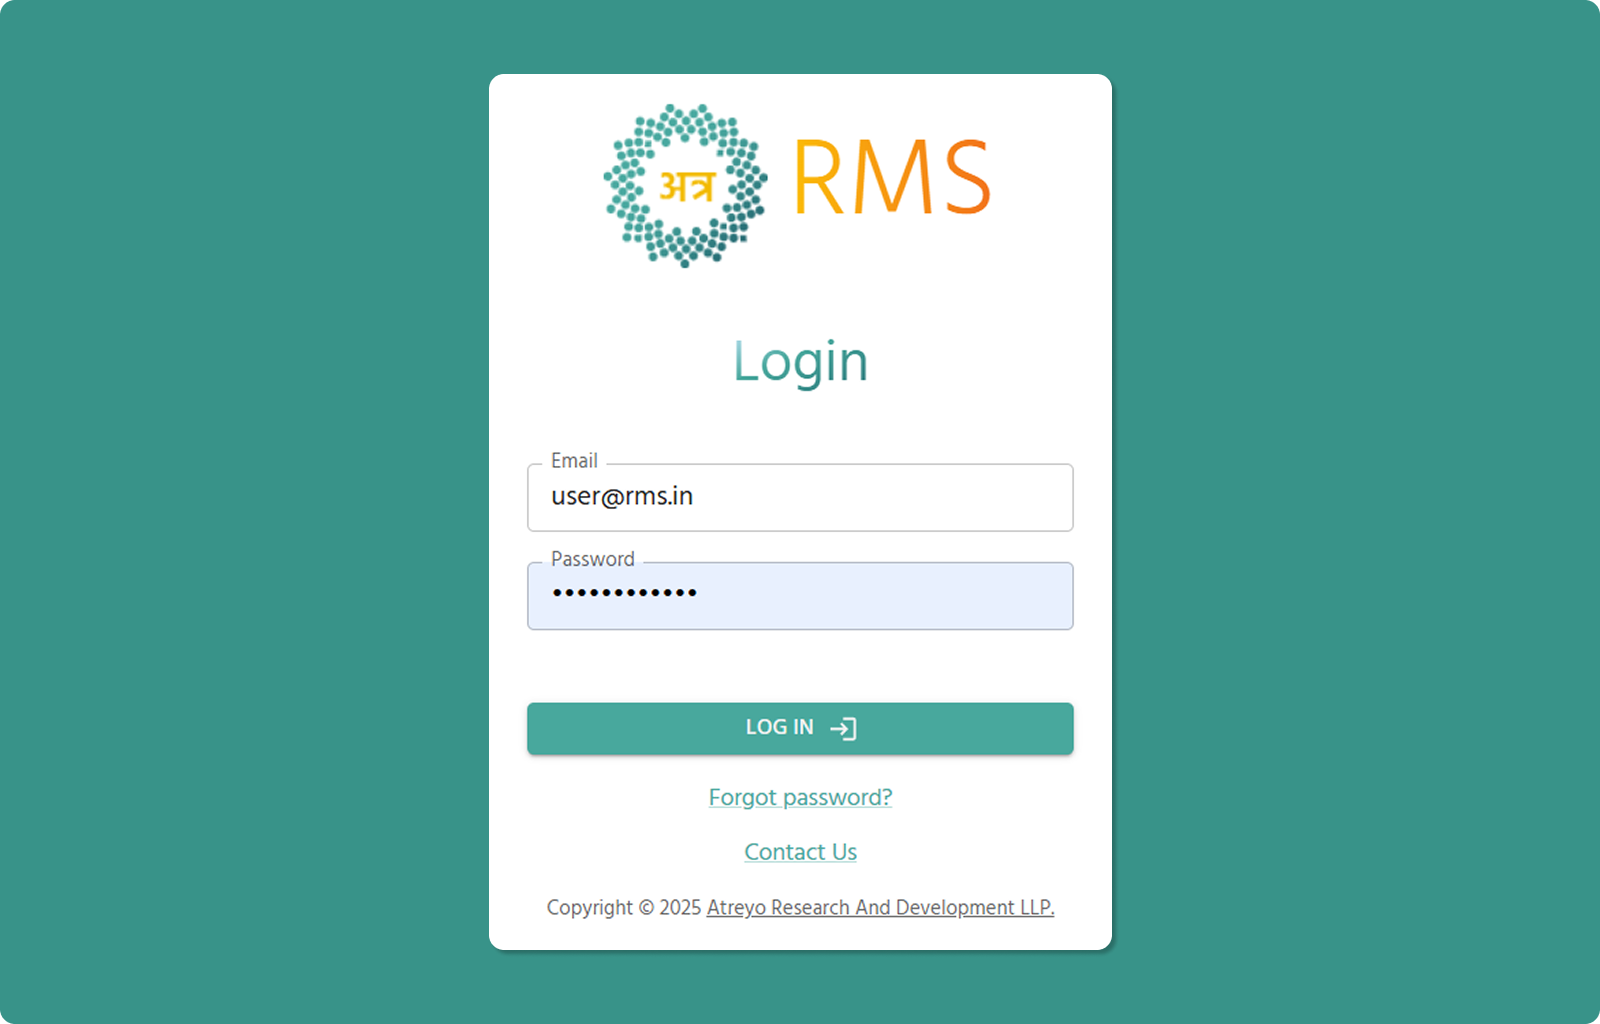
How to Log In
[INSERT SCREENSHOT: Login_Form.png]
Step 1: Enter Email
-
Click in "Email" field (📧)
-
Type your registered email address
-
Example: user@rms.in
Step 2: Enter Password
-
Click in "Password" field (🔒)
-
Type the password you created during setup
-
Click eye icon (👁️) to toggle visibility (optional)
Step 3: Log In
-
Click "LOG IN →" button (teal)
-
System validates credentials
-
If valid, redirects to Atra RMS overview page
Troubleshooting Login Issues
Problem: "Invalid Password" Error
Solutions:
-
✅ Verify email is correct (check for typos)
-
✅ Ensure password is correct (check Caps Lock)
-
✅ Use "Forgot password?" if password unknown
Problem: "User Not Found"
Solutions:
-
✅ Verify account setup was completed
-
✅ Check if invitation expired before setup
-
✅ Contact administrator to verify invitation was sent
-
✅ Request new invitation if needed
Need Help?
Forgot Password?
-
Click "Forgot password?" link below login button
-
Initiates password recovery process
-
See Password Recovery Guide section
Contact Us:
-
Click "Contact Us" link at bottom
-
Opens Contact Us forml
-
Atreyo Research and Development LLP
Getting Started with Atra-RMS
The Overview page is your command center in Atra RMS, offering a birds-eye view of your fleet and activity. From the navigation panel on the left, you can manage your Devices, VPN, Organizations, Users, and Roles. The panel also includes quick-access buttons to download the Atra VPN Client, view the Docs, or switch between light and dark modes via the theme toggle. For a cleaner view, you can collapse the panel using the icon at its top-right corner.
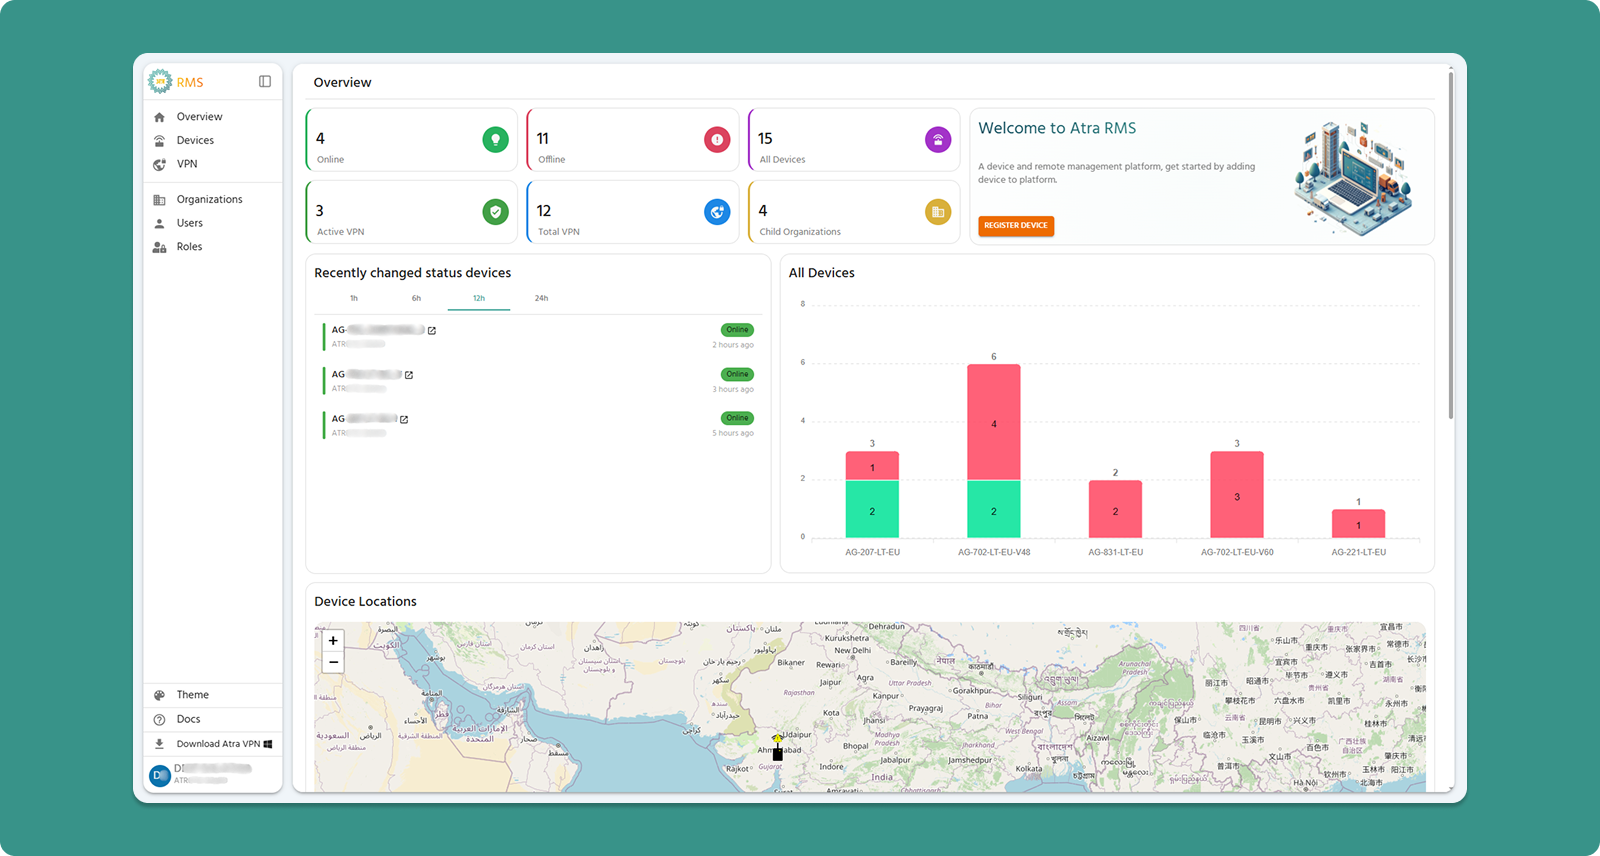
Device, VPN Tunnels & Organization Summary Cards
The six summary cards at the top display metrics for your organization and its immediate child organizations (1 level below).
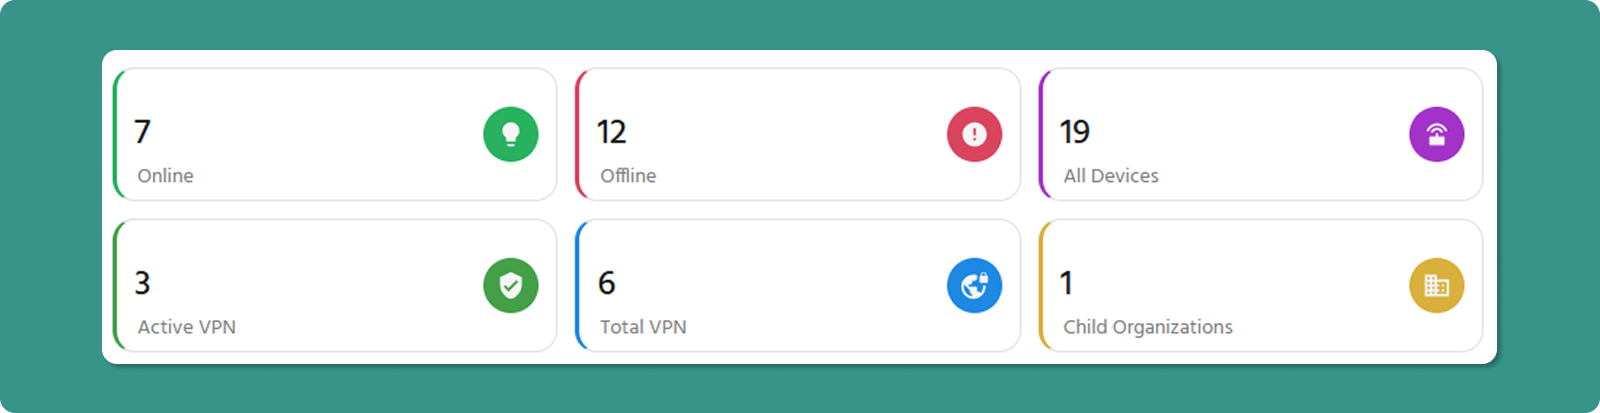
Card Breakdown
1. Online Devices
-
Displays: Number of devices currently online
-
Scope: Your organization + direct child organizations only
2. Offline Devices
-
Displays: Number of devices currently offline
-
Common Reasons: Device powered off, network issues, or maintenance
-
Action: Click through to Device List to investigate specific offline devices
-
Scope: Your organization + direct child organizations only
3. All Devices
-
Displays: Total registered devices under your management
-
Calculation: Online + Offline devices
-
Scope: Your organization + direct child organizations only
4. Active VPN
-
Displays: Number of active VPN Tunnels currently running
-
Scope: Your organization + direct child organizations only
5. Total VPN
-
Displays: Number of total VPN Tunnels
-
Calculation: Running + Exited
-
Scope: Your organization + direct child organizations only
4. Child Organizations
-
Displays: Count of immediate child organizations
-
Example: If your Level 1 org has 3 direct children, this shows "3"
-
Note: Does not count grandchild organizations (Level 3)
💡 Tip: Use these cards for quick health checks. A sudden spike in offline devices may indicate network issues requiring investigation.
Welcome Card & Key Action
Located on the right side of the summary section, this card provides quick access to the most common initial action.

Components
Welcome Message
-
Brief introduction to Atra RMS platform
-
Displayed on every login to orient new users
REGISTER DEVICE Button (Orange)
-
Purpose: Fast-track device registration
-
Action: Navigates directly to Device Registration form
-
Shortcut: Bypasses Devices menu navigation
-
When to Use: Registering new Gateways to your fleet
Device Statistics Charts
All Devices Bar Chart (Right Side)
This chart provides a visual breakdown of your online and offline device fleet by model type.
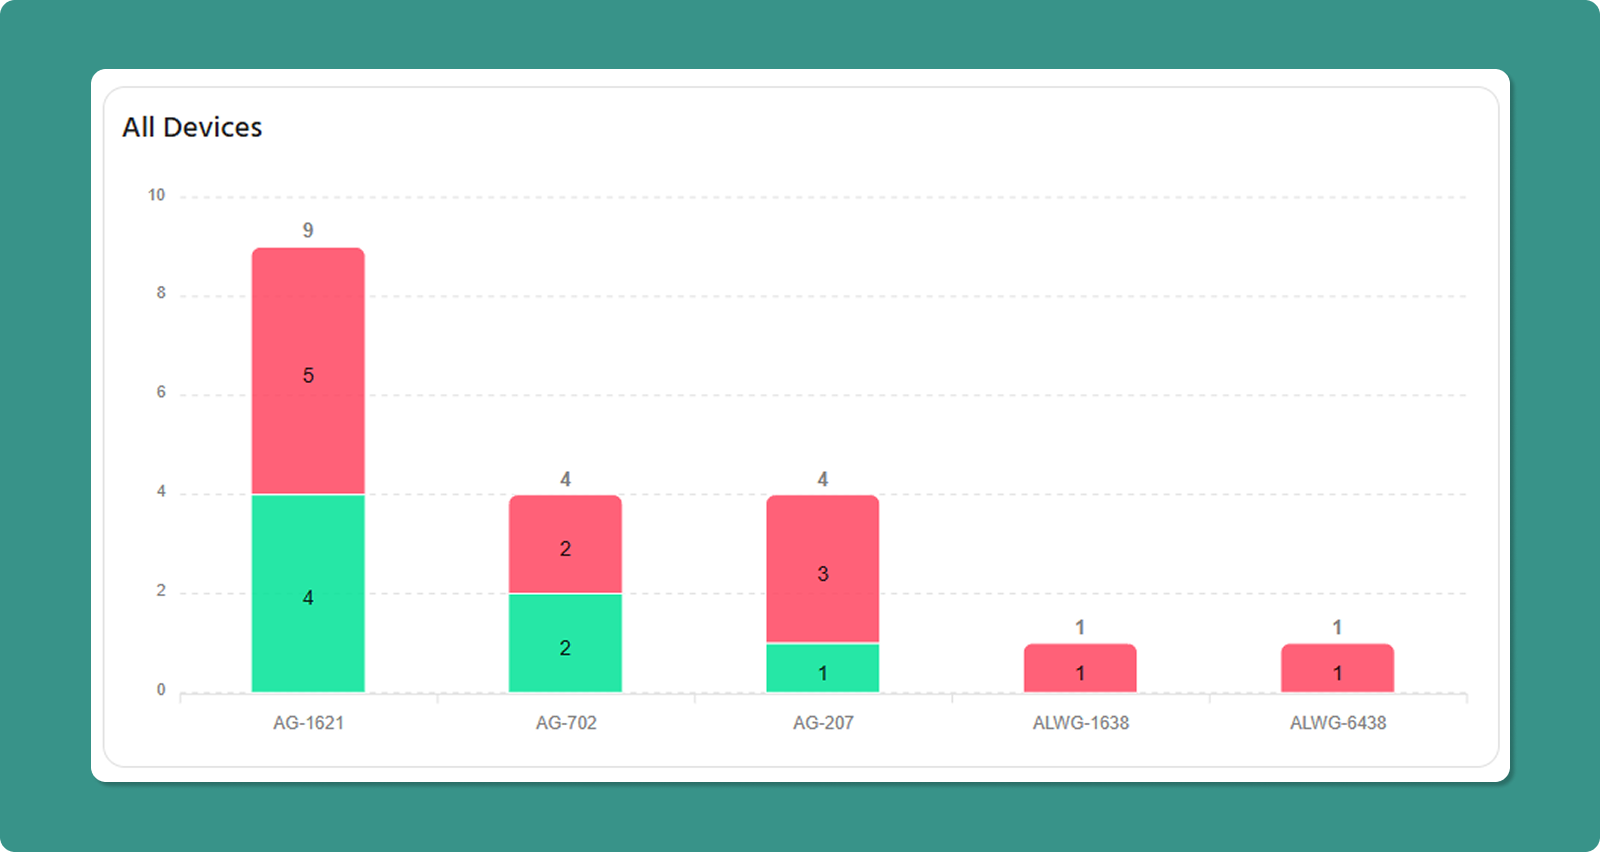
Chart Elements:
-
X-Axis: Device model names (e.g., AG-702-LT-EU-V48, AG-207-LT-EU)
-
Y-Axis: Total device count
-
Bar Values: Displays the total count of online and offline devices above each bar. Numbers in the green section indicate the online device count, while numbers in the red section indicate the offline device count.
-
Scope: Your organization + direct child organizations
Use Cases:
-
Activity Status: View ratios of Online vs. Offline devices across your entire fleet.
Device Status Activity (Left side)
This list provides a snapshot of the most recent connectivity events, highlighting exactly how long ago a device moved to its current Online or Offline state.
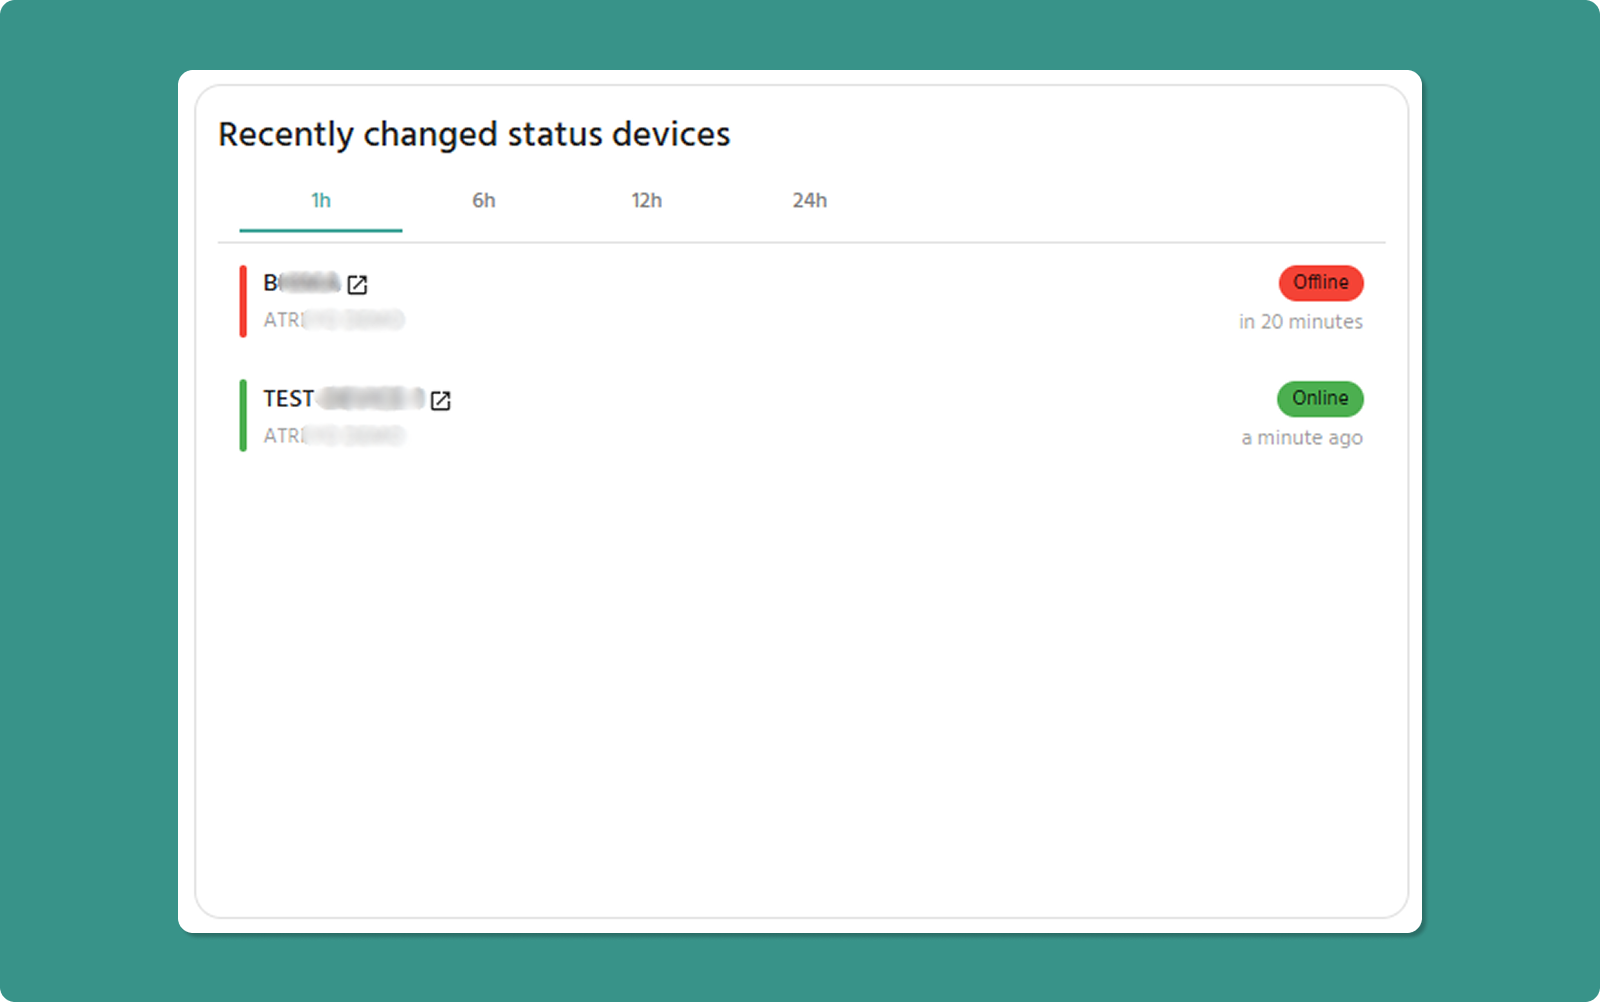
Card Elements:
-
Device Name: The specific identifier/name of the device.
-
Organization: The organization or child organization the device belongs to.
-
Status: A color-coded indicator showing the current state (Online/Green or Offline/Red).
-
Status Changed Time: Displays the relative or absolute time the device last switched status (e.g., "Online since 1 hour ago" or "Offline since 6 hours ago").
-
Time Filters: Quick-toggle options to filter events within the last 1, 6, 12, or 24 hours.
Scope: Your organization + direct child organizations.
Use Cases:
-
Connectivity Troubleshooting: Identify devices that have recently dropped offline to prioritize immediate maintenance or remote restarts.
-
Stability Monitoring: Observe if specific organizations are experiencing frequent "flapping" (devices repeatedly cycling between online and offline).
-
Deployment Validation: Confirm that newly installed devices have successfully reached an "Online" status within the expected timeframe.
Map Functionality
The interactive map displays geographic locations of your device fleet.

Location Data Sources
Devices appear on the map only when location data is available from:
-
GPS Service (Automatic)
-
Device fetches GPS coordinates
-
Manual Entry
-
The User sets fixed coordinates
-
Stored in cloud only (not on device)
-
Useful for stationary installations without GPS
⚠️ Important: If neither source is active, the device will not appear on the map, even if online.
Device Status Indicators
Online Device Icon:
-
Gateway symbol with Wi-Fi icon
-
Green dot indicator
-
Hover to see Serial Number
Offline Device Icon:
-
Gateway symbol with warning/alert icon
-
Hover to see Serial Number
Map Navigation
Zoom Controls:
Pan/Drag:
-
Click and hold to drag map
-
Reposition view to focus on specific regions
💡 Pro Tip: Use the map for quick visual confirmation that devices are deployed in expected locations.
Currently Connected Users (Right side)
This card displays a view of all users currently connected to the VPN tunnel via the Atra VPN Client.
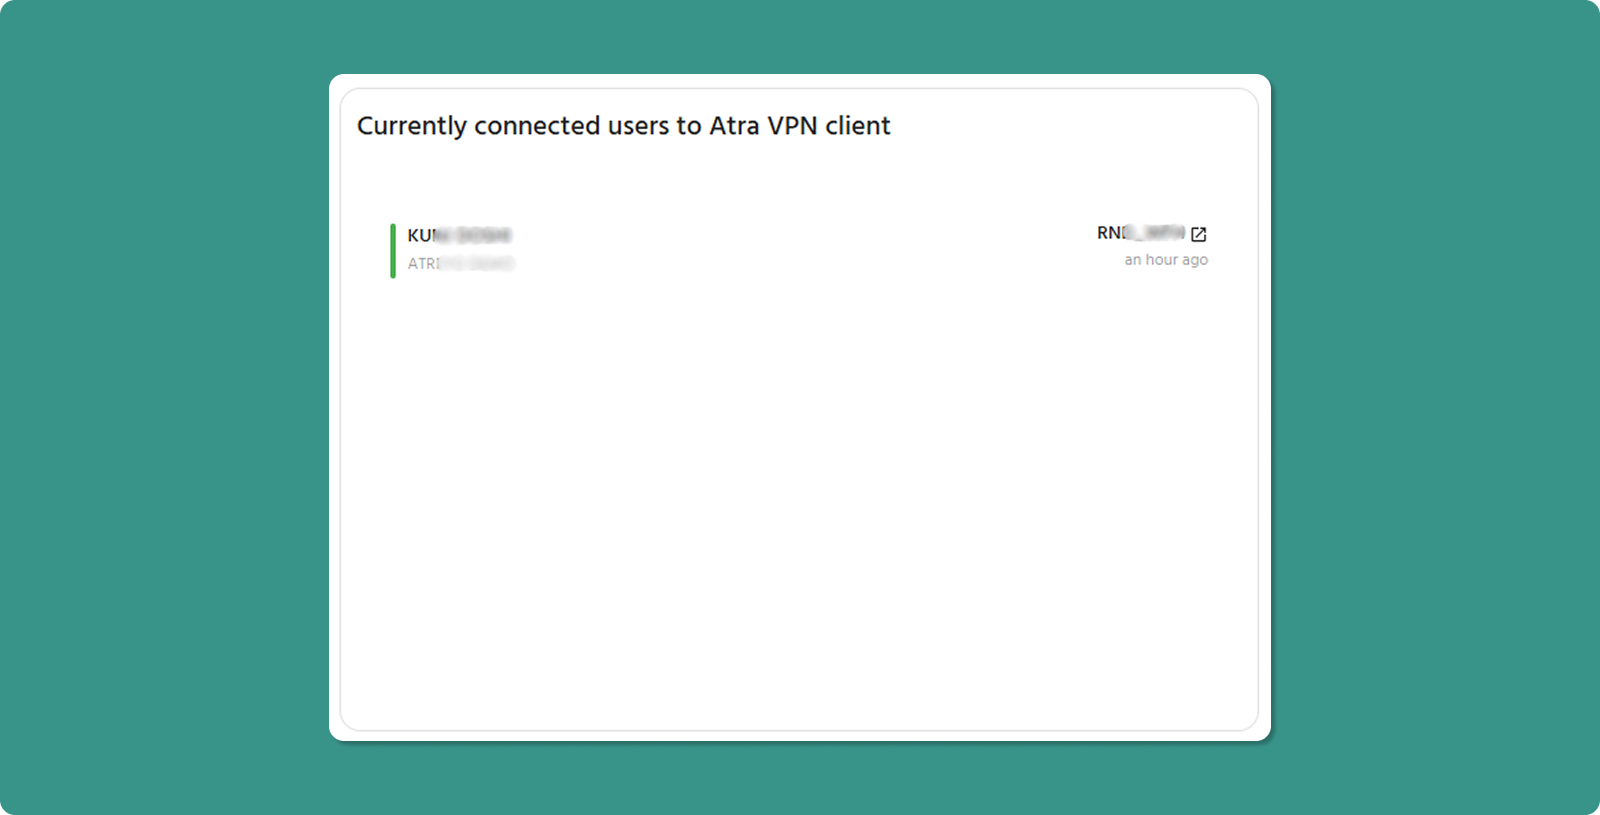
Card Elements:
-
User Name: The identity of the user currently connected.
-
Organization: The name of the organization with which the user is associated.
-
VPN Tunnel Name: The name of the VPN tunnel to which the user is connected.
-
Connected Time: The specific timestamp when the user established the connection to the VPN tunnel.
Scope: Your organization + direct child organizations.
Use Cases:
-
Gain instant visibility into how many users are actively working via VPN at any given moment.
-
See which VPN tunnels are most heavily utilized by tracking the distribution of active users across available tunnels.
Note: This card will only be displayed if a user is connected; otherwise, the map will be shown in full width.
Recent Activity Tables
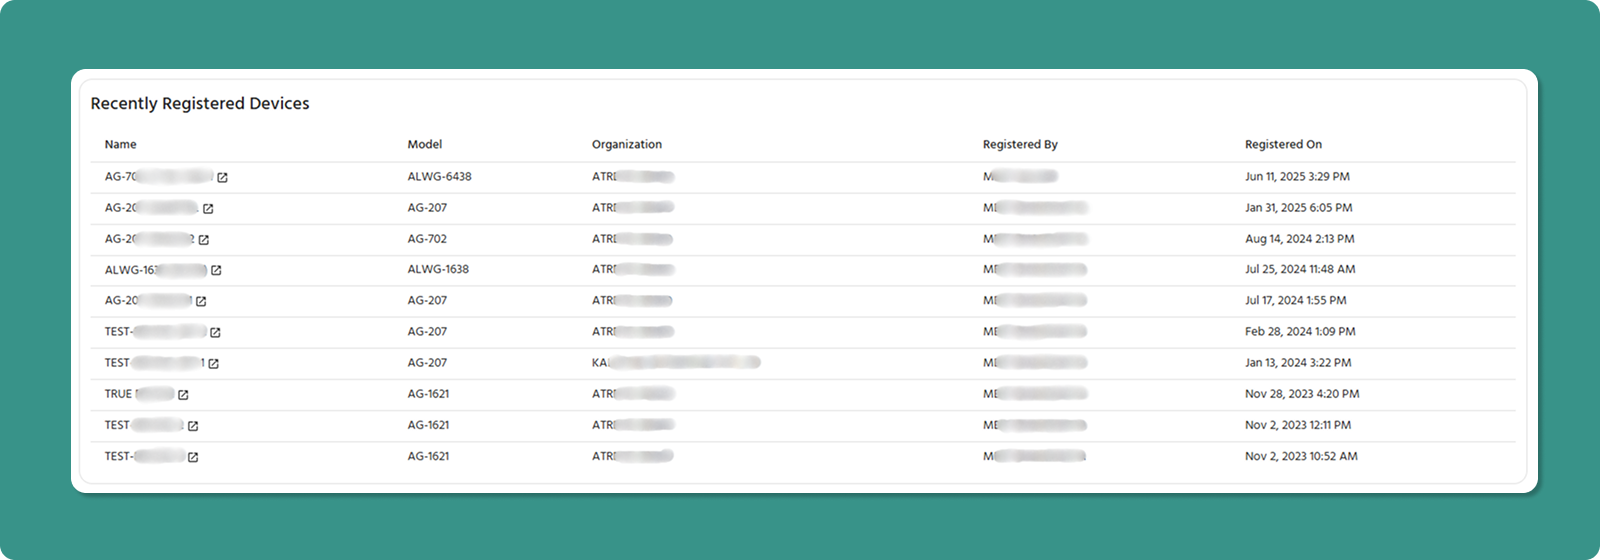
Recently Registered Devices
This table shows the last 10 devices added to your system, providing a quick view of new devices onboarding.
|
Column |
Information |
|
Name |
Custom device identifier |
|
Model |
Gateway model name |
|
Organization |
Assigned organizational name |
|
Registered By |
User who registered the device |
|
Registered On |
Date and time of registration |
Key Action:
-
Click device Name → Opens full Device Detail Page for monitoring
Common Uses:
-
Verify recent device additions were processed correctly
-
Identify who registered devices
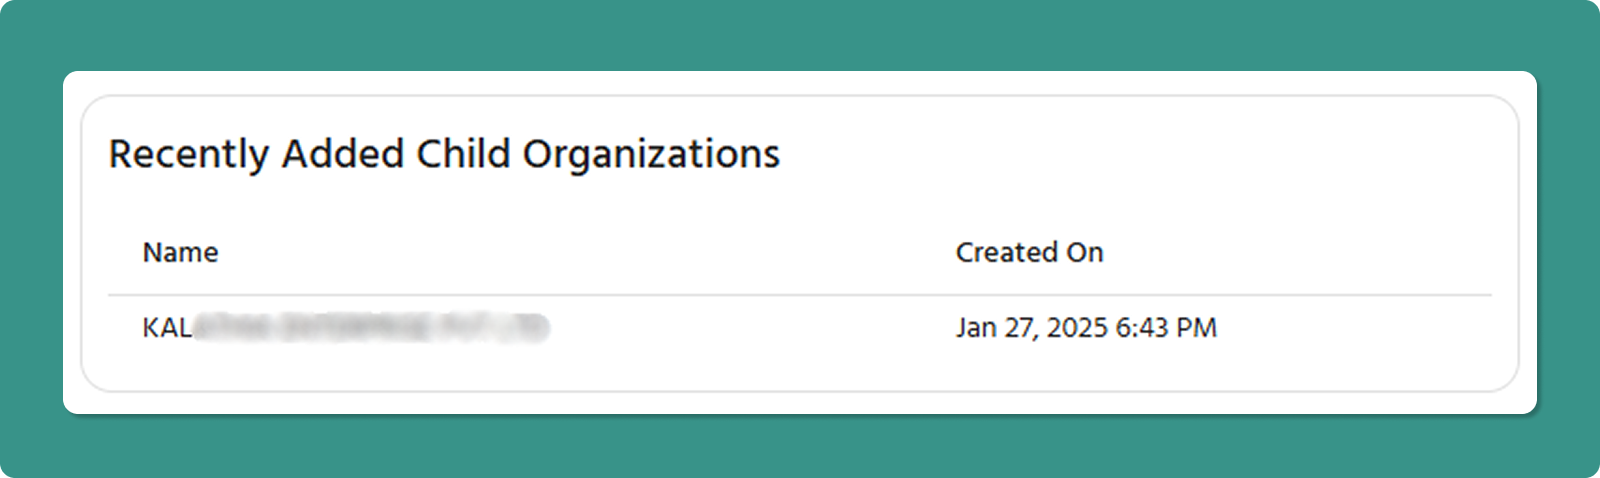
Recently Added Child Organizations
This list shows the last 5 child organizations created.
|
Column |
Information |
|
Name |
Child organization identifier |
|
Created On |
Date and time of creation |
Common Uses:
-
Verify that new organizations were created correctly
Device Count by Organization (Treemap)
The treemap provides an intuitive visual representation of device distribution across your organizational hierarchy.
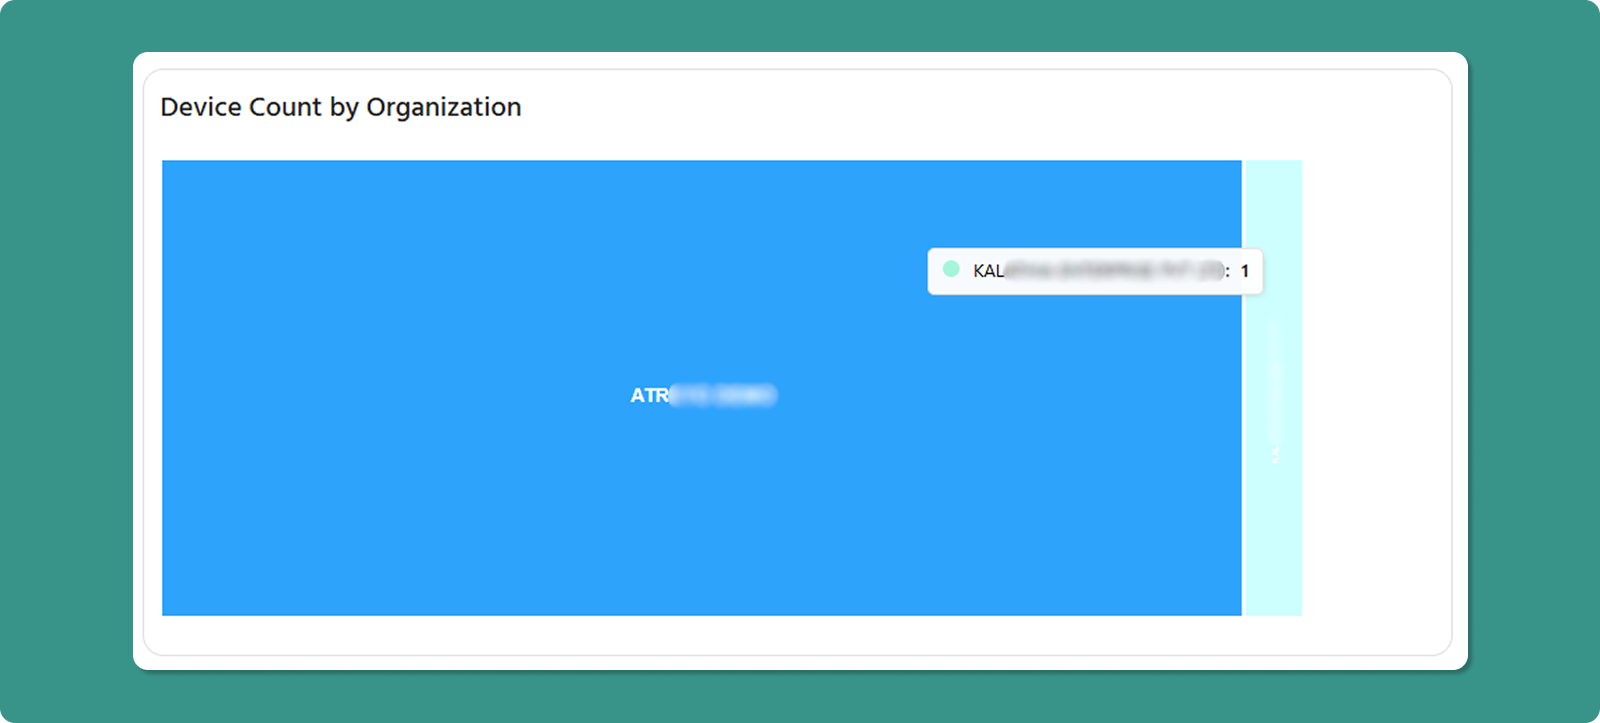
Understanding the Treemap
Visual Encoding:
-
Rectangle Size: Proportional to number of devices in that organization
-
Larger Rectangle: More devices assigned
-
Smaller Rectangle: Fewer devices assigned
Data Display:
-
Organization Label: Name visible inside each rectangle
-
Hover Tooltip: Shows exact device count
-
Color: Each organization has a distinct color
Important Scope Note
⚠️ Critical Understanding:
Each rectangle shows ONLY devices registered directly to that specific organization. It does NOT include devices from child organizations below it.
Example:
-
ATREYO (Level 1): 50 devices registered directly
-
DEMO_1 (Level 2 child): 30 devices registered directly
-
Treemap shows: ATREYO = 50, DEMO_1 = 30 (NOT 80)
Manage Your Devices
The device section provides a seamless process for registering and monitoring Atreyo gateways. This section covers the device registration and detailed monitoring.
Typical Device Workflow
- Locate Serial ID → Found on box or device label
- Register Device → Complete registration form
- Power On → Device appears in list as "Online"
- Monitor → View metrics on Device Detail Page
View and Monitor Your Devices
The Device List is your central hub for monitoring all registered devices. The table automatically refreshes every 5 seconds to provide real-time status updates.

Table Actions (Top Bar)

Column Definitions
|
Column |
Description |
Key Information |
|
Name |
The custom name you assigned during registration. |
Click to open Device Detail Page |
|
Serial-ID |
Unique 16-character device identifier (format: xxxx-xxxx-xxxx-xxxx) |
Used for technical support and verification |
|
Model |
Atreyo hardware model designation |
Identifies device capabilities and specifications |
|
Status |
Current connection state |
Online (green) or Offline (red) with timestamp |
|
Organization |
Assigned organization with level |
Shows hierarchy placement (e.g., "DEMO Level-2") |
|
Registered On |
Date and time device was added to Atra RMS |
Helps track when a device was added |
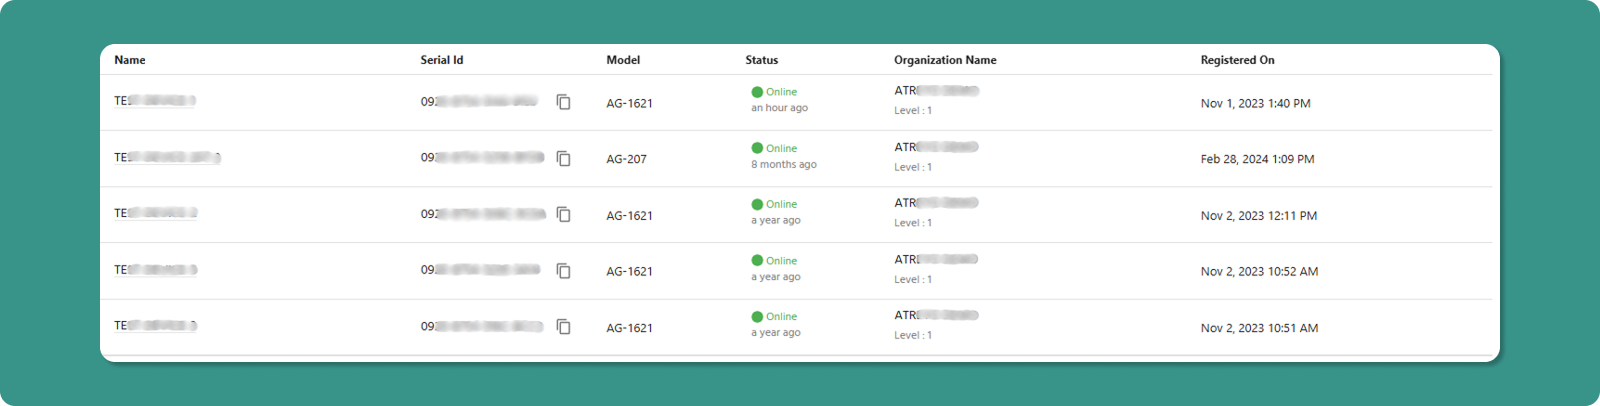
Status Indicators Explained
Online Status:
-
Indicator: Green Online text with green dot
-
Timestamp: "5 minutes ago" (time since last communication)
-
Meaning: Device is connected and transmitting data
Offline Status:
-
Indicator: Red Offline text
-
Timestamp: "2 hours ago" (time since last communication)
-
Meaning: Device is not currently connected
Auto-Refresh Feature
🔄 Automatic Update: The table refreshes every 5 seconds without requiring manual action.
Benefits:
-
Real-time status monitoring
-
No need to repeatedly click refresh
Manual Override:
-
Click the Refresh button (top-right) to force immediate update
-
Useful when expecting immediate status change (e.g., after device power-on)
Navigation Features

Table Controls (Bottom):
|
Control |
Purpose |
Options |
|
Rows per page |
Adjust visible devices |
5, 10, 15, 20,25 |
|
Total Count |
Displays total devices |
"Showing 1-5 of 25" |
|
Page Navigation |
Move between pages |
Previous, Next, Last, First |
Quick Actions
Open Device Details:
-
Locate device in table
-
Click the device Name (underlined text)
-
Device Detail Page opens with full monitoring interface
Device Registration Guide
Follow this 4-step process to register and activate new devices on your Atra RMS platform.
Prerequisites Checklist
Before starting registration:
✅ You have the device's Serial ID
✅ You have "Devices Register" permission in your role
✅ Target organization exists (create it first if needed)
Step 1: Locate Your Device's Serial ID
The Serial ID is a unique 16-character identifier required for registration.
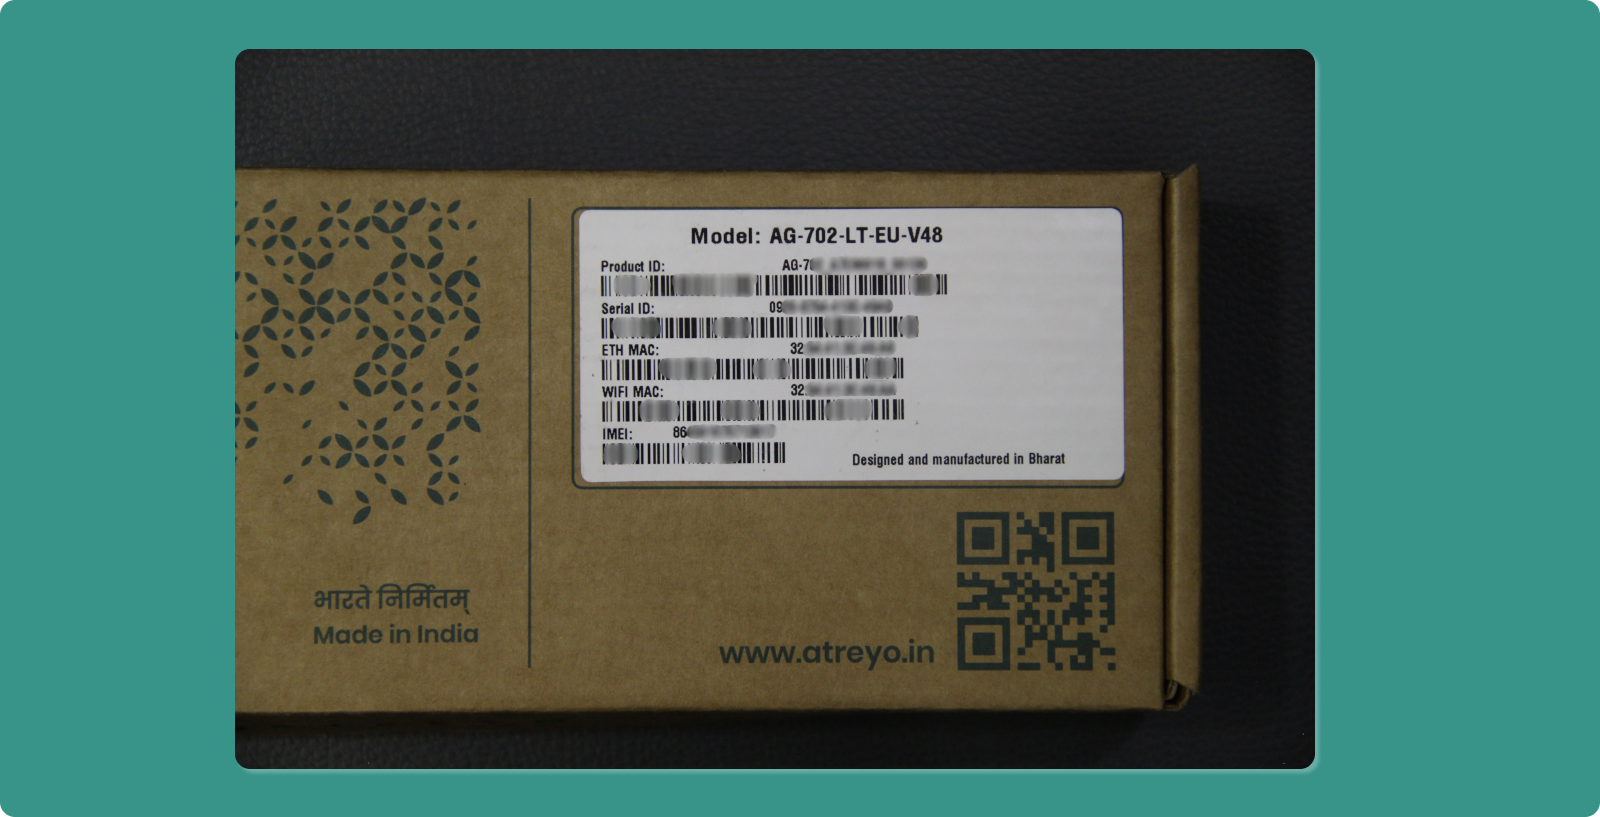

Finding the Serial ID:
Option A: On the Box
-
Look for white sticker on device packaging
-
Format: xxxx-xxxx-xxxx-xxxx
-
Example: 1A2B-3C4D-5E6F-7G8H
Option B: On the Device
-
Check white sticker on back or underside of device
-
Same format as above
🔍 Serial ID Format:
-
Exactly 16 characters
-
Four groups of 4 characters
-
Separated by hyphens
-
Mix of numbers and letters
⚠️ Common Mistakes:
-
Don't confuse Serial ID with MAC Address
-
Don't include extra spaces
-
Ensure all characters are correctly transcribed (0 vs O, 1 vs I)
Step 2: Navigate to Registration Page
-
Click "Devices" in the left sidebar menu
-
Click the "REGISTER" button (teal, top-left corner)
-
"Register Device" page loads
Step 3: Complete Registration Form
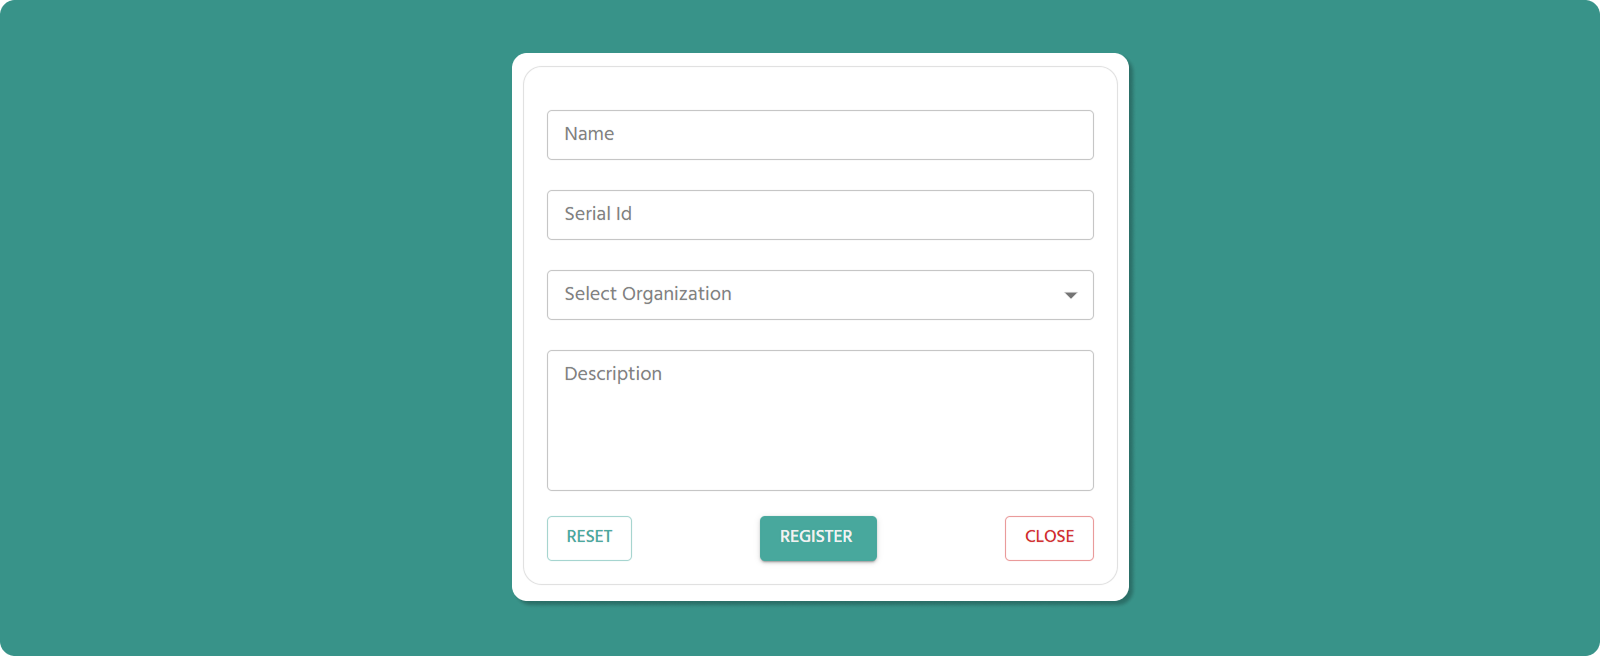
Fill out all required fields:
Name of Device (Required)
Input Rules:
-
Length: 3-40 characters
-
Allowed: Letters, numbers, spaces, periods (.), underscores (_), hyphens (-)
-
Not allowed at start/end: Period (.), underscore (_), hyphen (-)
-
No consecutive special characters: Avoid device..name or device--name
Examples:
-
✅ Factory_Gateway_01
-
✅ Warehouse-Floor-2
-
✅ Office.Main.Router
-
❌ _Gateway01 (starts with underscore)
-
❌ Device..Name (consecutive periods)
💡 Best Practice: Use descriptive names that indicate location or function (e.g., "Mumbai_Plant_A_Gateway" rather than "Device123").
Serial ID (Required)
Input Rules:
-
Format: Exactly xxxx-xxxx-xxxx-xxxx
-
Case: Usually uppercase, but system accepts both
-
Validation: System checks if Serial ID is valid and not already registered
What Happens:
-
✅ Valid + Unused: Registration proceeds
-
❌ Invalid Format: Error message appears
-
❌ Already Registered: "Device already registered" error
Select Organization (Required)
Dropdown Options:
-
Your current organization
-
All child organizations under your management
⚠️ Important Notes:
Creating Child Organizations:
-
If target child org doesn't exist yet, you must create it first
-
Go to: Organizations → Create button
-
Then return to device registration
Organization Hierarchy:
-
Device will belong to selected organization only
-
Parent orgs can view child org devices
-
Child orgs cannot view parent org devices
Description (Optional)
Input Rules:
-
Length: 0-1000 characters
-
Purpose: Additional notes about device
Example Use Cases:
-
Physical location details: "2nd Floor, Server Room B, Rack 5"
-
Network information: "Connected to Switch-A, Port 12"
-
Maintenance notes: "Installed June 2025, Warranty until June 2027"
-
Contact information: "Site supervisor: John Doe, +91-9876543210"
Form Actions
Step 4: Power On & Activate
After successful registration, the device must establish its first connection to come online.
Scenario A: First-Time Setup (Device Never Powered On)
-
Immediately After Registration:
-
Device appears in Device List
-
Status shows: "Offline"
-
Power On the Physical Device:
-
Connect power supply
-
Provide internet to gateway
-
Wait 90-120 seconds for boot sequence
-
Automatic Connection:
-
Device establishes connection to Atra RMS
-
Status changes to: "Online"
-
Example: "Online - 2 minutes ago"
Typical Boot Time: 90-120 seconds depending on model and network speed.
Scenario B: Device Was Already Running
If the device was powered on before registration:
⚠️ Critical Step: You must restart the device to complete registration.
Restart Methods:
Method 1: Power Cycle
-
Unplug power cable
-
Wait 10 seconds
-
Reconnect power cable
-
Wait 90-120 seconds for connection
Method 2: Reboot Command (if accessible)
-
Access device admin interface
-
Execute reboot command
-
Wait for restart completion
Troubleshooting: Device Stays Offline
If device remains "Offline" after several minutes:
Quick Fix - Manual Refresh:
If Still Offline - Check Common Issues:
❌ Power Supply
-
Verify power cable is connected
-
Check power LED indicator on device
-
Try different power outlet
❌ Network Connection
-
Ethernet: Verify cable is connected, check link lights on port
-
Cellular: Verify SIM card is inserted correctly and active
❌ Serial ID Issues
-
Verify Serial ID was entered correctly during registration
-
Check for typos (0 vs O, 1 vs I, etc.)
-
Confirm device hasn't been registered to different organization
Still Having Issues?
-
See Comprehensive Troubleshooting section
-
Contact Atreyo for Support
Understanding Device Details & Status
The Device Detail Page is your comprehensive monitoring dashboard for individual devices. It provides system information, resource utilization, network connectivity details, and GPS location.
Accessing Device Detail Page
From Device List:
Page Layout Overview
The Device Detail Page uses a two-column layout:
Left Panel: Static device identity and metadata
Right Panel: Dynamic monitoring data across four tabs
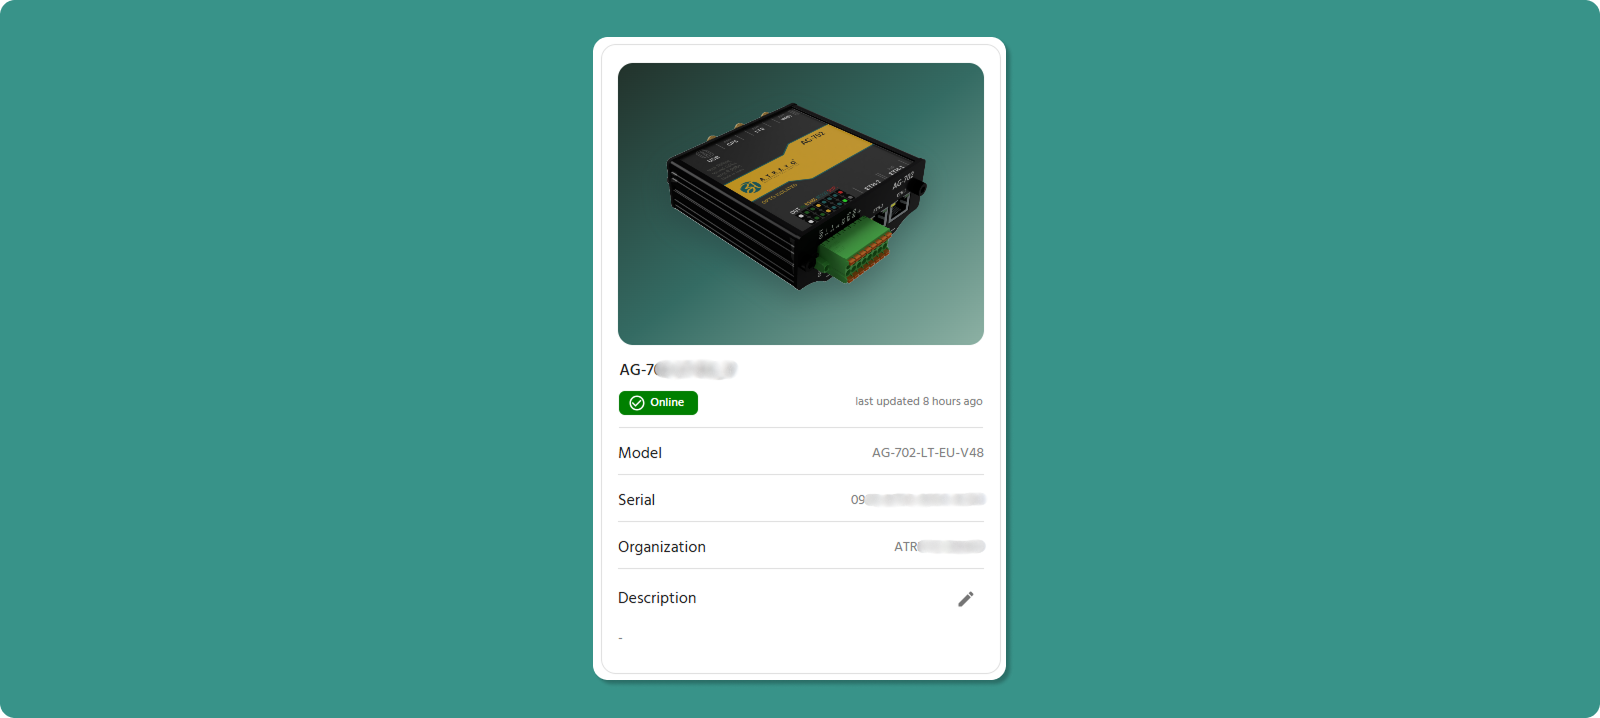
At-a-Glance Information (Left Panel)
The left panel displays the core identity and information for your device.
|
# |
Field |
Description |
Example |
|
1 |
Model Image |
Visual representation of device model |
Gateway illustration |
|
2 |
Device Name |
Custom name assigned during registration |
Delhi_Bus_207 |
|
3 |
Online Status |
Connection state with timestamp |
"Online since 5 minutes ago" |
|
4 |
Model Name |
The specific product name of your gateway. |
AG-207-LT-EU |
|
5 |
Serial-ID |
Unique 16-character device identifier |
1A2B-3C4D-5E6F-7G8H |
|
6 |
Organization |
Assigned organization |
ATREYO Level-1 |
|
7 |
Description |
Optional notes/details about device |
"Factory Floor A, Bay 3" |
|
8 |
Edit Button |
Pencil icon to modify description |
✏️ Click to edit |
Editing Device Description

To Edit Description:
Use Cases for Description Field:
-
Physical location updates
-
Maintenance schedules
-
Contact information for site
-
Network configuration notes
Detailed Monitoring Tabs (Right Panel)
The right panel contains four tabs for in-depth device monitoring. A Refresh button (🔄) in the top-right corner manually updates tab data.
-
Device Information
-
Resource Utilization
-
Network Information
-
GPS Location
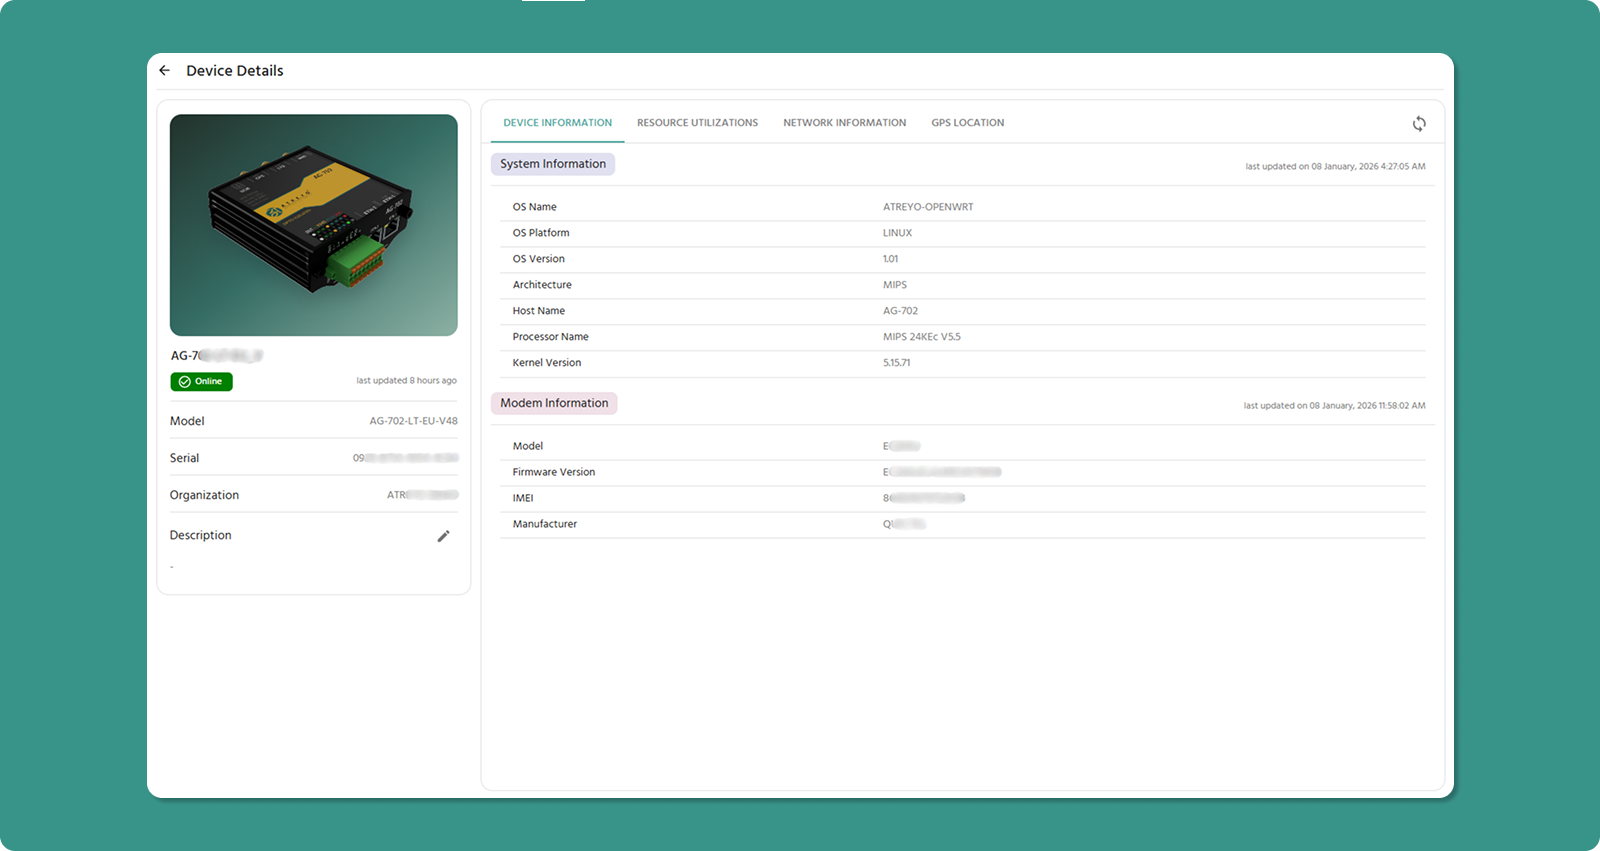
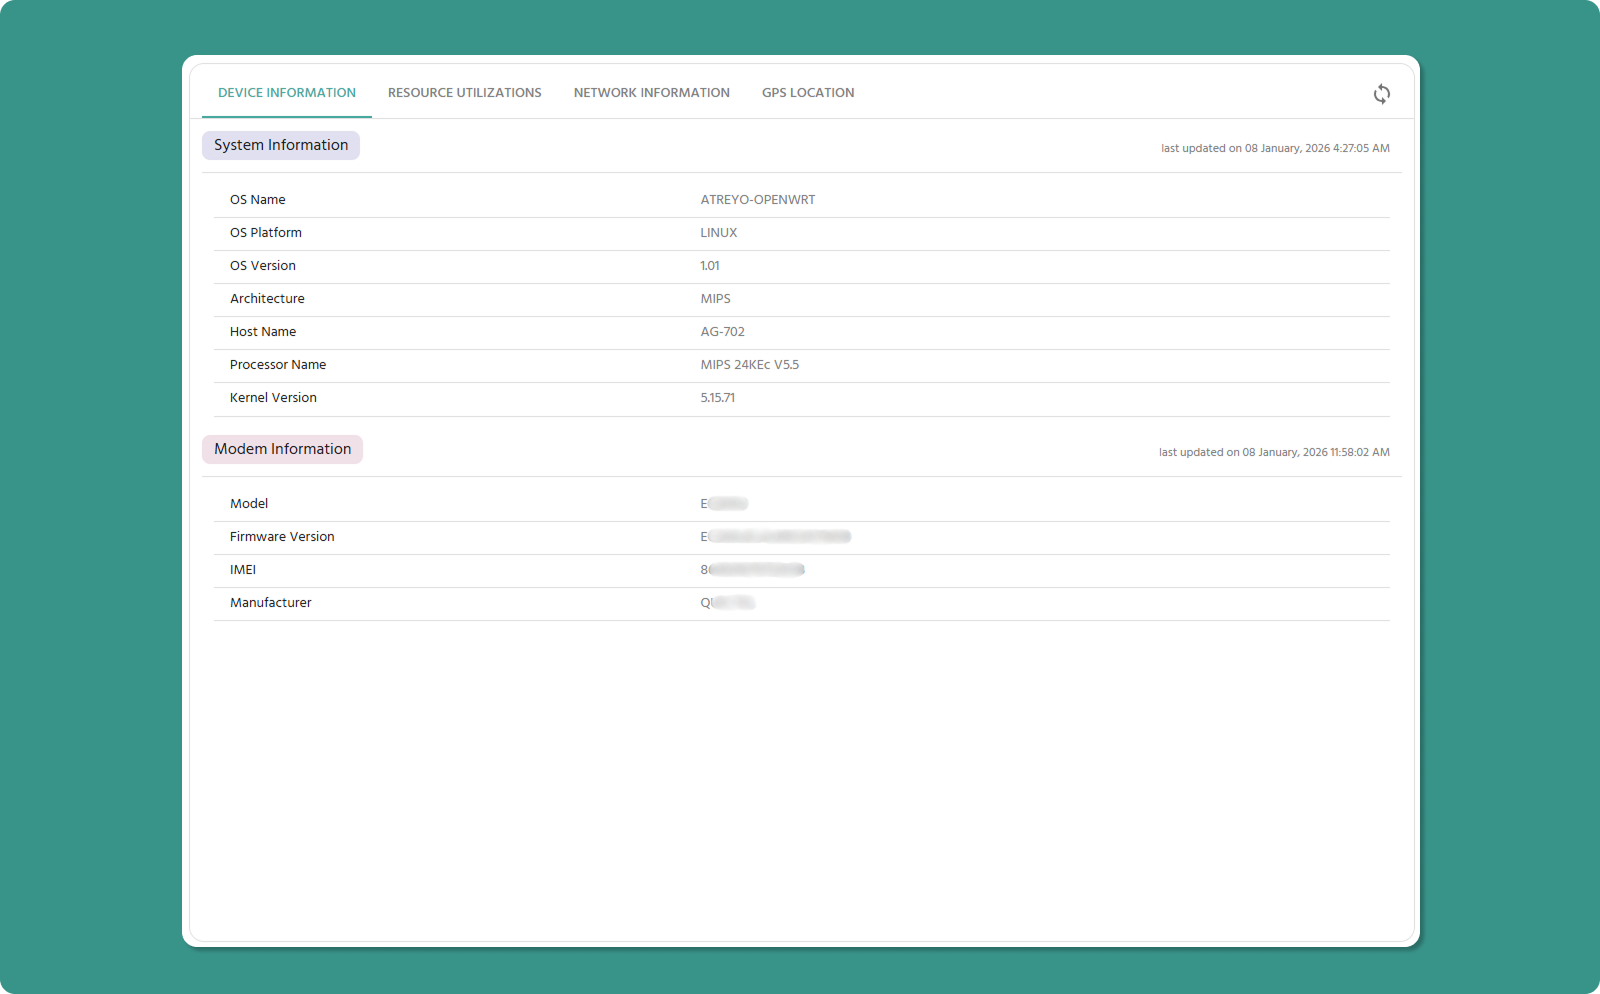
Tab 1: Device Information
This tab displays static technical specifications of your device's operating system, hardware, and cellular modem.

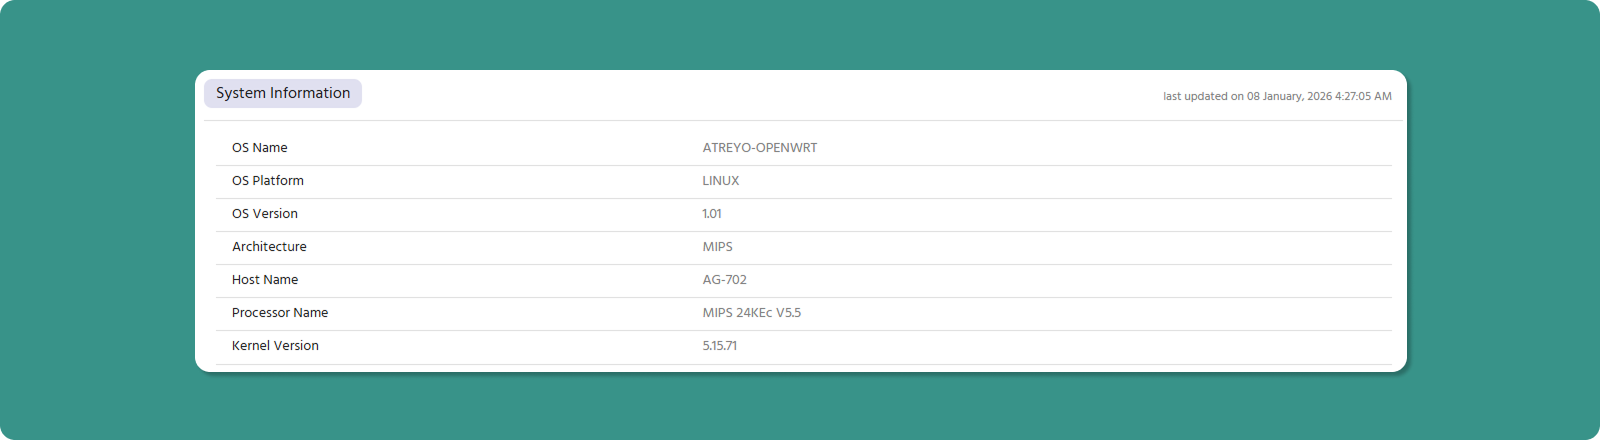
Section A: System Information
Core operating system and processor details.
|
Parameter |
Definition |
Example |
|
OS Name |
Operating system commercial name |
OpenWRT, Debian, Ubuntu |
|
OS Platform |
OS family or kernel type |
Linux |
|
OS Version |
Specific release number |
10.0.22621, 24.04 LTS |
|
Architecture |
CPU instruction set |
ARMv7l, ARM64, MIPS |
|
Host Name |
Device model name |
AG-702 |
|
Processor Name |
CPU model designation |
MIPS 24KEc V5.5, ARMv7 Processor rev 5 |
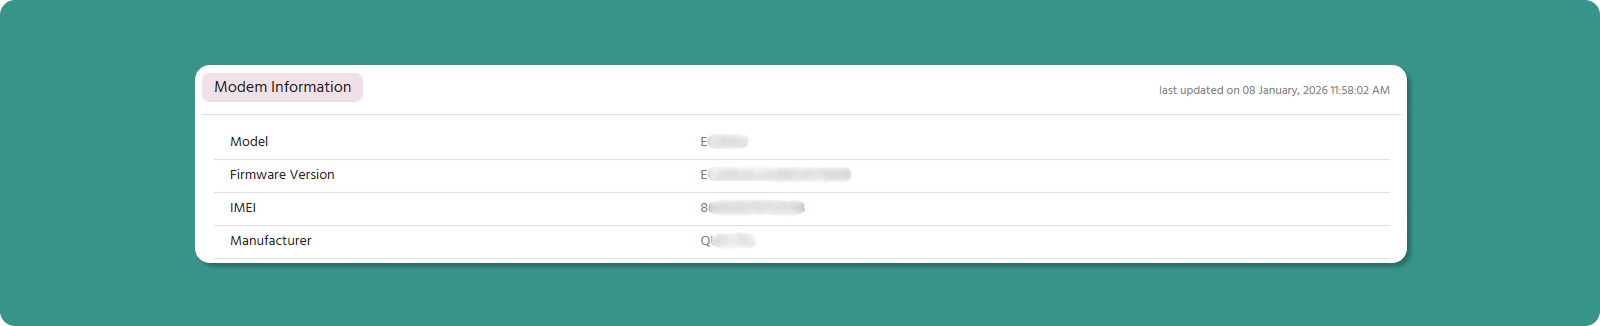
Section B: Modem Information
Cellular modem hardware and firmware specifications.
|
Parameter |
Definition |
Example |
|
Model |
Manufacturer's modem product designation |
- |
|
Firmware Version |
Embedded software version number |
V1.01.03, 2.1.25 |
|
IMEI |
International Mobile Equipment Identity (15 digits) |
123456789111111 |
|
Manufacturer |
Company that produced the modem |
- |
Tab 2: Resource Utilization
This tab is your device health dashboard, showing performance metrics and 24-hour historical trends.
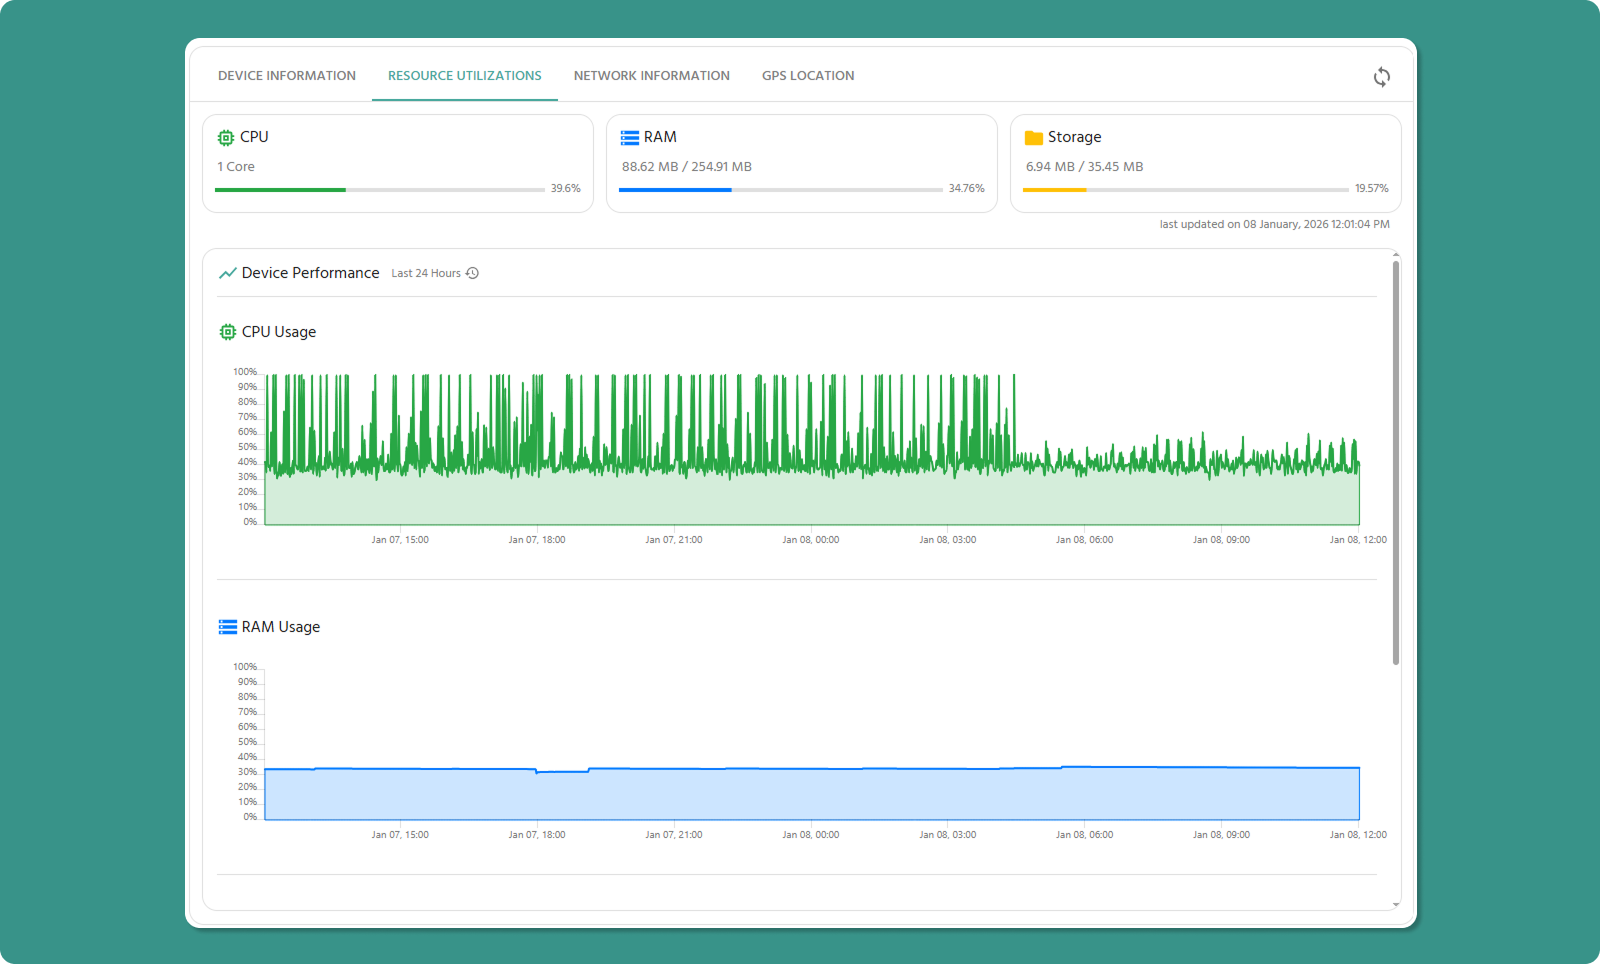
Metrics Cards
Three cards display current resource usage across critical components.

CPU Utilization
Displays:
-
Number of CPU cores
-
Current utilization percentage
Example:
CPU: 1 cores
Utilization: 45%
RAM Utilization
Displays:
-
Total RAM capacity
-
Currently used RAM
-
Utilization percentage
Example:
RAM: 128 MB total
Used: 66 MB (51.5%)
💡 Memory Management: High RAM usage isn't always problematic. Modern systems use available RAM efficiently. Concern arises when usage stays at 90%+ for extended periods.
Storage Utilization
Displays:
-
Total storage capacity
-
Used storage space
-
Utilization percentage
Example:
Storage: 512 MB total
Used: 270 MB (52.73%)
Common Storage Consumers:
-
Logs
-
Application data
24-Hour Performance Graphs
Below the real-time cards, three line graphs display historical resource usage trends.
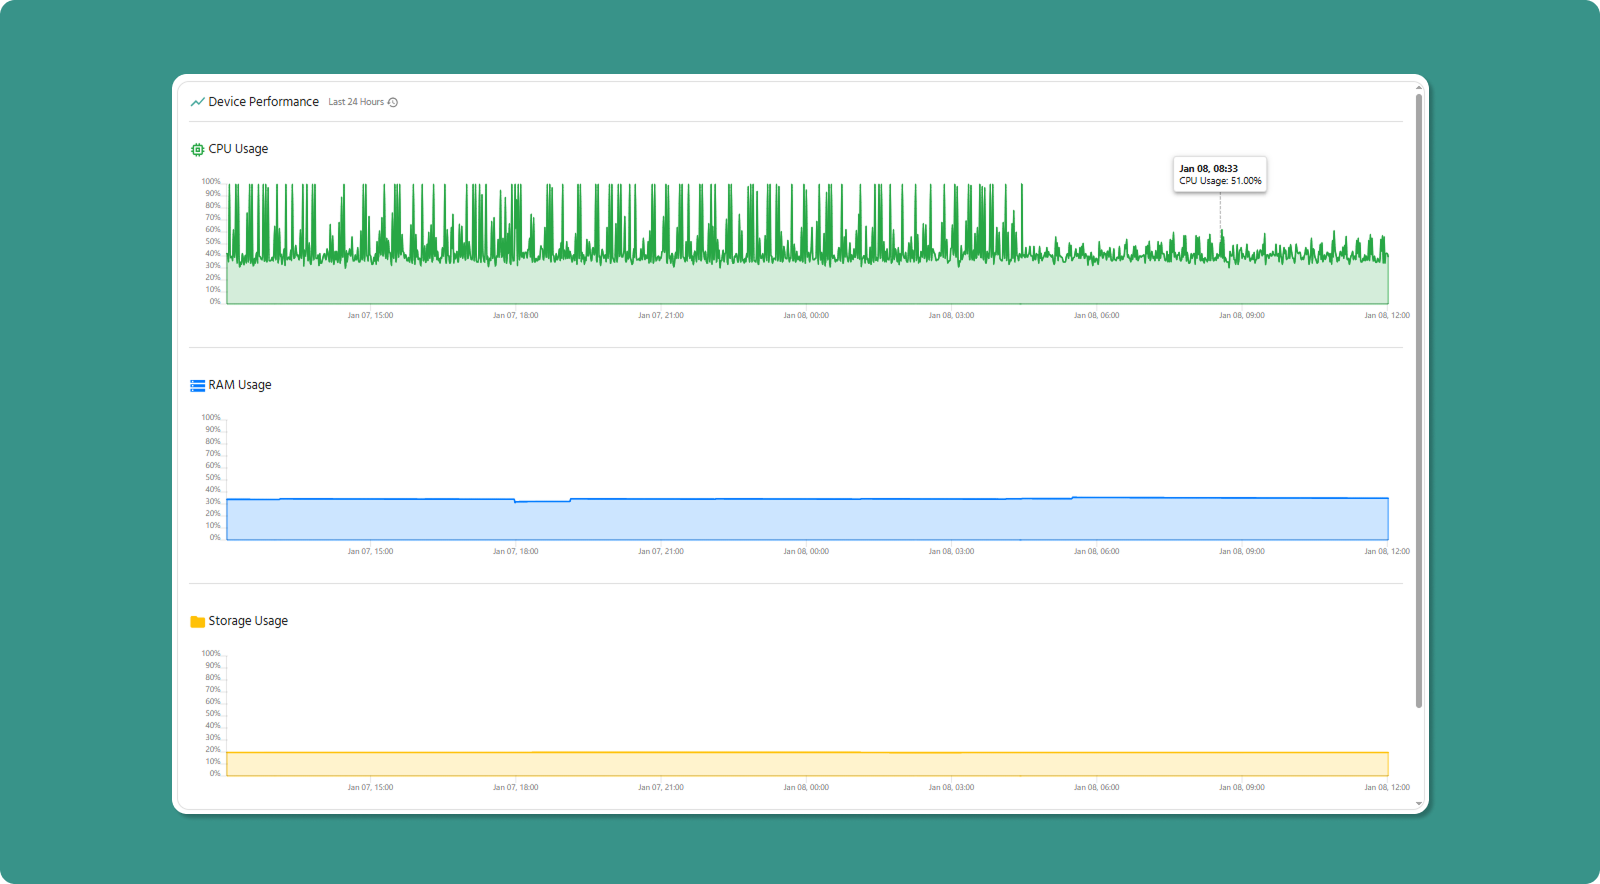
Graph Specifications:
-
Time Range: Last 24 hours
-
Data Points: Every 1 minute
-
X-Axis: Time (hours)
-
Y-Axis: Utilization percentage (0-100%)
Graph Types:
-
CPU Usage Graph (Green line)
-
RAM Usage Graph (Blue line)
-
Storage Usage Graph (Yellow line)
Analyzing Performance Trends
Normal Patterns:
CPU:
-
Fluctuates based on workload
-
Spikes during data transmission or processing
-
Should return to baseline after tasks complete
RAM:
-
Typically steady with gradual increases
-
May step up when new processes start
-
Rarely decreases significantly without restart
Storage:
-
Gradually increases over time
-
Sudden jumps indicate large file writes
-
Decreases indicate log rotation or cleanup
Tab 3: Network Information
This tab provides detailed connectivity information for both wired (Ethernet) and wireless (Cellular) network interfaces.
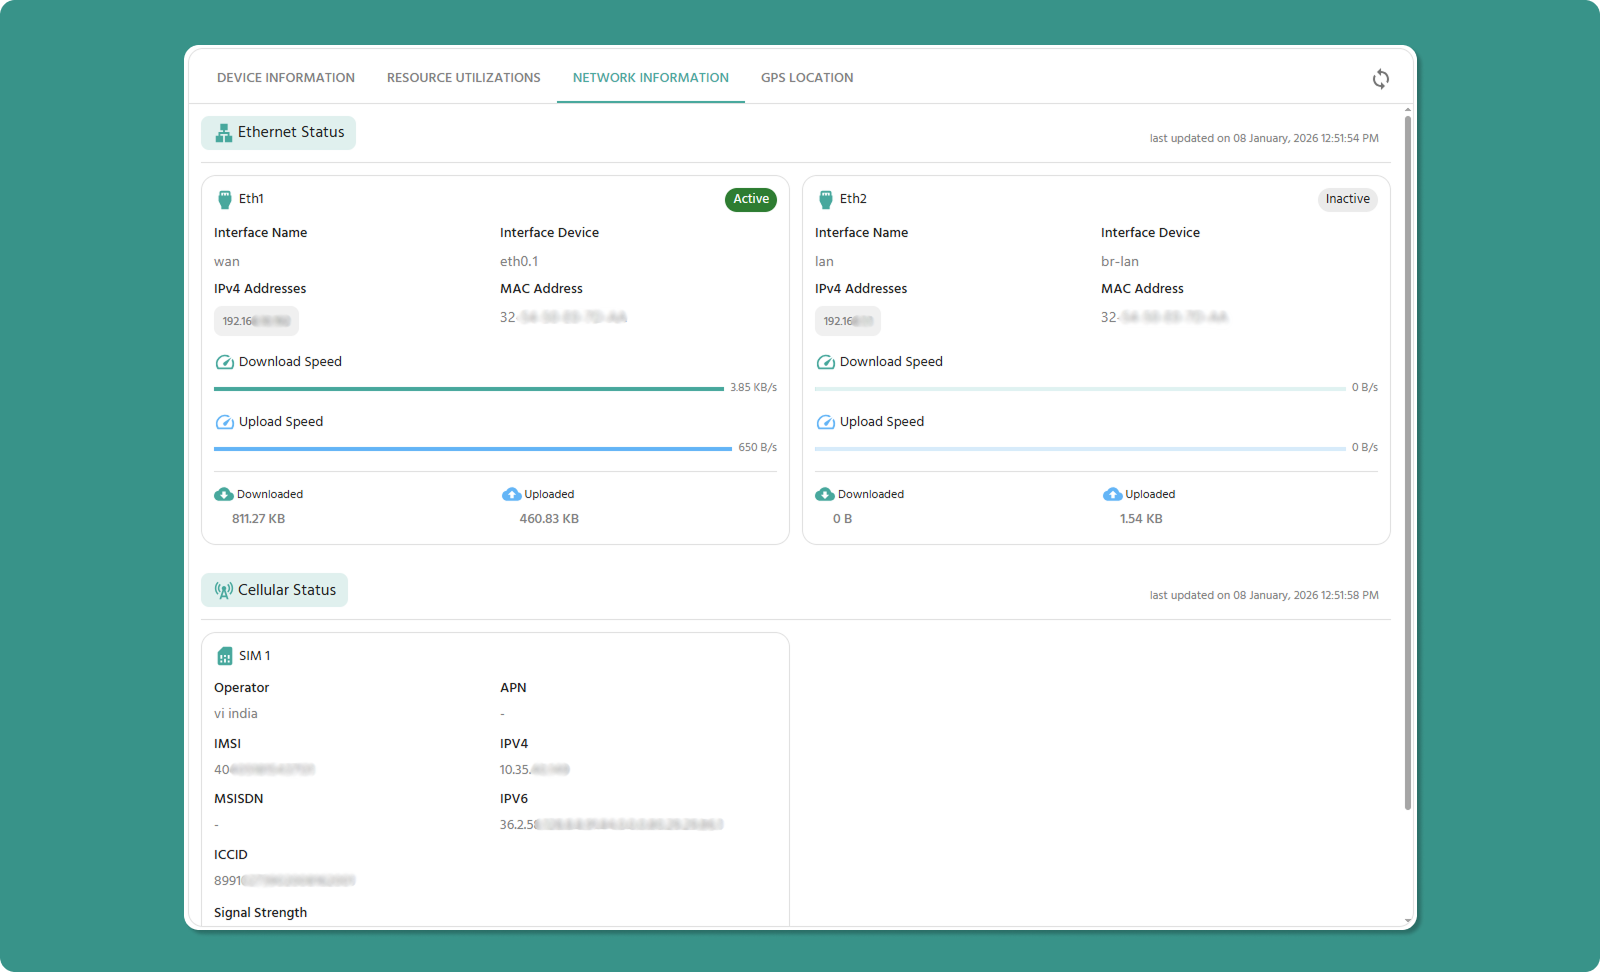
The tab is organized into two sections:
-
Ethernet Card Information
-
Cellular Card Information
Section A: Ethernet Card Information
Wired network interface details for WAN (internet) and LAN (local network) connections.

Typical Display: Multiple ethernet interfaces may be shown (e.g., WAN, LAN, LAN2)
Ethernet Parameters
|
Parameter |
Definition |
Example |
|
Interface Name |
Logical network function identifier |
WAN (internet-facing), LAN (local network) |
|
Interface Device |
OS-assigned hardware identifier |
eth0.1 (VLAN sub-interface), br-lan (bridge) |
|
IPv4 Address |
Network address for IPv4 communication |
192.168.1.1 (router), 192.168.1.105 (client) |
|
MAC Address |
Unique 12-digit hardware identifier |
00:1A:2B:3C:4D:5E |
|
Download Speed |
Current incoming data transfer rate |
100 Mbps, 1 Gbps |
|
Upload Speed |
Current outgoing data transfer rate |
50 Mbps, 900 Mbps |
|
Downloaded Data |
Total data received since last reset |
5.2 GB, 1.3 TB |
|
Uploaded Data |
Total data transmitted since last reset |
850 MB, 450 GB |
Section B: Cellular Card Information
Wireless cellular network connectivity details for mobile or backup internet connections.
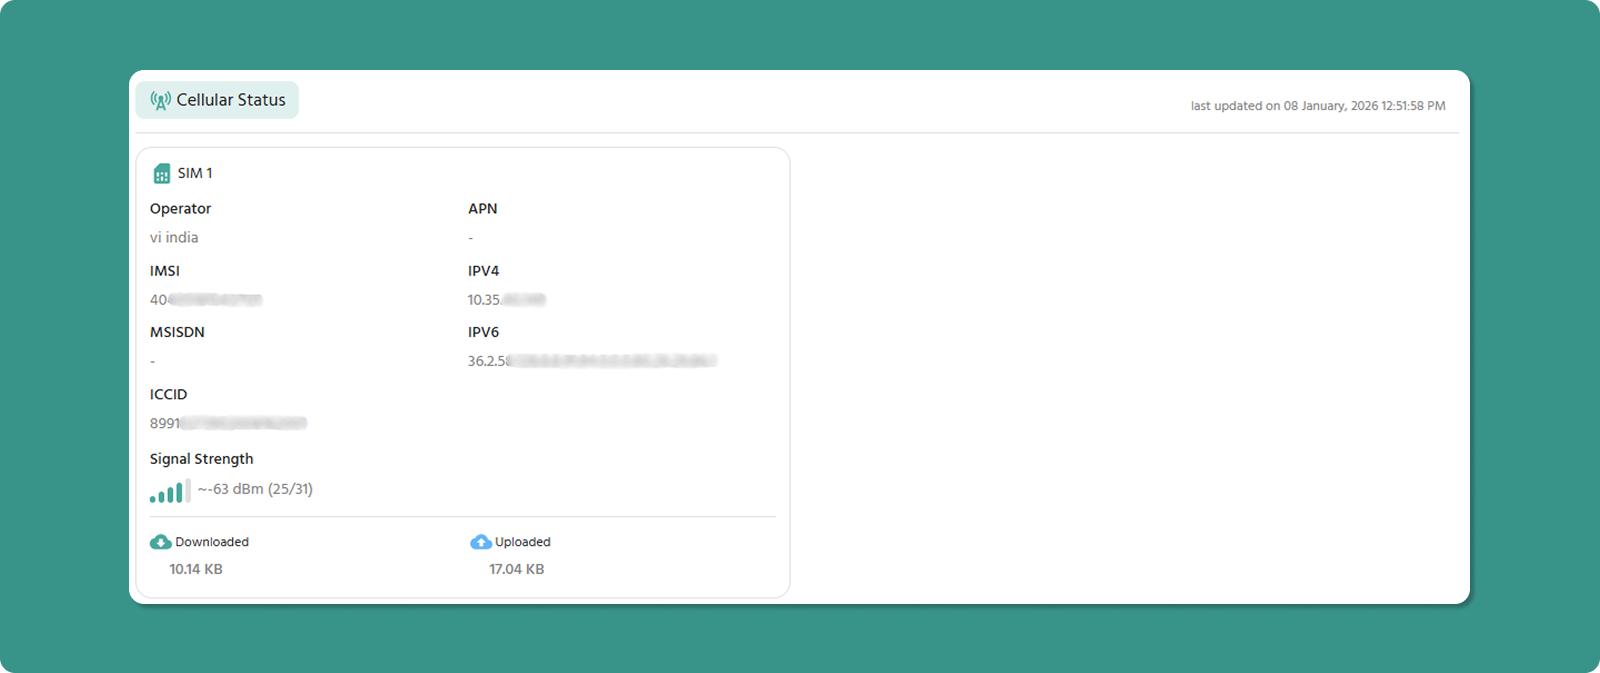
Cellular Parameters
|
Parameter |
Definition |
Example |
|
Operator |
Telecommunications carrier providing service |
Vodafone, AT&T, T-Mobile, Airtel |
|
APN |
Access Point Name - Gateway for mobile internet |
internet.voda.ie, broadband, airtelgprs.com |
|
IMSI |
International Mobile Subscriber Identity (15 digits) |
310410123456789 |
|
IPv4 |
Mobile network IP address (version 4) |
10.123.45.67 (carrier private IP) |
|
IPv6 |
Mobile network IP address (version 6) |
2001:0db8:85a3::8a2e:0370:7334 |
|
MSISDN |
SIM card number |
+447700900000, 5551234567 |
|
ICCID |
Integrated Circuit Card ID - SIM serial number |
89014103210123456789 |
|
Signal Strength |
Cellular signal quality in dBm |
-75 dBm (excellent), -110 dBm (poor) |
|
Downloaded Data |
Total cellular data received |
2.1 GB |
|
Uploaded Data |
Total cellular data transmitted |
450 MB |
Interpreting Signal Strength
Signal strength is measured in dBm (decibel-milliwatts), a logarithmic scale where higher (less negative) values indicate stronger signals.
Signal Quality Scale:
|
dBm Range |
Quality |
Description |
Connectivity |
|
-50 to -70 |
Excellent |
Strong, clear signal |
Full-speed data, reliable |
|
-70 to -85 |
Good |
Adequate signal |
Good data speeds, stable |
|
-85 to -100 |
Fair |
Weak signal |
Reduced speeds, occasional drops |
|
-100 to -110 |
Poor |
Very weak signal |
Slow speeds, frequent disconnects |
|
-110 to -120 |
Critical |
Barely detectable |
Unusable, constant drops |
Factors Affecting Signal:
-
Distance from cell tower
-
Physical obstructions (buildings, terrain)
-
Weather conditions
-
Network congestion
-
Antenna quality and positioning
Cellular Troubleshooting Quick Guide
Problem: Poor Signal Strength (<-100 dBm)
Solutions:
-
Antenna Positioning: Relocate device or adjust external antenna
-
Alternative Location: Move device to higher elevation or near window
Problem: No Cellular Connection
Check:
-
✅ SIM card inserted correctly
-
✅ Carrier account is active and paid
-
✅ APN settings match carrier requirements
-
✅ Device is in carrier coverage area
-
✅ IMEI is not blocked by carrier
Problem: High Data Usage
Investigate:
-
Check Downloaded/Uploaded Data totals
-
Review application data transmission settings
-
Confirm data is being sent via cellular (not ethernet)
-
Look for unauthorized usage or malware
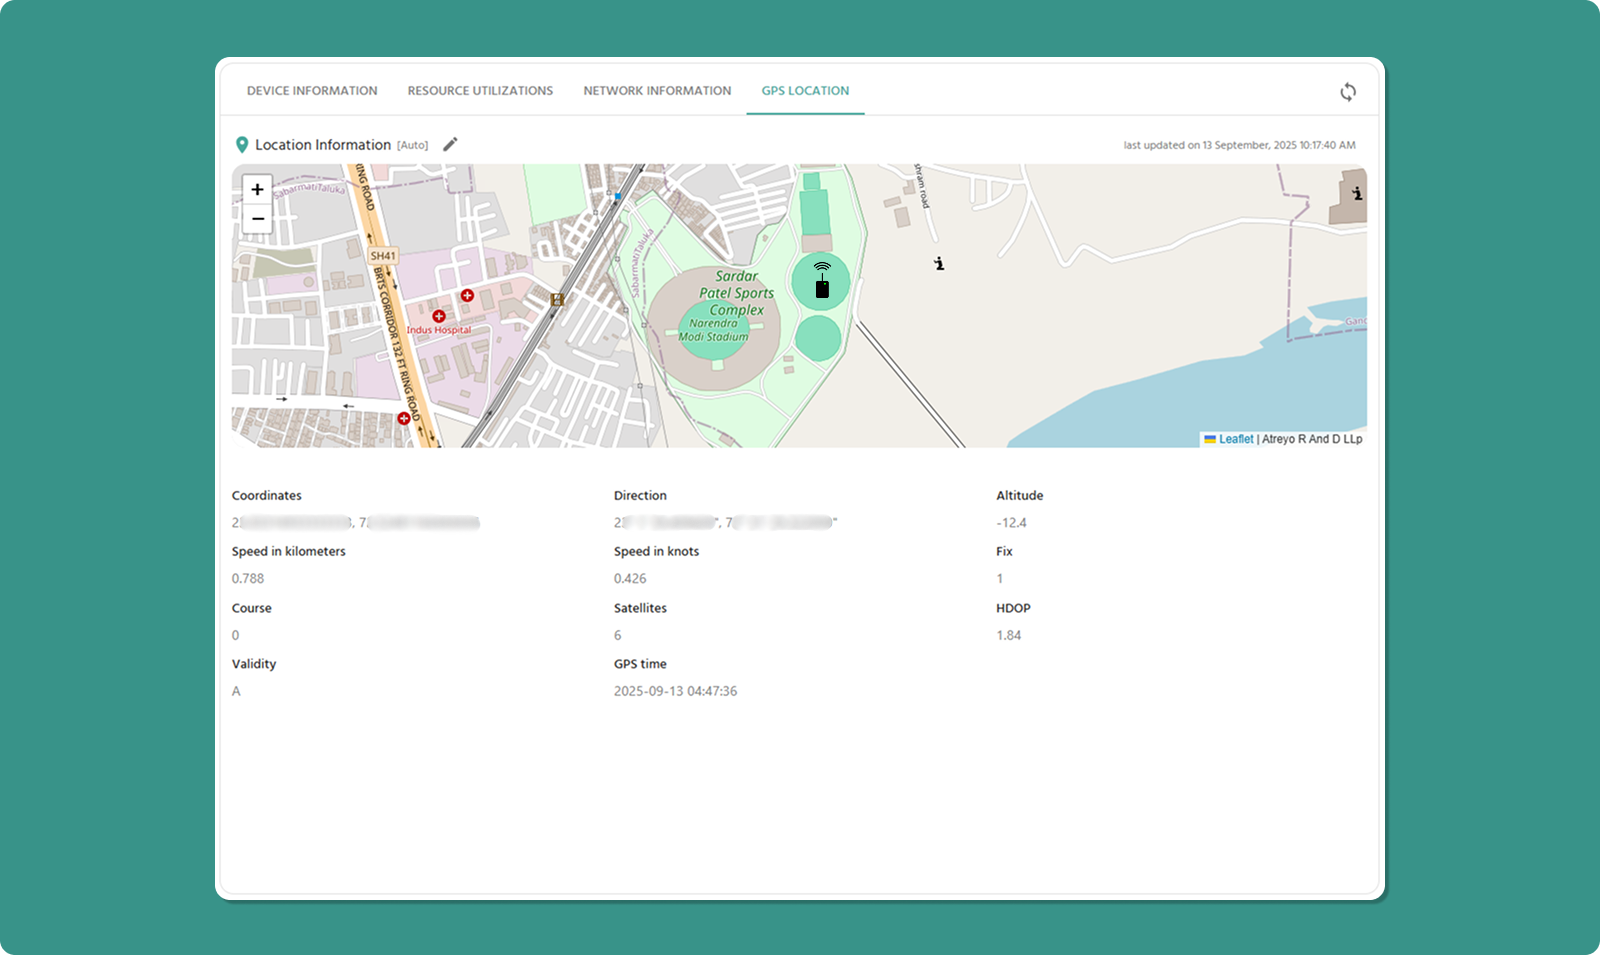
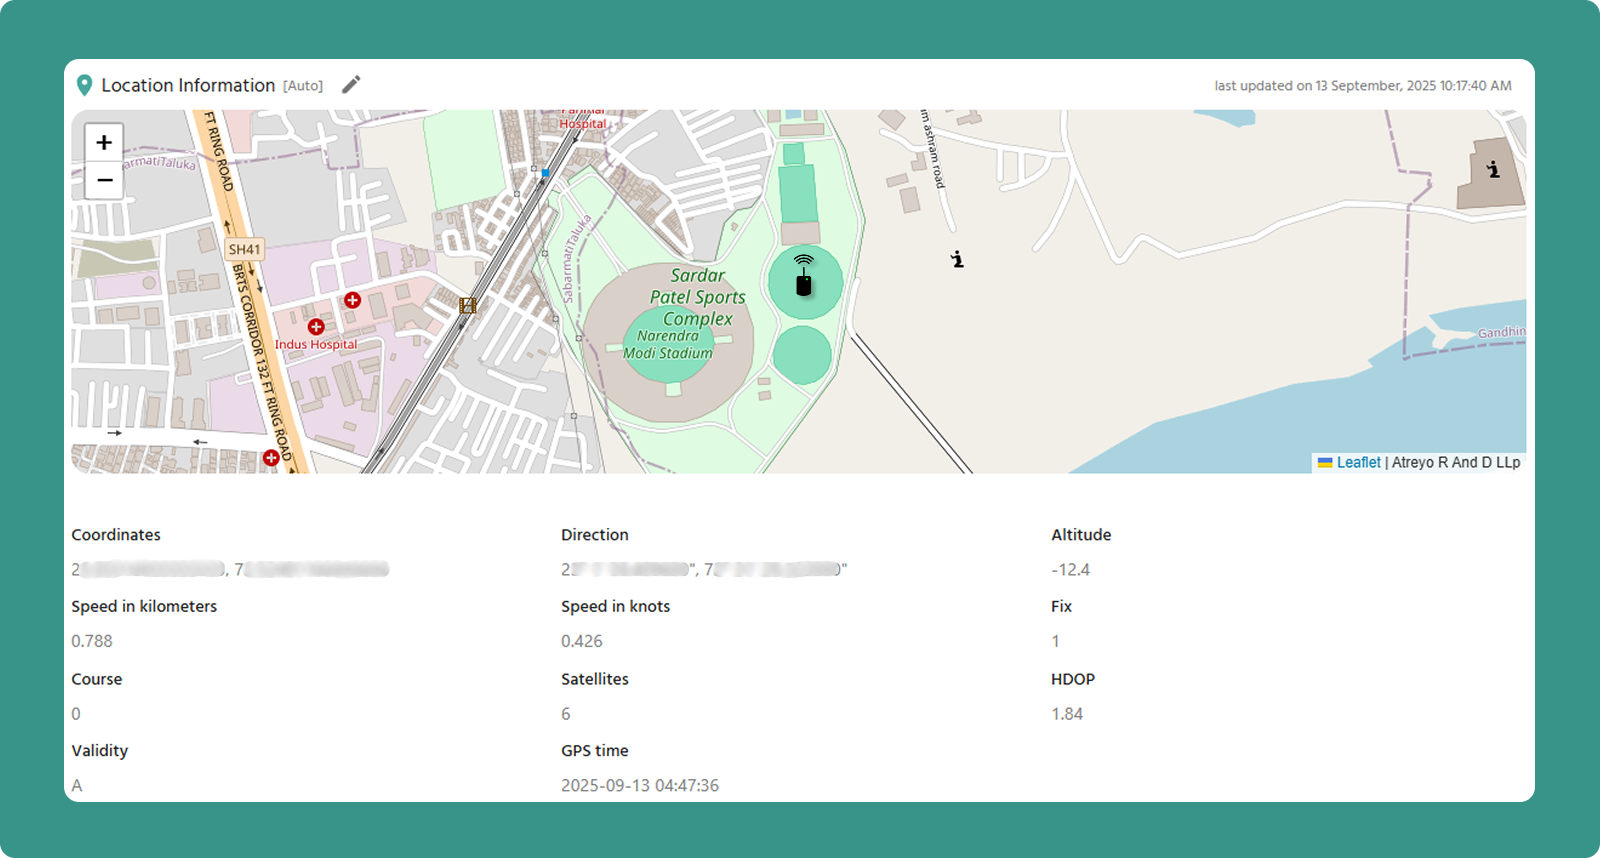
Tab 4: GPS Location
This tab manages device location tracking through automatic GPS data or manual coordinate entry.
Location Tracking Modes
The tab offers two mutually exclusive modes:
-
Auto Mode: Automatic GPS tracking
-
Manual Mode: User-defined coordinates
Option A: Auto Mode
Automatic location tracking using the device's internal GPS modem.
How It Works:
-
Device's cellular modem contains GPS receiver
-
Modem locks onto GPS satellites (requires 4+ satellites)
-
Location data calculated on device
-
Coordinates transmitted to Atra RMS
-
Map updates automatically
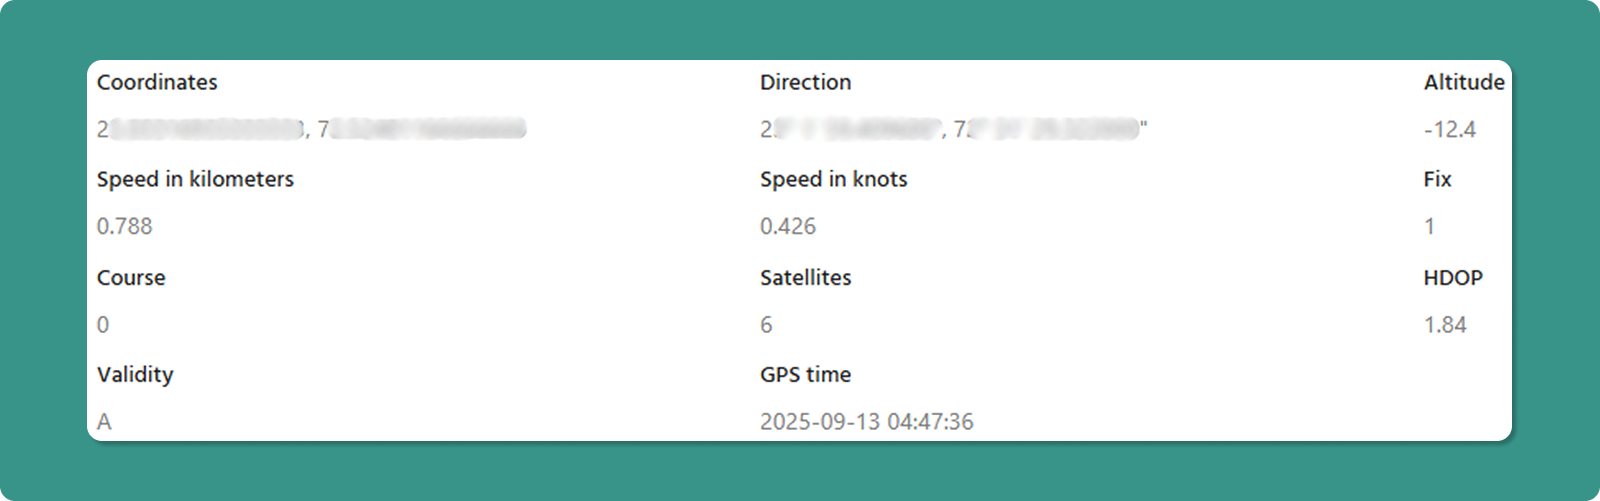
GPS Data Fields
When Auto mode is active and GPS has a fix, the following data is displayed:
|
Field |
Description |
Example |
|
Coordinates |
Latitude and Longitude (decimal degrees) |
23.0225° N, 72.5714° E |
|
Altitude |
Height above mean sea level |
45 meters (147.6 feet) |
|
Speed |
Current velocity in km/h and knots |
60 km/h (32.4 knots) |
|
Direction/Course |
Compass heading (0-360°) |
270° (West), 45° (Northeast) |
|
Fix |
Position calculation status |
"3D Fix" (lat, lon, alt) |
|
Satellites |
Number of GPS satellites locked |
8 satellites |
|
HDOP |
Horizontal Dilution of Precision |
1.2 (excellent accuracy) |
|
Validity |
Data reliability indicator |
'A' (valid), 'V' (invalid) |
|
GPS Time |
Timestamp from GPS satellite system |
2025-12-31 14:30:45 UTC |
Understanding GPS Accuracy
Satellites Count:
-
4+ satellites: Minimum for 3D fix (lat, lon, altitude)
-
3 satellites: 2D fix only (lat, lon, no altitude)
-
8-12 satellites: Optimal accuracy
-
<3 satellites: No position fix possible
HDOP (Horizontal Dilution of Precision):
-
Quality Indicator: Lower values = better accuracy
-
Scale:
-
1.0-2.0: Excellent (typical accuracy: 1-3 meters)
-
2.0-5.0: Good (typical accuracy: 3-10 meters)
-
5.0-10.0: Moderate (typical accuracy: 10-30 meters)
-
>10.0: Poor (accuracy degraded)
-
Validity Codes:
-
'A' (Active/Valid): GPS data is current and reliable
-
'V' (Void/Invalid): GPS data is stale or unreliable
GPS Troubleshooting
Problem: No GPS Fix
Common Causes:
-
❌ Device is indoors (GPS requires clear sky view)
-
❌ Device is in metal enclosure (blocks signals)
-
❌ GPS antenna not connected properly
-
❌ Location service disabled in device settings
Solutions:
-
Move Device: Place near window or outdoors temporarily
-
Check Antenna: Verify external GPS antenna connection
-
Wait: First fix can take 5-15 minutes ("cold start")
-
Verify Settings: Ensure GPS service is enabled
Problem: Poor Accuracy (High HDOP)
Solutions:
-
Improve Sky View: Remove obstructions above device
-
Wait: Accuracy improves as more satellites are acquired
-
External Antenna: Use high-quality external GPS antenna
-
Check Environment: Avoid placement near RF interference sources
Use Cases for Auto GPS Mode
Ideal Scenarios:
-
✅ Vehicle-mounted devices (fleet tracking)
-
✅ Mobile equipment monitoring
-
✅ Temporary installations requiring location verification
-
✅ Asset tracking applications
-
✅ Devices requiring location-based automation
Not Recommended:
-
❌ Stationary indoor installations
-
❌ Underground or heavily shielded locations
-
❌ Locations with poor GPS visibility
Option B: Manual Mode
User-defined static location coordinates.
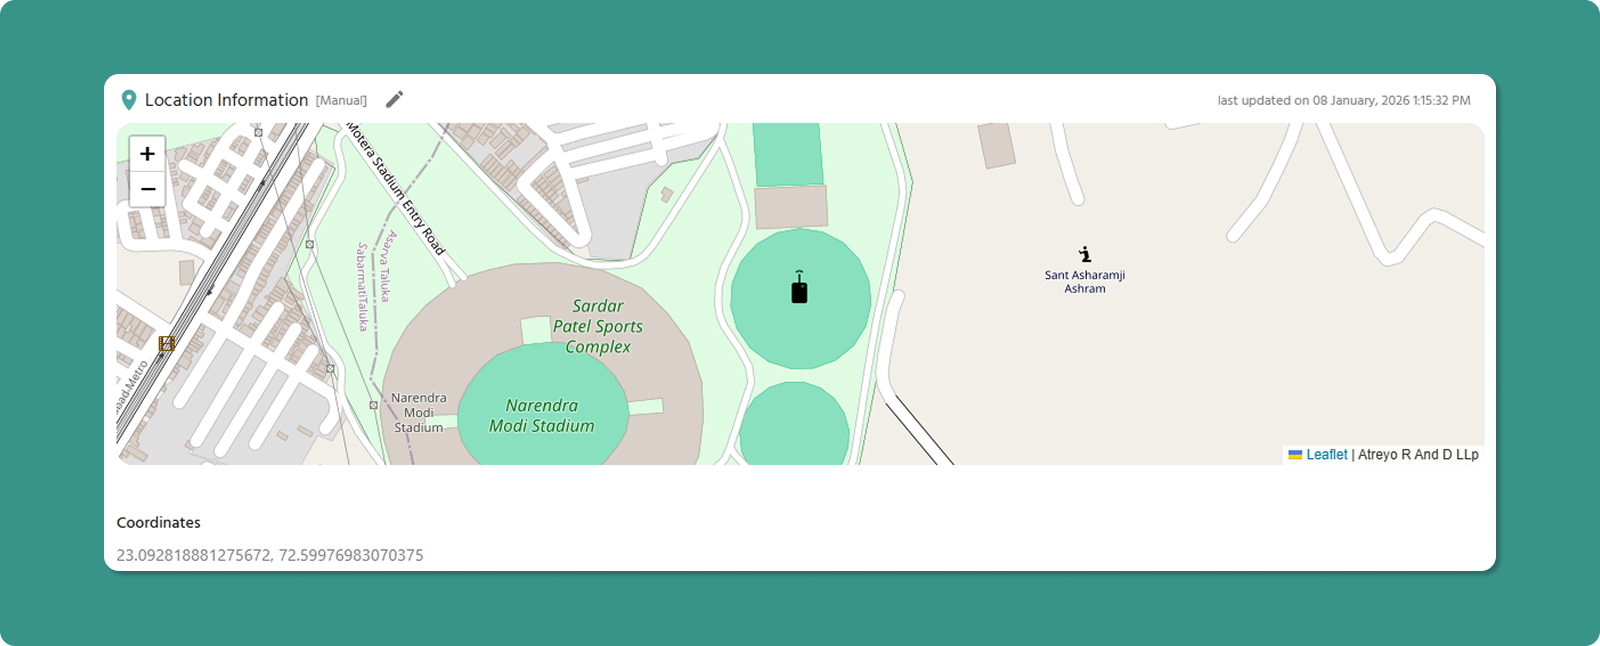
How It Works:
-
User enters Latitude and Longitude manually
-
Coordinates stored in cloud only
-
Location displayed on Overview map
-
No data transmitted from device
Manual Location Entry
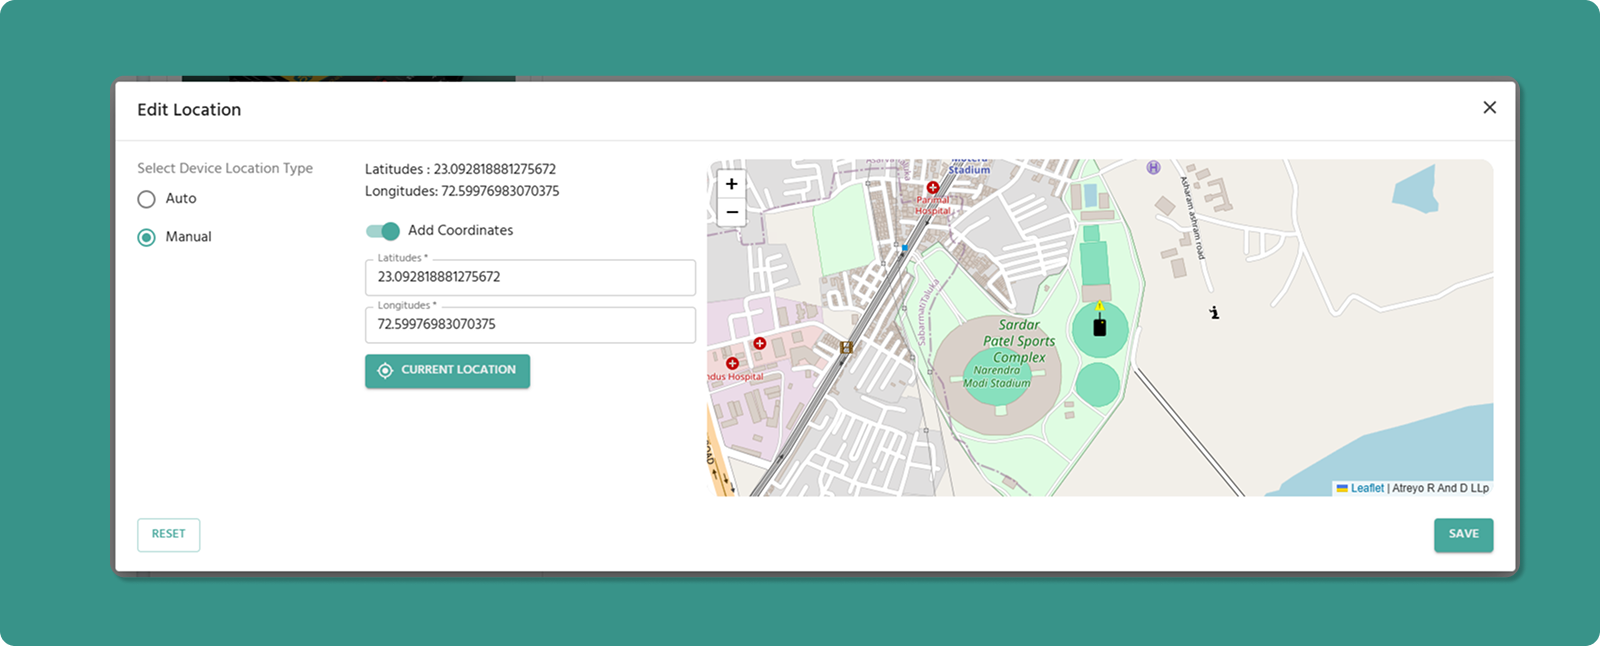
Input Fields:
Latitude:
-
Format: Decimal degrees
-
Range: -90° to +90°
-
North: Positive values
-
South: Negative values
-
Example: 23.0225 (23° N)
Longitude:
-
Format: Decimal degrees
-
Range: -180° to +180°
-
East: Positive values
-
West: Negative values
-
Example: 72.5714 (72° E)
Finding Coordinates for Manual Entry
Method 1: Google Maps
-
Open Google Maps (maps.google.com)
-
Right-click on desired location
-
Click "What's here?"
-
Coordinates appear at bottom (click to copy)
-
Format: Latitude, Longitude (e.g., 23.0225, 72.5714)
Method 2: GPS Device/Phone
-
Use smartphone GPS app
-
Stand at device location
-
Record coordinates from app
-
Enter into Manual Location fields
Method 3: Physical Address Lookup
-
Use geocoding service (e.g., geocode.xyz)
-
Enter physical address
-
Service returns coordinates
-
Verify accuracy on map before using
Important Limitations of Manual Mode
⚠️ Critical Understanding:
Manual location data is stored ONLY in the cloud, NOT on the physical device.
Implications:
-
Map Display: Device appears at manual location on Overview map
-
Device Reality: Physical device has no knowledge of this location
-
Mismatch Possible: Device may be physically elsewhere
⚠️ Use Manual Mode Only When:
Use Cases for Manual Mode
Appropriate Scenarios:
-
✅ Fixed indoor installations (factories, server rooms)
-
✅ Underground installations (basements, tunnels)
-
✅ Devices in GPS-shielded enclosures
-
✅ Legacy devices without GPS capability
-
✅ Approximate location sufficient for inventory purposes
Not Recommended:
-
❌ Mobile devices requiring real-time tracking
-
❌ Situations requiring precise location verification
-
❌ Applications with location-based automation
-
❌ Compliance scenarios requiring actual device location
Device Management FAQs
Q: How do I get to the Device Detail Page?
A: From the Device List Page, click on the name of the device you wish to inspect. This will navigate you directly to its detail page.
Q: How do I get to the Device Detail Page?
A: From the Device List Page, click on the name of the device you wish to inspect. This will navigate you directly to its detail page.
Q: What is the most important information on the Device Detail Page for troubleshooting?
A: The Resource Utilization tab is most critical. It shows real-time usage for CPU, RAM, and Storage, along with 24-hour historical graphs. This data provides immediate insight into device health and performance bottlenecks.
Q: What does a low HDOP value mean in the GPS Location tab?
A: HDOP stands for Horizontal Dilution of Precision. A low HDOP value (1.0-2.0) is excellent - it means GPS satellites are well-distributed in the sky, providing accurate position data (typically 1-3 meters accuracy). High HDOP (>5.0) indicates poor satellite geometry and reduced accuracy.
Q: What's the difference between "Auto" and "Manual" GPS location?
A:
-
Auto: Device automatically sends real-time location from its internal GPS modem. Best for mobile devices.
-
Manual: You enter coordinates manually. Data stored only in cloud, not on device. Use when GPS is unavailable (indoor/underground installations).
Q: How often does the Device List refresh?
A: The Device List automatically refreshes every 5 seconds to show real-time status updates. You can also click the Refresh button for immediate manual update.
Connect Securely with VPNs
The VPN section enables secure remote connectivity between devices and users through encrypted tunnels. Atra RMS VPN supports both peer-to-peer and peer-to-site connections for secure access to remote devices and networks.
View VPN Tunnels
The main VPN interface displays all VPN tunnels under your management.
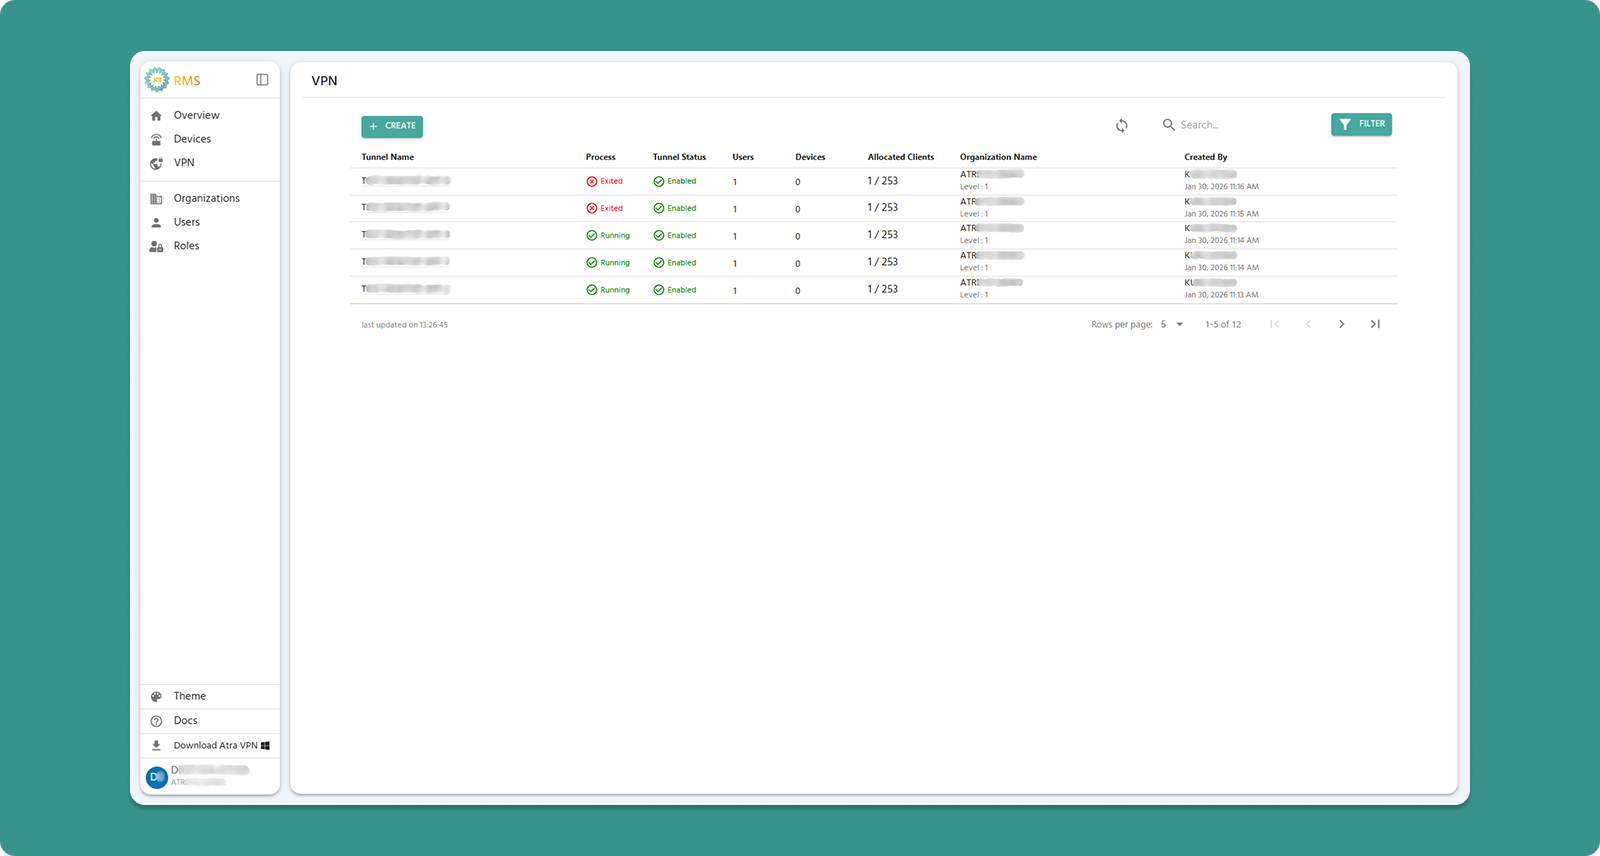
Interface Actions (Top Bar)

|
Action |
Location |
Purpose |
|
+CREATE Button |
Primary action area (Left) |
Click to navigate to the VPN tunnel creation form and establish a new tunnel. |
|
Refresh Button |
Primary action area(Right) |
Manually update tunnel list (also auto-refreshes every 5 seconds) |
|
Search Bar |
Search area(Right) |
Filter by tunnel name, organization or creator |
|
Filter |
Primary action area (Right) |
Filter by Creator,Organization Name and Process Status(Running/Exited) |
Column Definitions
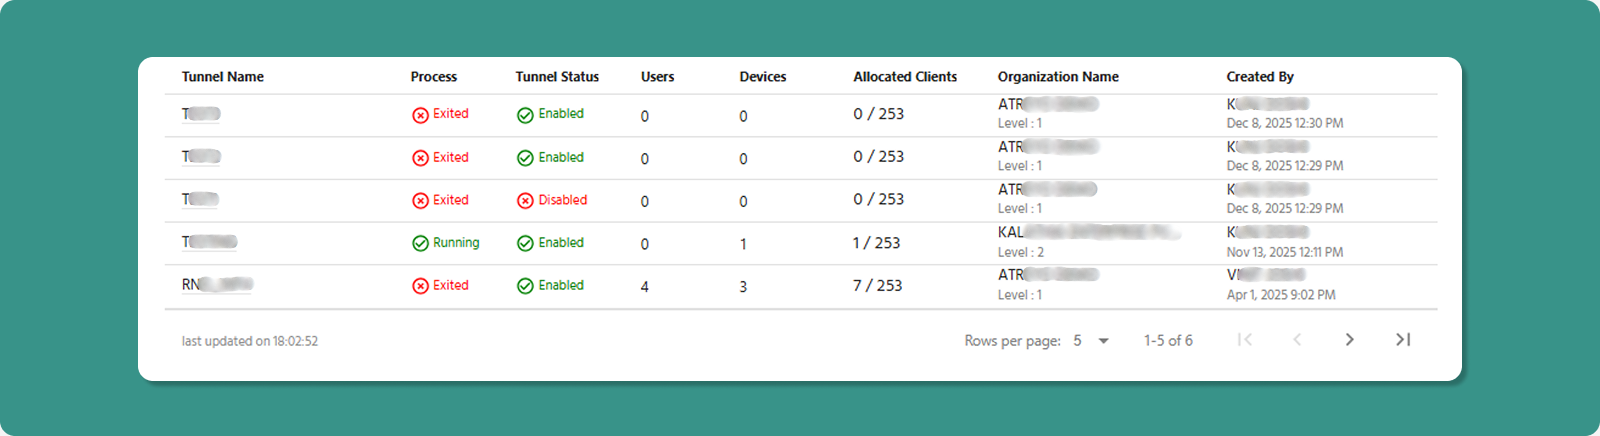
|
Column |
Description |
Values |
|
Tunnel Name |
Custom name assigned during creation (click to open VPN Tunnel Overview page) |
Production_Tunnel, Office_VPN |
|
Process |
Indicates the operational state of the VPN server process. |
Running, Exited |
|
Tunnel Status |
Management/activity state |
Enabled, Disabled |
|
Users |
Count of users allocated to tunnel |
10 |
|
Devices |
Count of devices allocated to tunnel |
5 |
|
Allocated Clients |
Total users + devices in tunnel |
15 |
|
Organization Name & Level |
name of the organization and its level under which the tunnel was created or assigned |
ATREYO Level-1 |
|
Created By |
Username who created tunnel |
admin@company.com |
|
Created At |
Date/time of tunnel creation |
Dec 28, 2025, 9:30 AM |
Understanding VPN States
Process State
The Process indicates the VPN server operational state.
|
State |
Meaning |
User/Device Impact |
|
Running |
VPN tunnel is active |
✅ Users and devices CAN connect securely |
|
Exited |
VPN tunnel is inactive |
❌ Users and devices CANNOT connect. |
Common Causes of "Exited":
-
Administrator manually stopped the process
-
Tunnel was disabled (automatically stops process)
-
Inactivity timeout (no connections for extended period)
-
Technical error or crash (rare)
💡 Troubleshooting: If process shows "Exited" unexpectedly, check Tunnel Status. If "Disabled", enable it. If "Enabled", manually start the process.
Tunnel Status
The Tunnel Status determines management capabilities.
|
Status |
Meaning |
What You Can Do |
|
Enabled |
Tunnel is active and fully manageable |
✅ Start/Stop process |
|
Disabled |
Tunnel is inactive and locked down |
❌ Cannot start process |
When to Disable:
-
Temporarily suspend VPN access without deleting tunnel
-
Maintenance period requiring no connections
-
Security incident requiring immediate access cutoff
-
Preparing tunnel for deletion
Effect of Disabling:
-
Process automatically stops (becomes "Exited")
-
All connected users/devices are disconnected
-
No new connections possible until re-enable
Auto-Refresh Feature
🔄 Automatic Update: The VPN tunnel table refreshes every 5 seconds to show real-time status.
Benefits:
-
Monitor process state changes automatically
-
See when users/devices connect or disconnect
-
Immediate visibility into tunnel health
Manual Override:
Table Navigation
|
Control |
Purpose |
Options |
|
Rows per page |
Adjust visible tunnels |
5, 10, 15, 20,25 |
|
Total Count |
Display total tunnels |
"Showing 1-5 of 25" |
|
Page Navigation |
Move between pages |
Previous, Next, Last, First |
What is Atra RMS VPN?
-
Secure Virtual Private Network service
-
Encrypted tunnels connecting users and devices
-
Remote access to devices and their local networks
-
Built on OpenVPN protocol for enterprise-grade security
Use Cases:
-
Remote Device Access: Connect to IIoT gateways from anywhere
-
Network Access: Access devices on remote local networks
-
Secure Connectivity: Encrypted communication for sensitive data
-
Troubleshooting: Remote diagnostics without site visits
VPN Tunnel Creation Guide
Create a new VPN tunnel to enable secure remote access for users and devices.
Prerequisites
Before creating VPN tunnel:
✅ You have "VPN Create" permission
✅ You have "Devices View" permission (required dependency)
✅ You understand which devices/users need VPN access
✅ You know the network topology (especially for network forwarding decisions)
Step 1: Navigate to Creation Form
-
Click "VPN" in left sidebar menu
-
Click "+CREATE" button (teal, top-left)
-
VPN Tunnel creation form loads
Step 2: Complete Tunnel Form
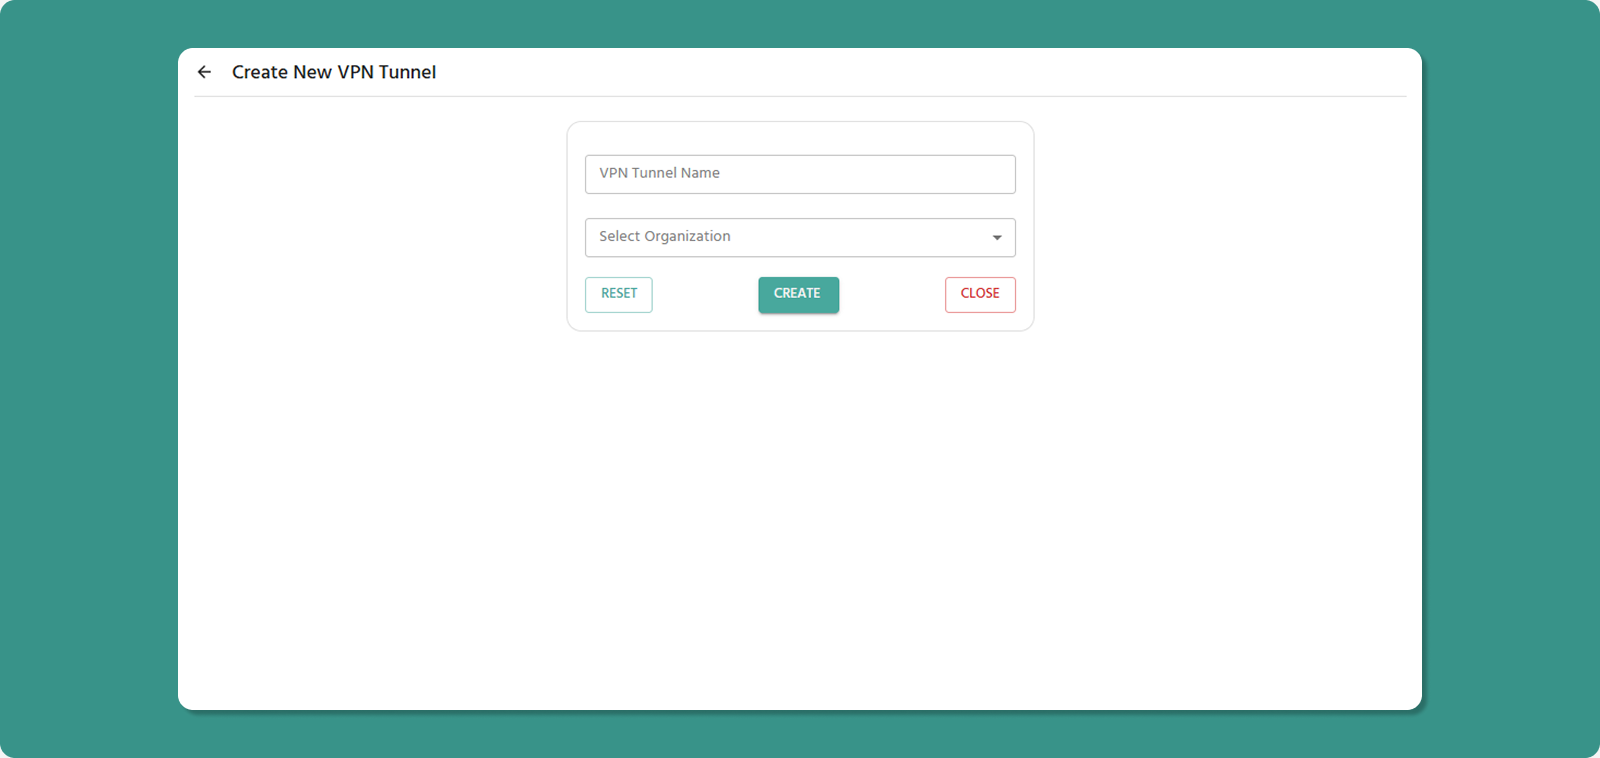
Tunnel Name (Required)
Naming Conventions:
-
Length: 3-50 characters
-
Allowed: Letters, numbers, spaces, hyphens (-), underscores (_)
-
Not allowed at start/end: Hyphen, underscore
-
No consecutive special characters
Examples:
-
✅ Production Tunnel 01
-
✅ Office_VPN
-
✅ Remote-Access-Main
-
❌ _Tunnel (starts with underscore)
-
❌ VPN--Tunnel (consecutive hyphens)
💡 Naming Best Practices:
-
Indicate purpose: "Production", "Development", "Support"
-
Include location if relevant: "Mumbai_Office_VPN"
-
Use consistent naming: "Site_Function_Number"
Organization (Required)
Select the organization where the tunnel will be created.
Dropdown Options:
-
Your current organization
-
Child organizations under your management
Important:
-
Only devices/users from selected organization (and its children) can be added
-
Cannot add devices/users from parent organizations
Step 3: Review and Create
Before submitting, review:
✅ Tunnel name is descriptive
✅ Correct organization selected
Form Actions:
After Creation
Immediate Effects:
-
New tunnel appears in VPN Tunnel List
-
Tunnel Status: Disabled
-
Process State: Exited (not running yet)
Next Steps:
-
Start the VPN Process (see Tunnel Overview page)
- Add devices and users to tunnel
-
Users download VPN client (if not already installed)
-
Users connect via VPN Desktop Application
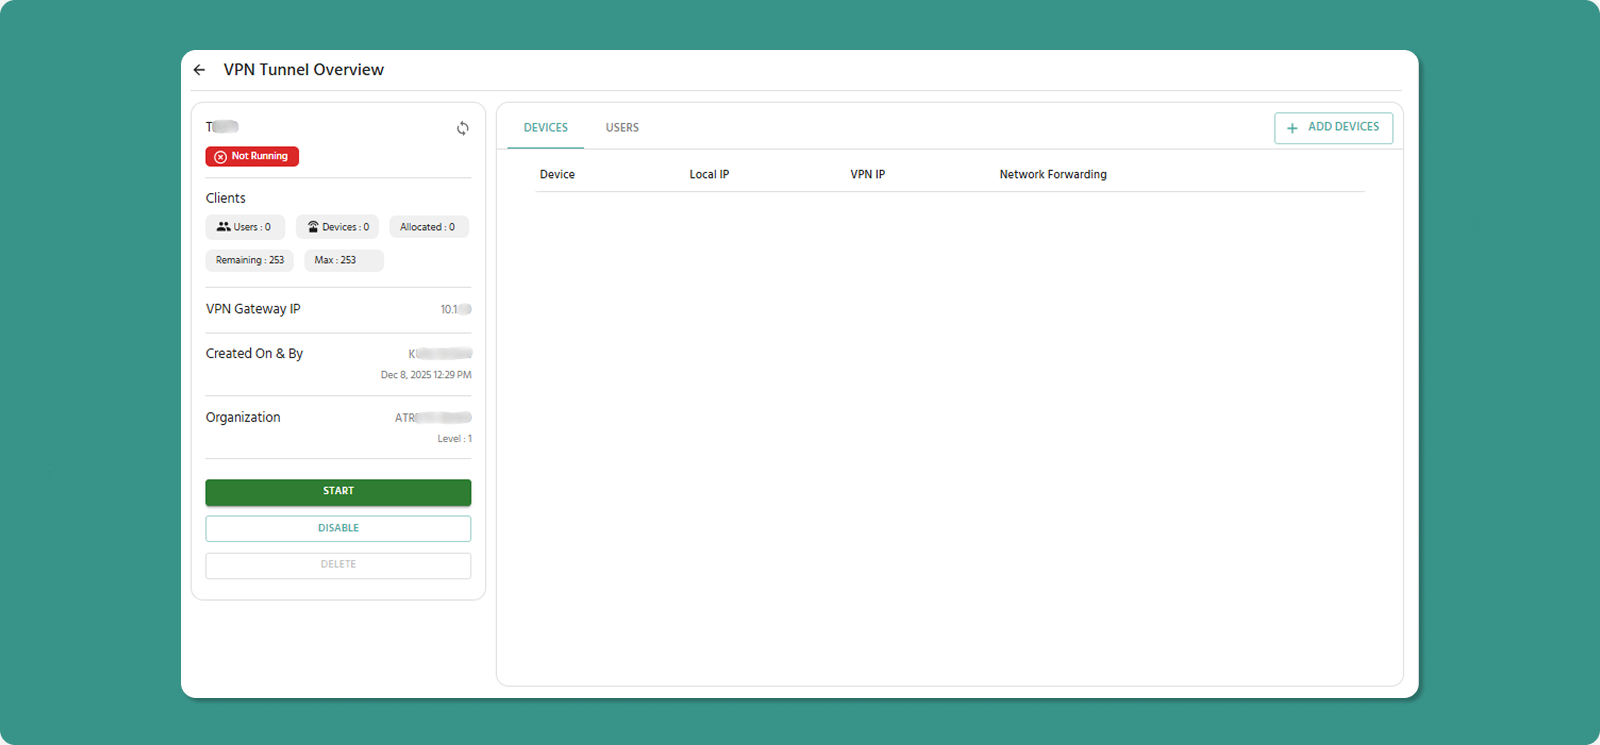
Manage and View VPN Tunnel Profiles
The Tunnel Overview page is your control center for managing an individual VPN tunnel, its process, and its connected clients.
Accessing Tunnel Overview
Page Layout
Two-Panel Design:
Left Panel: Tunnel details, status, and management actions
Right Panel: Client management tabs (Devices and Users)
Left Panel: Tunnel Details & Actions
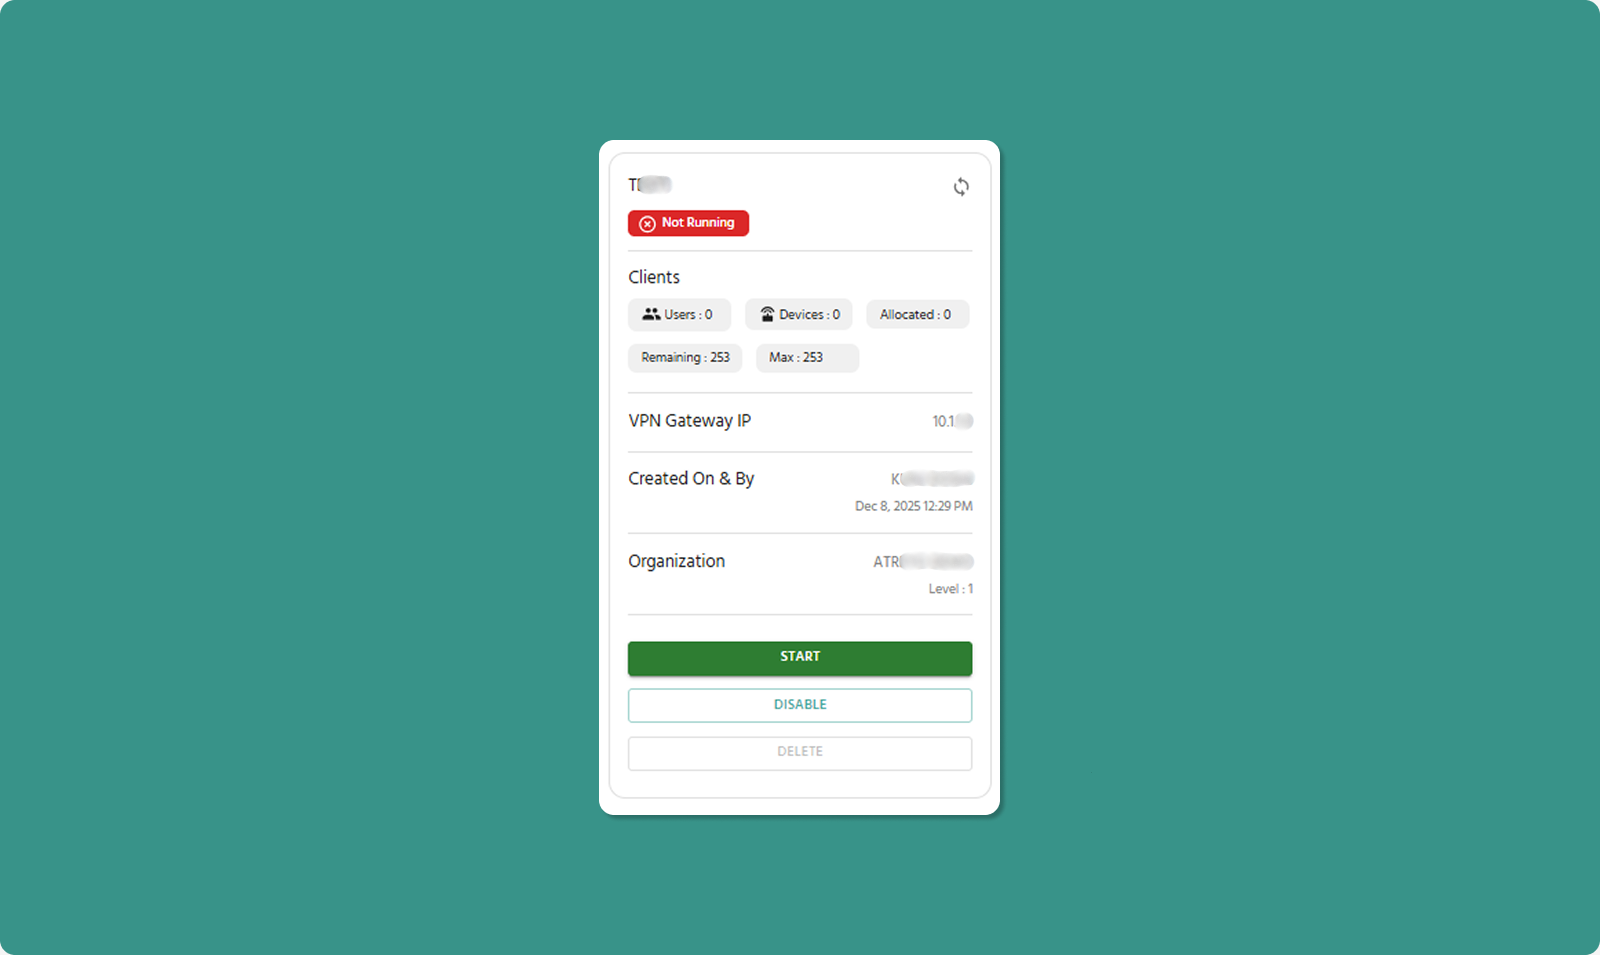
Core Status Information
|
Field |
Description |
Example |
|
Name of Tunnel |
Custom tunnel identifier |
Production_Tunnel_01 |
|
Status of Process |
Current VPN server state |
Running, Not-Running (Exited) |
|
VPN IP |
Gateway IP address for tunnel |
10.8.0.1 |
VPN IP Significance:
-
All traffic for this tunnel routes through this IP
-
First IP in tunnel's subnet
-
Cannot be modified
Client Information
|
Field |
Description |
Limit |
|
Number of Users |
Total users allocated to tunnel |
No specific limit (within Max) |
|
Number of Devices |
Total devices allocated to tunnel |
No specific limit (within Max) |
|
Allocated Clients |
Sum of users + devices currently in tunnel |
Max 253 |
|
Remaining Clients |
Available slots for additional users/devices |
253 - Allocated |
|
Max |
Absolute maximum clients supported |
253 (fixed) |
Example Calculation:
Users: 10
Devices: 5
Allocated Clients: 15
Remaining Clients: 253 - 15 = 238
Tunnel Metadata
|
Field |
Information |
|
Created By |
Username who created tunnel + date/time |
|
Organization |
Org name and level where tunnel exists |
Management Actions
Start/Stop Button
Purpose: Manually control VPN tunnel process
When Process is "Exited":
When Process is "Running":
⚠️ Important: Stopping process disconnects all active users/devices immediately. Use during maintenance windows only.
💡 Use Case for Stopping: If you need to add/remove devices or users and process is running, you CAN do so. However, stopping first ensures clean state management.
Enable/Disable Button
Purpose: Control tunnel's manageability and activity
When Status is "Enabled":
When Status is "Disabled":
⚠️ Critical Warning: If tunnel is Running and you click Disable:
-
Process automatically stops
-
All active connections immediately terminate
-
Users may lose work or# Atra RMS - User Guide
Delete Button
Purpose: Permanently remove tunnel from system
Important Restrictions:
⚠️ Cannot delete Enabled tunnel
Deletion Process:
-
Ensure tunnel is Disabled
-
Click DELETE button
-
Confirmation dialog appears
-
Click CONFIRM to permanently delete
-
Tunnel and all its configuration removed
What Gets Deleted:
-
Tunnel configuration
-
User/device associations
-
Process state
-
Historical connection logs (may be retained for audit)
What's NOT Affected:
-
Devices remain in system (not deleted)
-
Users remain in system (not deleted)
-
Other tunnels unaffected
⚠️ Deletion is Permanent: Cannot be undone. Must recreate the tunnel from scratch if needed again.
Refresh Button
Location: Top-right corner of Left Panel
Purpose: Manually update displayed information
When to Use:
-
After starting/stopping process (verify state change)
-
After adding/removing devices/users
-
To check current connection status
-
When expecting status change
💡 Note: Page auto-refreshes periodically, but manual refresh ensures immediate update.
Right Panel: Client Management Tabs
The right panel manages users and devices associated with the tunnel through two tabs.
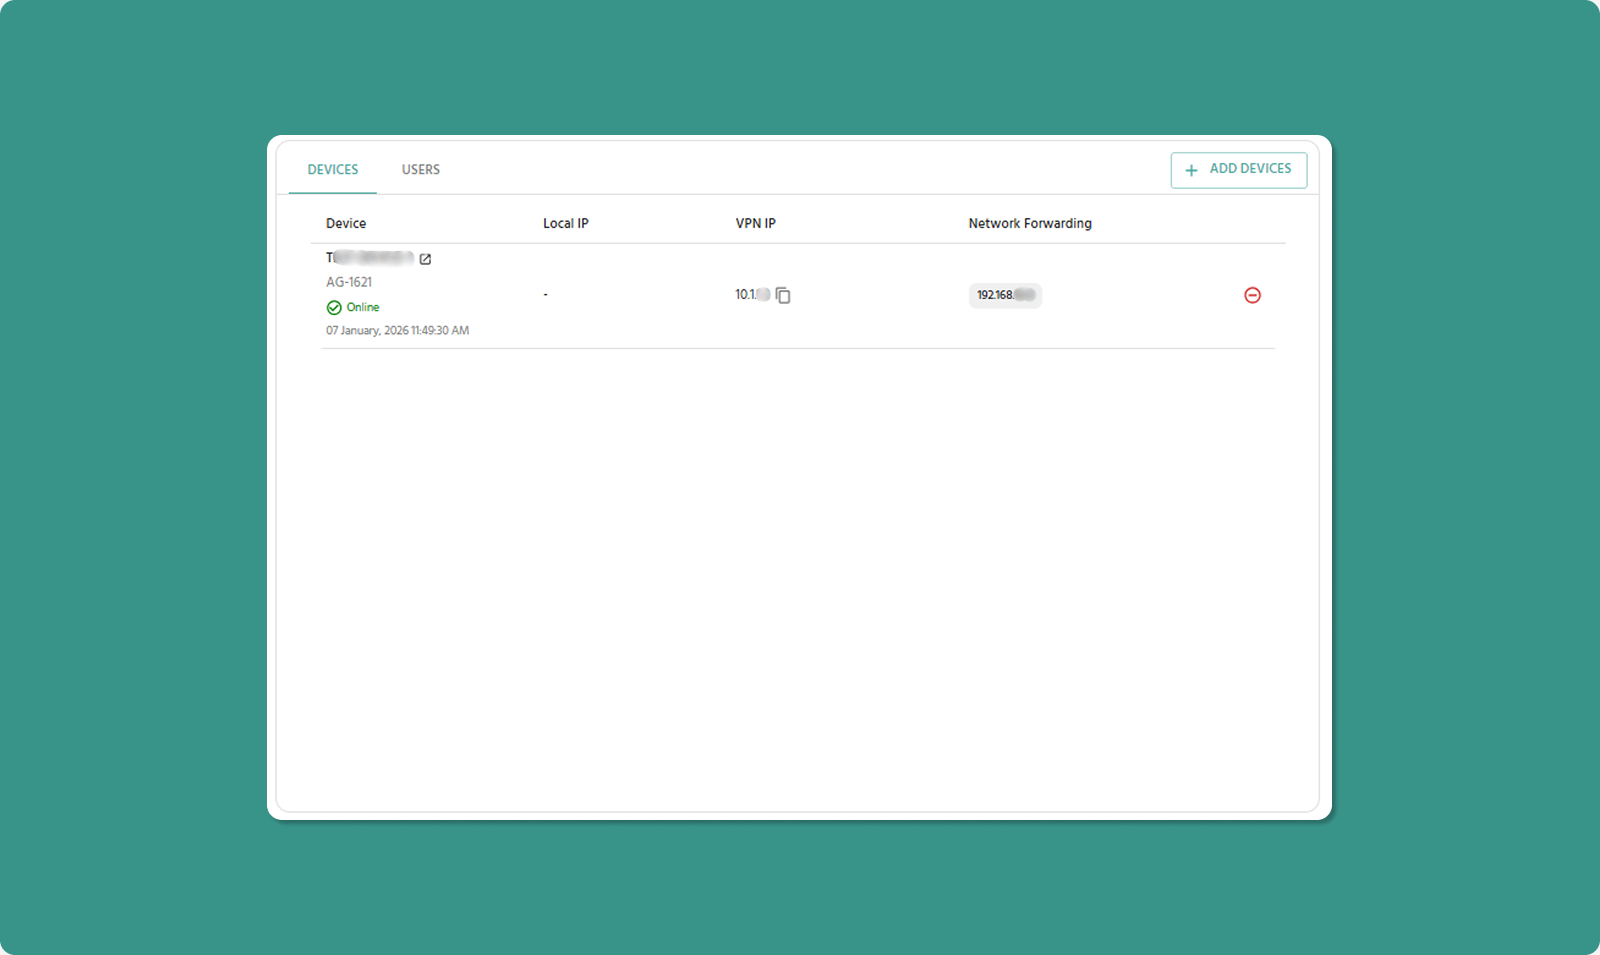
Tab 1: Devices
Tab 2: Users
Both tabs have an "Add" button in the top-right corner of the tab header.
Tab 1: Devices
Displays all devices allocated to this VPN tunnel with their network configuration.
Adding Devices
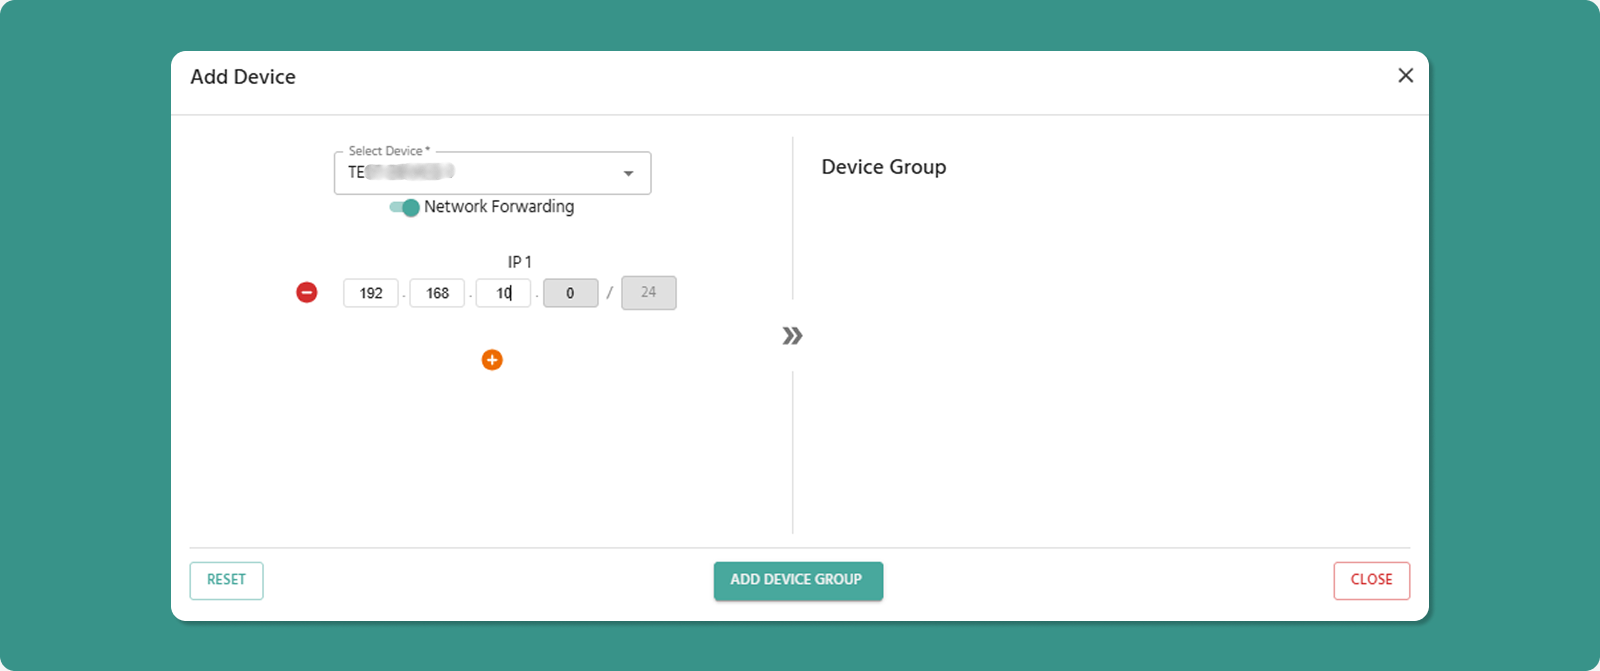
To Add Devices:
-
Click "Add Devices" button
-
Device selection dialog opens
-
Select devices from list (checkbox for each)
-
Configure Network Forwarding for each device
-
Click Add to confirm
Available Devices:
-
All devices from tunnel's organization
-
Devices from child organizations
Limit Check: System prevents adding devices if it would exceed 253 total clients (users + devices).
Network Forwarding Setting
Critical Decision: For each device added, choose Network Forwarding state.
|
State |
Effect |
Use When |
|
Enabled |
VPN users can access the device AND other devices on its local network |
Need to reach PLCs, sensors, or computers on device's LAN |
|
Disabled |
VPN users can ONLY access this specific device |
Only need device itself, not its local network (security/isolation) |
Example Scenarios:
Scenario 1: Factory with PLC Network
-
Device: IIoT Gateway in factory
-
Local Network: 10 PLCs on 192.168.10.x
-
Network Forwarding: ENABLED
-
Result: VPN users can connect to gateway AND all 10 PLCs
Scenario 2: Remote Sensor
-
Device: Standalone temperature sensor gateway
-
Local Network: None (device only)
-
Network Forwarding: DISABLED
-
Result: VPN users can only access sensor gateway itself
💡 Security Best Practice: Enable Network Forwarding only when necessary. Disabled provides better isolation and security.
Devices Table Columns
|
Column |
Description |
Details |
|
Device |
Device Name, Model, and Status |
Status shows Online/Offline with timestamp |
|
Local IP |
Device's IP on its physical LAN/WAN |
Example: 192.168.1.50 |
|
VPN IP |
Unique IP assigned by tunnel |
Example: 10.8.0.10 |
|
Network Forwarding |
Access to device's local network |
Enabled or Disabled (toggle switch) |
Device Name Link
The Device Name is a clickable link.
Action: Click device name
Result: Opens Device Detail Page in new browser tab
Use Case: Quick access to device monitoring without leaving VPN page
Local IP vs VPN IP
Local IP:
-
IP address on device's physical network
-
Example: 192.168.1.50 (factory LAN)
-
Used for communication within local site
-
Not accessible from internet
VPN IP:
-
IP assigned when device added to tunnel
-
Example: 10.8.0.10
-
Unique within this tunnel
-
Used for VPN communication
-
How users connect to device through VPN
Connection Flow:
User's Computer (10.8.0.25)
↓ VPN Tunnel
VPN Gateway (10.8.0.1)
↓Device VPN IP (10.8.0.10)
↓ If Network Forwarding Enabled
Device's Local Network (192.168.1.x)
Network Forwarding Toggle
Enabled State:
-
Toggle switch: ON (green)
-
Effect: VPN users can access device AND its local network
-
Routing: Traffic forwarded through device to local network
-
Access: Can reach 192.168.1.x devices (if device is on that network)
Disabled State:
-
Toggle switch: OFF (gray)
-
Effect: VPN users can ONLY access this specific device
-
Routing: No traffic forwarding to local network
-
Access: Can only reach device's VPN IP (10.8.0.10)
Changing Setting:
-
Click toggle switch
-
State changes immediately (Enabled ↔ Disabled)
-
Effect applies to all connected users
⚠️ Live Changes: You can toggle Network Forwarding while tunnel is running. Changes apply immediately without restarting the process.
Removing Devices
To Remove Device from Tunnel:
-
Locate device in table
-
Click Remove button (red, right side of row)
-
Confirmation dialog appears
-
Click CONFIRM to remove device
-
Device disappears from tunnel (but remains in system)
Effects:
-
Device's VPN IP deallocated
-
Allocated Clients count decreases
-
Remaining Clients increases
-
Device can be re-added later with different VPN IP
Tab 2: Users
Displays all users allocated to this VPN tunnel.

Adding Users

To Add Users:
-
Click "Add Users" button
-
User selection dialog opens
-
Select users from list (checkbox for each)
-
Click Add User to confirm
Available Users:
-
All users from selected organization
-
Users from child organizations (if any)
Available Users:
-
All users from tunnel's organization
-
Users from child organizations
Limit Check: System prevents adding users if it would exceed 253 total clients (users + devices).
Users Table Columns
[INSERT SCREENSHOT: Users_Table_Columns.png]
|
Column |
Description |
Example |
|
Name |
User's full name |
Jane Doe, Rajesh Kumar |
|
User VPN IP |
Unique IP assigned to user |
10.8.0.25 |
|
Status |
Shows whether the user is connected to the tunnel in the ATRA VPN client. |
Connected/Disconnected |
|
Organization Name |
User's organization |
ATREYO Level-1 |
|
|
User's login email |
jane.doe@company.com |
User VPN IP Assignment
How It Works:
-
Each user gets unique VPN IP when added to tunnel
-
IP automatically assigned from tunnel's subnet
-
Format: 10.8.0.x (where x = 2-254)
-
IP remains consistent until user removed
Usage:
-
User's VPN Desktop Application connects using this IP
-
Other users/devices can reach this user via this IP
-
Used for logging and access control
Removing Users
To Remove User from Tunnel:
-
Locate user in table
-
Click Remove button (red, right side of row)
-
Confirmation dialog appears
-
Click CONFIRM to remove user
-
User disappears from tunnel (but remains in system)
Effects:
-
User's VPN IP deallocated
-
Allocated Clients count decreases
-
Remaining Clients increases
-
User's VPN client disconnects (if currently connected)
-
User cannot reconnect to this tunnel
-
User can be re-added later with different VPN IP
⚠️ Active Connections: Removing user while they're connected immediately terminates their VPN session. Warn users before removal.
VPN Tunnel Workflow Examples
Example 1: Creating Production Tunnel
Scenario: Factory needs VPN access to 5 gateways and 10 users
Steps:
-
Gateway_A (Network Forwarding: ENABLED - has PLCs on LAN)
-
Gateway_B (Network Forwarding: ENABLED - has sensors on LAN)
-
Gateway_C (Network Forwarding: DISABLED - standalone)
-
Gateway_D (Network Forwarding: ENABLED - has HMI on LAN)
-
Gateway_E (Network Forwarding: DISABLED - standalone)
-
Add 10 users (engineers and managers)
-
Click CREATE
-
Navigate to Tunnel Overview page
-
Click START button (process begins running)
-
Notify users to download VPN client and connect
Result: 15 allocated clients (5 devices + 10 users), 238 remaining slots
Example 2: Maintenance Procedure
Scenario: Need to add 2 new devices during maintenance window
Steps:
Result: Clean device addition without disrupting other connections
Example 3: Emergency Disable
Scenario: Security incident requires immediate VPN shutdown
Steps:
-
Tunnel Status → Disabled
-
Process → Exited
-
All users disconnected
-
No new connections possible
-
Investigate security issue
-
When resolved:
Result: Complete VPN access shutdown in seconds
---⚠️ Critical Warning: If tunnel is Running and you click Disable:
-
Process automatically stops
-
All active connections immediately terminate
-
Users may lose work or experience disruption
-
Use only during maintenance windows or emergencies
Common Use Cases:
-
Temporary Suspension: Disable tunnel during security incident
-
Maintenance: Disable before major configuration changes
-
Preparation for Deletion: Must disable before deleting tunnel
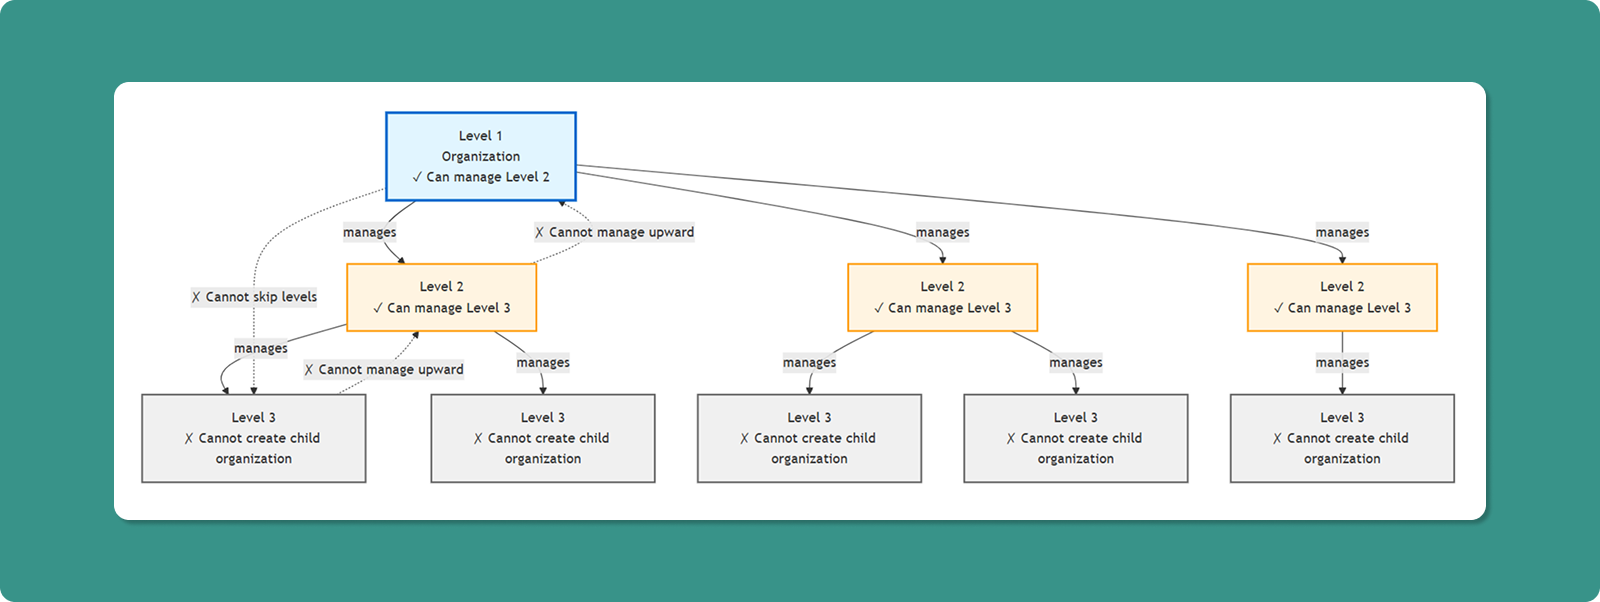
Structure Your Organization
The Organizations section allows you to create and manage hierarchical organizational structures within Atra RMS. This enables logical separation of devices, vpn tunnels, users, and roles.
Structure:
Level 1: Parent Organization
├── Level 2: Child Organization A
│ ├── Level 3: Child Organization A1
│ └── Level 3: Child Organization A2
└── Level 2: Child Organization B
└── Level 3: Child Organization B1
Key Principles:
- The Atra-RMS uses a strict 3-level hierarchy for management
- Organizations form parent-child relationships
- Parent can view child org resources
- Child cannot view parent org resources
- A Level 3 organization cannot create any child organizations
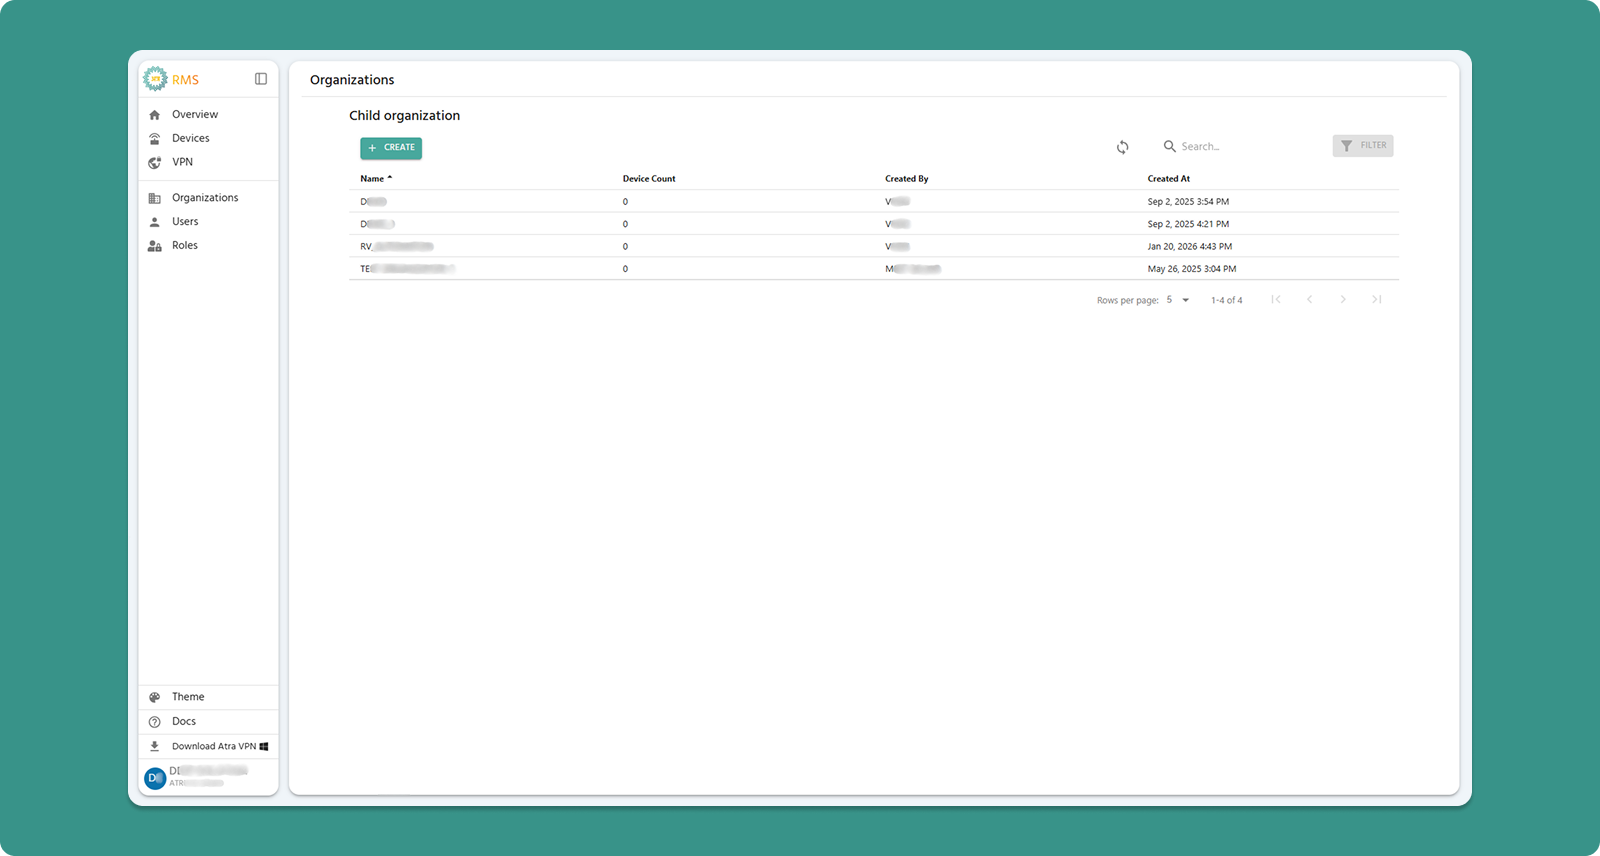
View and Manage Child-Organizations
The main Organizations interface displays all child organizations under your management.
Interface Actions

|
Action |
Location |
Purpose |
|
+CREATE Button |
Top-left (Teal) |
Add new child organization |
|
Refresh Button |
Top-right |
Manually update organization list |
|
Search Bar |
Center |
Filter by organization name or creator |
|
Filter |
Top-right |
Currently not available |
Table Columns
|
Column |
Description |
Example |
|
Name |
Child organization identifier |
AMC, MMC, etc. |
|
Device Count |
Total devices registered to that organization |
25 |
|
Created By |
Username who created the organization |
Demo User |
|
Created At |
Date and time of creation |
Dec 15, 2025, 10:30 AM |

Table Navigation

|
Control |
Purpose |
Options |
|
Rows per page |
Adjust visible organizations |
5, 10, 15, 20,25 |
|
Total Count |
Display total child organizations |
"Showing 1-5 of 25" |
|
Page Navigation |
Move between pages |
Previous, Next, Last, First |
Child Organization Creation Guide
Follow these steps to create a new child organization under your current organization.
Step 1: Navigate to Creation Form
-
Click "Organizations" in left sidebar menu
-
Click "+CREATE" button (Teal, top-left corner)
-
"Create New Organization" page loads
Step 2: Complete Organization Form
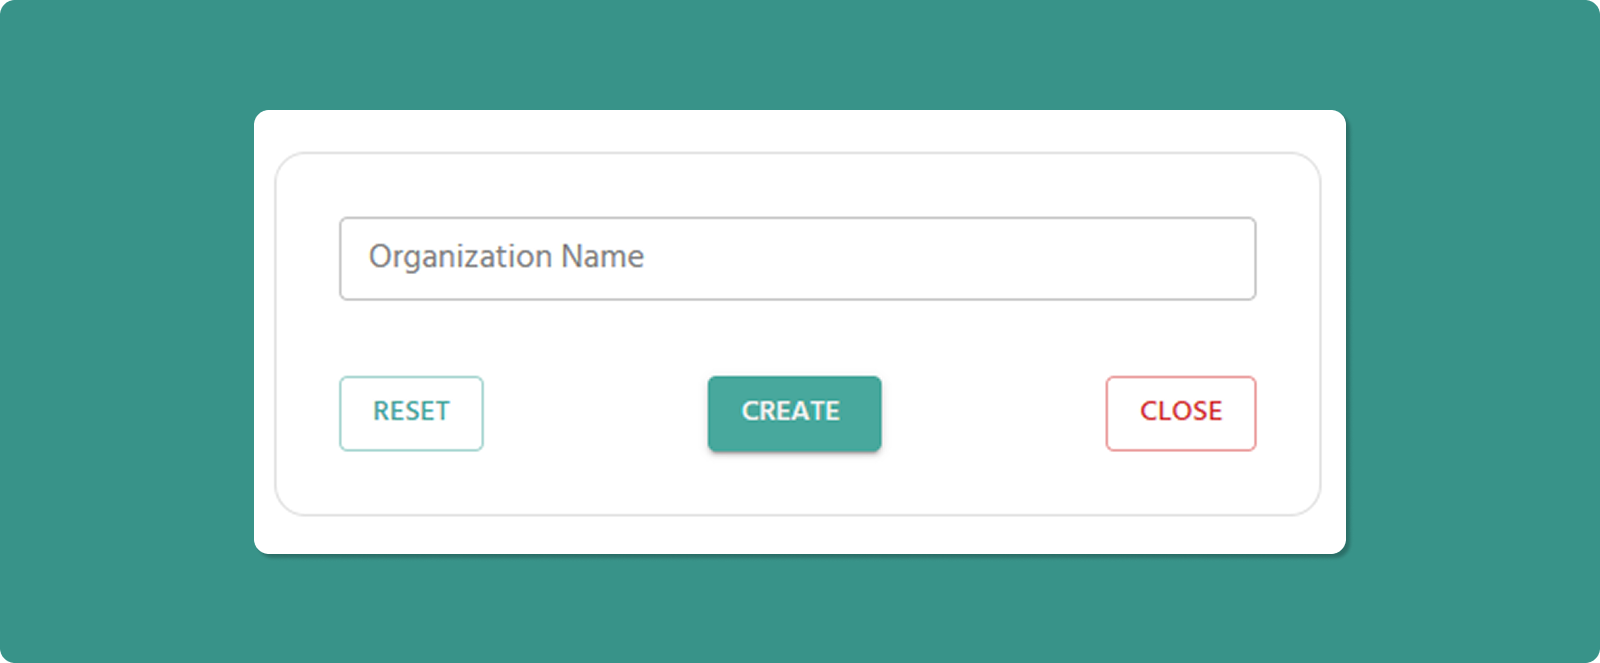
Organization Name (Required)
Input Rules:
-
Length: 3-40 characters
-
Allowed: Letters, numbers, spaces, periods (.), underscores (_), hyphens (-)
-
Not allowed at start/end: Period (.), underscore (_), hyphen (-)
-
No consecutive special characters: Avoid org..name or org--name
Examples:
-
✅ Atreyo Research and Development LLP
-
✅ Reliance Industries
-
✅ Google Cloud Platform
-
✅ Mumbai_Branch_Office
-
❌ _Organization (starts with underscore)
-
❌ Org..Name (consecutive periods)
-
❌ Department- (ends with hyphen)
💡 Naming Best Practices:
-
Use clear, descriptive names reflecting business structure
-
Consider geographic location: "Mumbai_Office", "Delhi_Warehouse"
-
Consider function: "R&D_Lab", "Production_Floor_A", "Sales_Team_North"
-
Maintain consistent naming convention across all organizations
Step 3: Submit Form
Important Notes
Automatic Parent Assignment:
⚠️ The new organization you create will automatically become a child of your current organization (the one the logged-in user belongs to).
Example:
-
You belong to: "ATREYO" (Level 1)
-
You create: "AMC"
-
Result: "AMC" becomes Level 2 child under "ATREYO"
Cannot Choose Parent:
-
You cannot select a different parent organization
-
New organization always created under your current organization
-
To create under different parent, switch to that organization first
After Creation
Immediate Effects:
-
New organization appears in Child Organizations list
-
Organization is assigned Level = (Your Level + 1)
-
You can now:
-
Register devices to this organization
-
Create roles specific to this organization
-
Invite users to this organization
-
Create further child organizations under it (Level 3)
Next Steps:
-
Create Roles: Define permissions specific to this organization
-
Invite Users: Add team members to the new organization
-
Register Devices: Assign devices to the organization
User Management
The Users section enables complete user lifecycle management: inviting new users, assigning roles, editing user information, and managing access to Atra RMS.
Key Capabilities:
- Invite new users to join Atra RMS
- Assign users to specific organizations
- Define user permissions through roles
- Edit user names and roles
- Remove users from the system
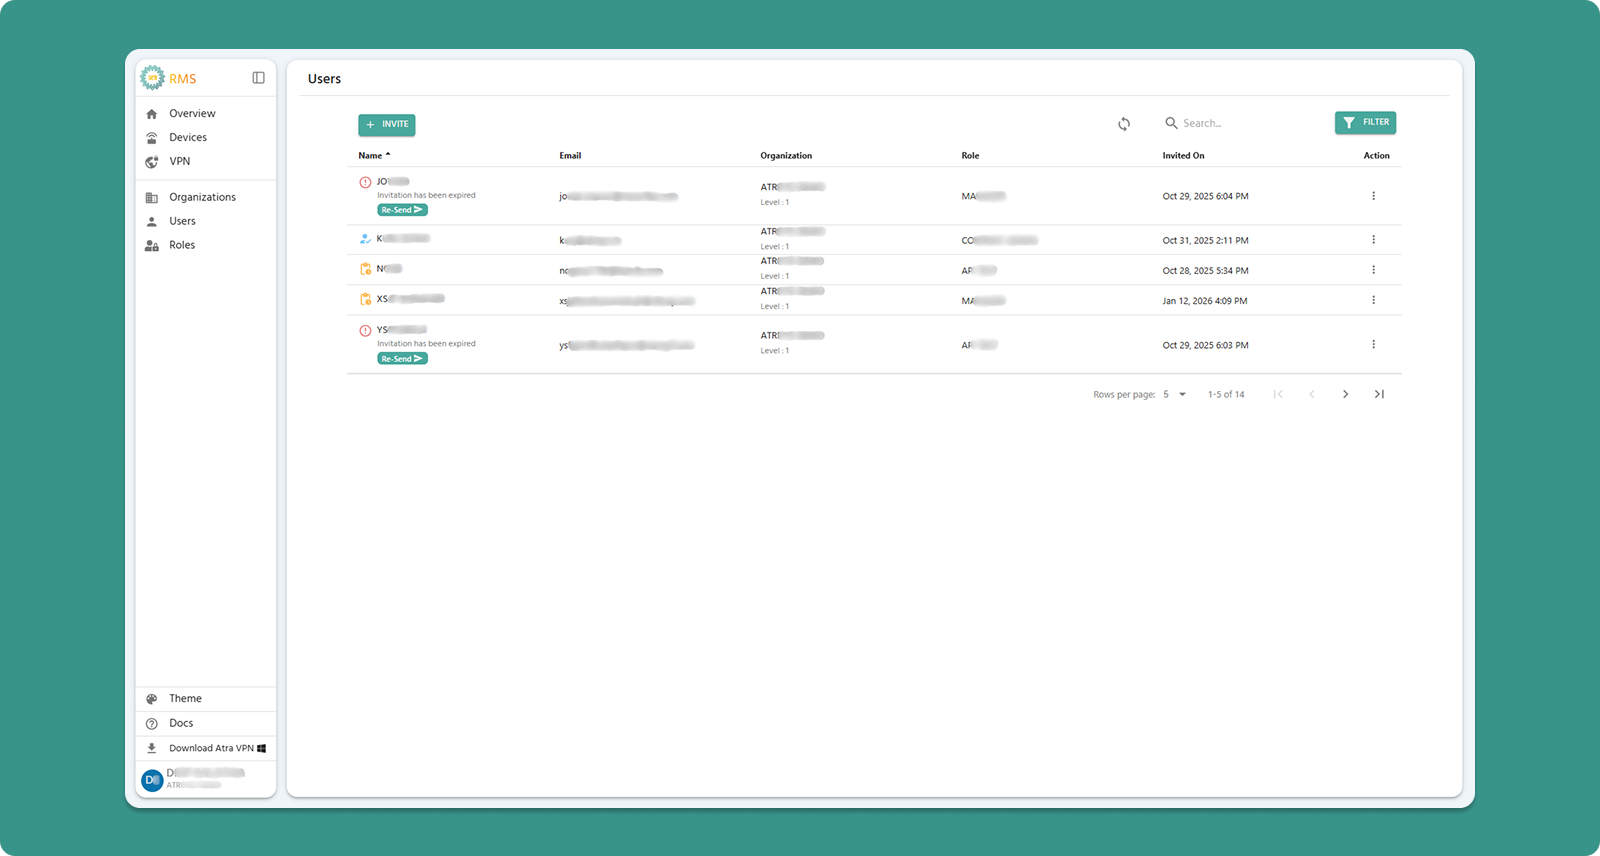
View and Manage Users
The main Users interface provides a comprehensive view of all users in your organization and immediate child organizations.
Interface Actions

|
Action |
Location |
Purpose |
|
+INVITE Button |
Top-left (Teal) |
Invite new user to Atra RMS |
|
Refresh Button |
Top-right |
Manually update user list |
|
Search Bar |
Center |
Filter by name, email, organization, or role |
|
Filter |
Top-right |
Filter users by invitation status, role, and organization |
Table Columns
|
Column |
Description |
Example |
|
Name |
User's name with status icon |
👤 Jane Doe, ⏳ John Smith, ⚠️ Mike Johnson |
|
|
User's login email address |
jane.doe@company.com |
|
Organization |
Org name with level |
ATREYO Level-1 |
|
Role |
Assigned permission set |
COMPANY ADMIN, MANAGER |
|
Created On |
Invitation date/time |
Dec 20, 2025, 3:45 PM |
Scope: Data includes users from your current organization and all immediate child organizations.
Name Column with Status Icons
The Name column displays user status through visual icons alongside the user's name.
Icon Types and Meanings
Icon 1: Account Active (✓ User Icon - Blue)
Appearance:
-
Blue user icon (👤)
-
User name displayed normally
-
No additional text below name
Meaning:
-
User successfully created their account
-
Account setup completed
-
User can log in to Atra RMS
Icon 2: Account Creation Pending (⏳ Clock Icon - Yellow)
Appearance:
-
Yellow clock icon (⏳)
-
User name displayed normally
-
No additional text below name
Meaning:
-
User has been invited
-
Invitation email sent successfully
-
User has NOT yet completed account setup
-
Invitation link still valid (within 24 hours)
What Happens Next:
-
User receives invitation email
-
User clicks "Set Up Password" link
-
User creates password
-
Icon changes to ✓ (Account Active)
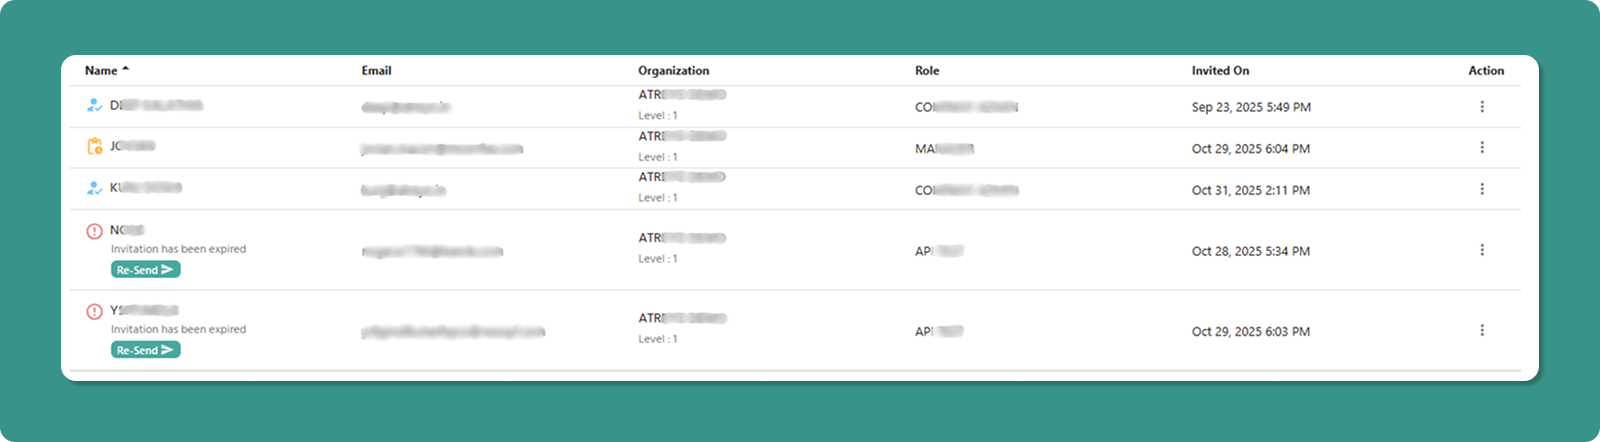
Icon 3: Invitation Expired (⚠️ Warning Icon - Red)
Appearance:
-
Red warning icon (⚠️)
-
User name displayed
-
Text below name: "Invitation has been expired"
-
Re-Send button below caption (teal button with arrow →)
Meaning:
-
User was invited but did not complete setup
-
24-hour invitation validity period has expired
-
User cannot use old invitation link
-
Administrator/User must resend invitation
Re-Send Button Functionality

When invitation expires, a Re-Send button appears below the user's name.
-
Label: "Re-Send →" (with arrow symbol)
-
Colour: Teal
-
Location: Directly below "Invitation has been expired" text
-
Purpose: Send new invitation email to user
How to Resend Invitation
Steps:
-
Locate Expired User
-
Find user with ⚠️ warning icon
-
Look for "Invitation has been expired" text
-
Click Re-Send Button
-
Click the "Re-Send →" button below user name
-
System Processing
-
New invitation email sent to user's email address
-
New 24-hour validity period starts
-
User status updates in table
-
Visual Update
-
Icon changes from ⚠️ (expired) to ⏳ (pending)
-
"Invitation has been expired" text disappears
-
Re-Send button disappears
-
User now shows as "invited, pending account setup"

What Happens After Resending
User Receives:
-
New invitation email with fresh link
-
Subject: "Invitation to Join Atra RMS"
-
New 24-hour validity period
Old Invitation Link:
-
Previous invitation link becomes invalid
-
User cannot use old link even if they still have the email
-
Only new link will work
User Must:
-
Check email for new invitation
-
Click "Set Up Password" button in new email
-
Complete account setup within 24 hours
-
Create password and activate account
If User Completes Setup:
-
Icon changes to ✓ (Account Active)
-
User can now log in
-
Invitation system complete
Individual User Actions
Each user row has an Action button (three vertical dots ⋮) that opens a menu with management options.

|
Action |
Purpose |
Permission Required |
|
Edit Name |
Modify user's display name |
Users Update |
|
Change Role |
Assign different role |
Users Update |
|
Delete User |
Permanently remove user |
Users Delete |
Action: Edit Name
Modify a user's display name (does not affect email/login).

Steps:
Input Rules:
-
Length: 3-40 characters
-
Allowed: Letters, numbers, spaces, periods (.), underscores (_), hyphens (-)
-
Not allowed at start/end: Period, underscore, hyphen
-
No consecutive special characters
Examples:
-
✅ Jane Doe
-
✅ Product-Manager
-
✅ User_123
-
❌ _Jane (starts with underscore)
-
❌ User..Name (consecutive periods)
Action: Change Role
Assign a different role to modify user's permissions.

Steps:
Available Roles:
-
Displays all roles created for the user's organization
-
Examples: ADMIN, MANAGER, VIEWER, custom roles
Effect:
-
User's permissions immediately update
-
User may need to refresh browser to see new capabilities
-
Previous role's permissions are revoked
⚠️ Caution: Changing a user's role affects their access to devices, VPN, and other resources. Verify the new role has appropriate permissions before saving.
Action: Delete User
Permanently remove a user account from Atra RMS.

Steps:
⚠️ Critical Warnings:
Deletion is Permanent:
-
User account is immediately deleted
-
User cannot log in after deletion
-
Action cannot be undone
-
User must be re-invited to regain access
VPN Tunnel Restriction:
-
Cannot delete users currently in any VPN tunnel
-
Must first remove user from all VPN tunnels
-
Then deletion will be allowed
Audit Trail Preserved:
-
User's name remains in "Created By" and "Registered By" fields
Self-Management Prevention:
-
Logged-in user cannot delete their own account
-
Logged-in user cannot change their own role
-
Prevents accidental self-lockout

|
Control |
Purpose |
Options |
|
Rows per page |
Adjust visible users |
5, 10, 15, 20,25 |
|
Total Count |
Display total users |
"Showing 1-5 of 25" |
|
Page Navigation |
Move between pages |
Previous, Next, Last, First |
User Invite Guide
Invite new users to join your Atra RMS organization through a secure email invitation process.
Step 1: Navigate to Invite Form
-
Click "Users" in left sidebar menu
-
Click "+INVITE" button (Teal, top-left corner)
-
"Invite New User" page loads
Step 2: Complete Invitation Form

[INSERT SCREENSHOT: User_Invite_Form.png]
Fill out all required fields:
1. Name (Required)
User's full name (can be edited later).
Input Rules:
-
Length: 3-40 characters
-
Allowed: Letters, numbers, spaces, periods (.), underscores (_), hyphens (-)
-
Not allowed at start/end: Period, underscore, hyphen
-
No consecutive special characters
Examples:
-
✅ Jane Doe
-
✅ Rajesh Kumar
-
✅ Product-Manager
-
✅ User_123
2. Email (Required)
User's email address (used for login and communication).
Input Rules:
-
Must be valid email format
-
Must include @ symbol and domain
-
Case-insensitive
Examples:
-
✅ user@company.com
-
✅ jane.doe@organization.co.in
-
✅ admin@example.org
-
❌ usercompany.com (missing @)
-
❌ user@ (incomplete domain)
⚠️ Email Uniqueness:
-
Email must be unique across entire Atra RMS platform
-
Cannot invite user with email already in system
-
If email exists, system shows error: "Email already registered"
3. Organization (Required)
Select the organization this user will belong to.

[INSERT SCREENSHOT: Organization_Dropdown_Invite.png]
Dropdown Options:
-
Your current organization
-
All child organizations under your management
Organization Impact:
-
User's access scope limited to assigned organization
-
User inherits organizational hierarchy visibility based on role
-
User can only manage resources within their organization
4. Role (Required)
Select the role that defines user's permissions.
Important: Role dropdown only activates after organization is selected.
Why?
-
Roles are organization-specific
-
Different organizations may have different available roles
-
System must know organization to display correct role options
Available Roles:
-
All roles created for the selected organization
-
Examples: ADMIN, MANAGER, VIEWER
Step 3: Submit Invitation
Step 4: Invitation Email Sent
After clicking INVITE:
-
System generates secure invitation token
-
Email sent to provided address containing:
-
Invitation message
-
"Set Up Password" button/link
-
User appears in Users List with "Invited" Yellow clock icon (⏳)
-
You are redirected back to Users List
Email Delivery Time: Usually instant, but may take up to 5 minutes.
⚠️ If User Doesn't Receive Email:
-
Check spam/junk folder
-
Verify email address was entered correctly
-
Wait 10 minutes, then resend the invitation. To do this, delete the user and re-invite them via the "Invite User" form. Only perform this process if the user needs an account but the email address was entered incorrectly, or if they haven’t received the email within 10 minutes.
Controlling Access with Roles
Roles define what actions users can perform in Atra RMS. Each role is a set of permissions that controls access to Devices, Users, Organizations, VPN, and Roles features.
Key Benefits:
- Security through least-privilege access
- Easy permission management
- Organization-specific customization
View Roles
View all roles in your organization and child organizations.
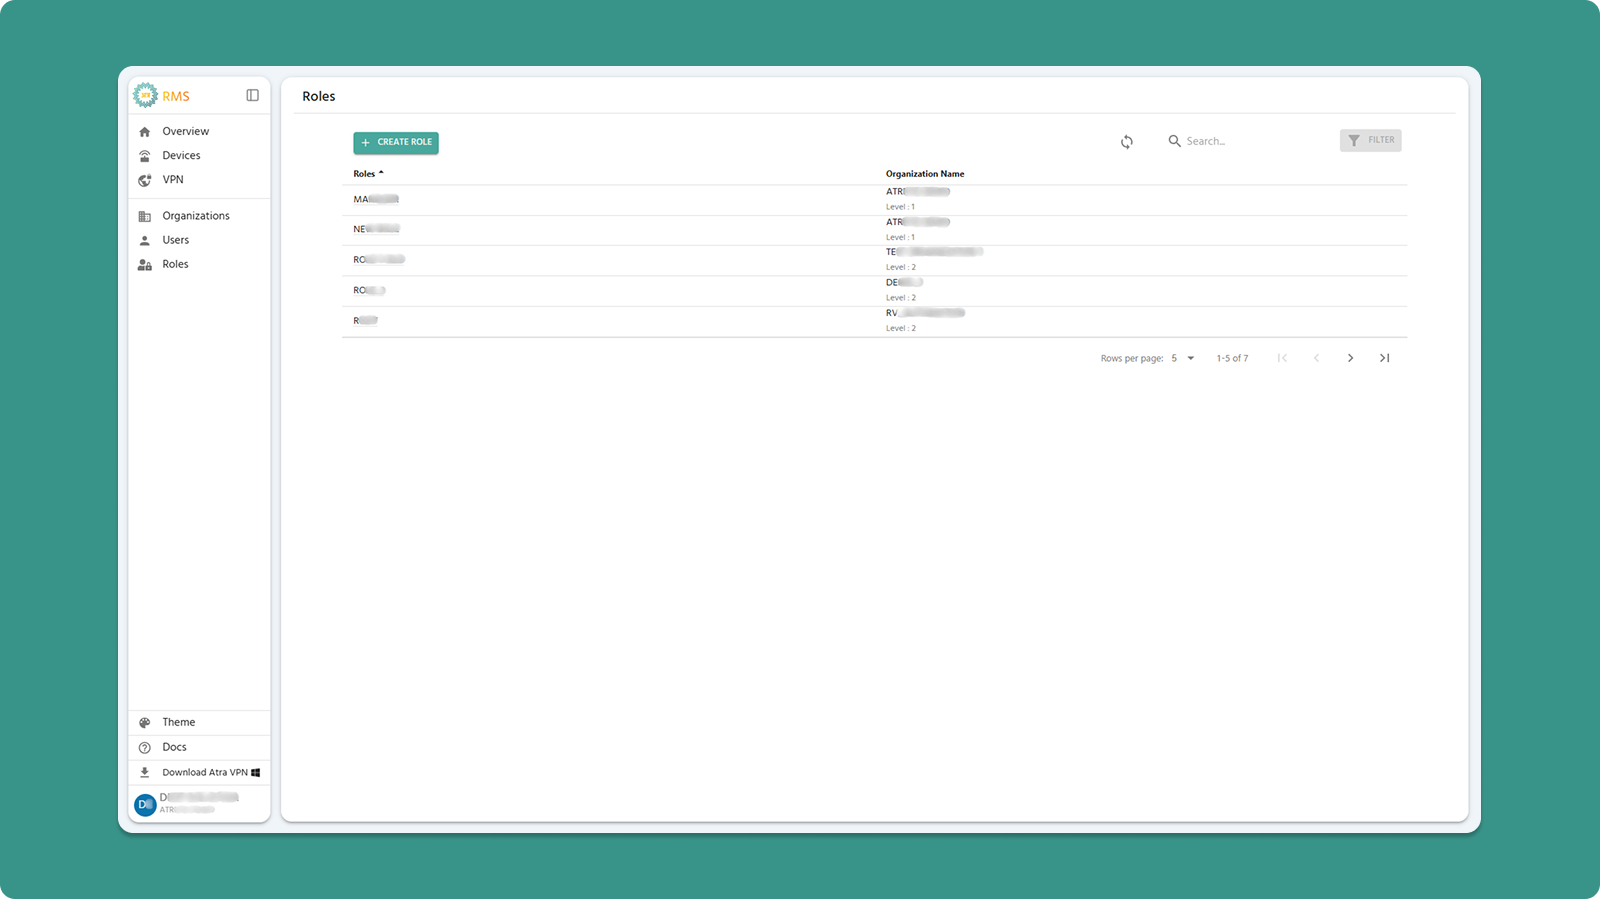
Actions:
-
+CREATE ROLE (Teal button) - Create new role
-
Search Bar - Filter by role name or organization
-
Refresh - Update list
Table Columns:
-
Roles - Role name (click to view details)
-
Organization Name - Where role exists
Role Creation Guide
Quick Steps
-
Click +CREATE ROLE button
-
Enter Role Name (3-50 characters, letters/numbers/spaces/-/_)
-
Select Organization
-
Check permissions for each section
-
Click CREATE
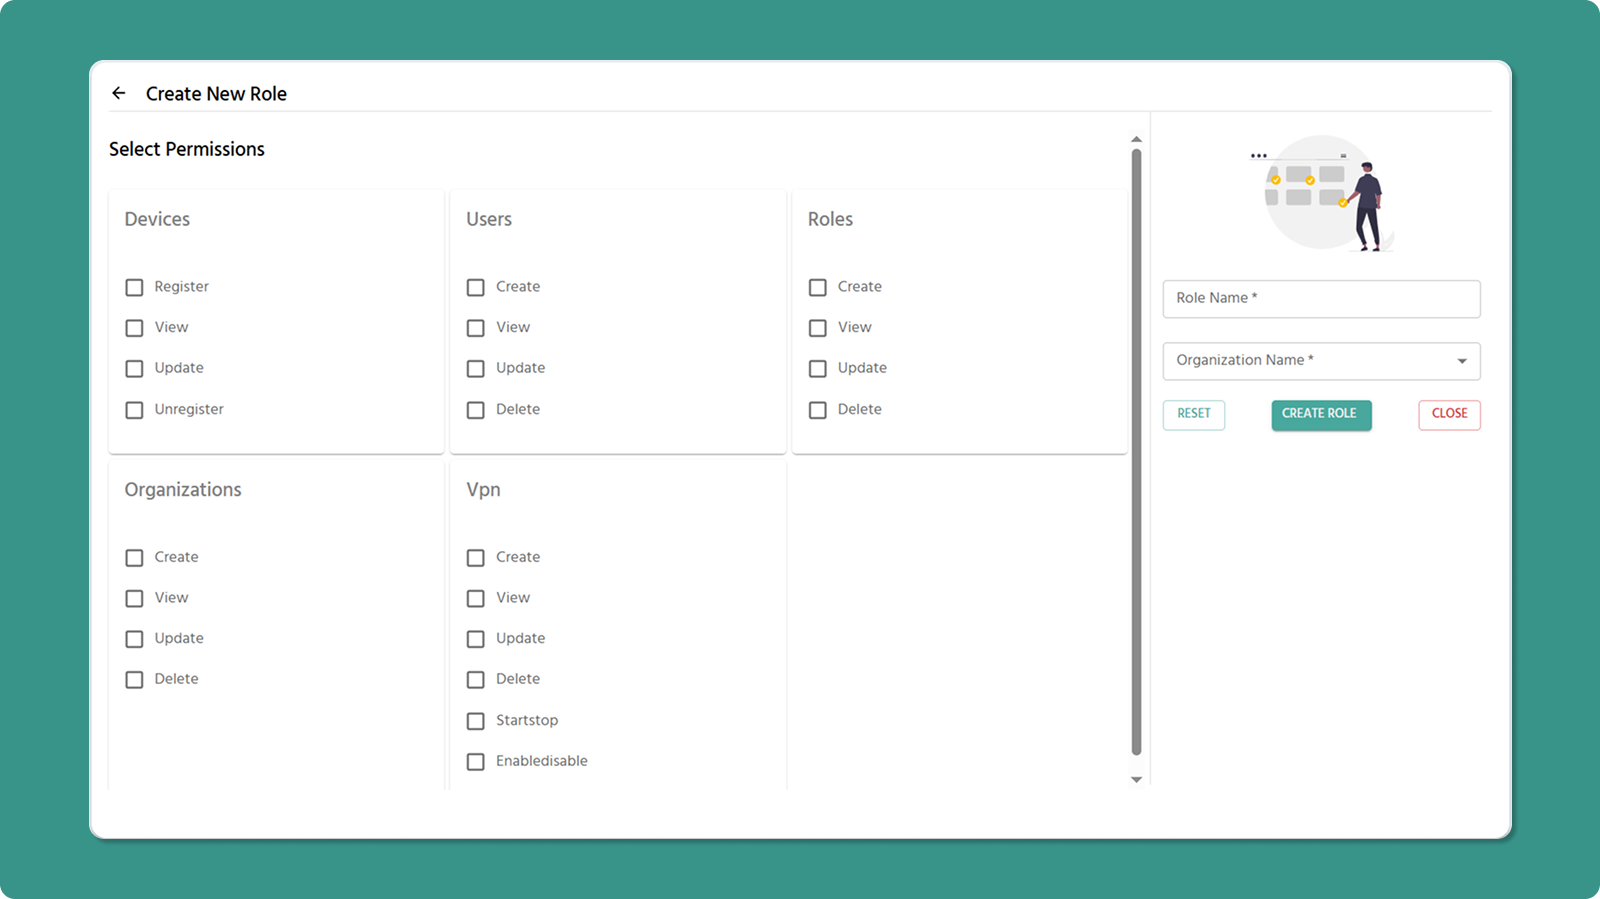
Role Name Rules
✅ Valid: Company Admin, Device_Manager, Field-Technician
❌ Invalid: _Admin (starts with _), Role- (ends with -), Admin__Role (consecutive __)
Permissions by Section
1. Devices
-
Register - Add new devices
-
View - See device list and details
-
Edit - Modify device info
-
Unregister - Remove devices
2. Users
-
Create - Invite new users
-
View - See user list
-
Edit - Change names/roles
-
Delete - Remove users
3. Roles
-
Create - Define new roles
-
View - See role list
-
Edit - Modify permissions and name
-
Delete - Remove roles
4. Organizations
-
Create - Add child organizations
-
View - See organization list
-
Edit - Change names
-
Delete - Remove organizations
5. VPN
-
Create - Make VPN tunnels
-
View - See VPN list
-
Edit - Change tunnel names
-
Delete - Remove tunnels, and remove devices and users from tunnel
-
Start/Stop - Control VPN process
-
Enable/Disable - Manage tunnel status
Permission Rules
⚠️ View Dependency
Must check View permission when checking any other permission in that section.
✅ Valid: Devices View + Register
❌ Invalid: Devices Register only (system auto check View)
⚠️ VPN Dependency
Must check Devices View when checking any VPN permission.
✅ Valid: VPN View + Devices View
❌ Invalid: VPN View only (system auto check Devices View)
Common Role Templates
System Administrator
✓ All permissions in all sections
Device Manager
✓ Devices: Register, View, Edit
✓ Users: View
✓ Organizations: View
Field Technician
✓ Devices: Register, View
Network Administrator
✓ Devices: View
✓ VPN: All permissions
Read-Only Viewer
✓ All sections: View only
Understanding Role Permissions
Click any role name in the list to open the Role Detail Page.
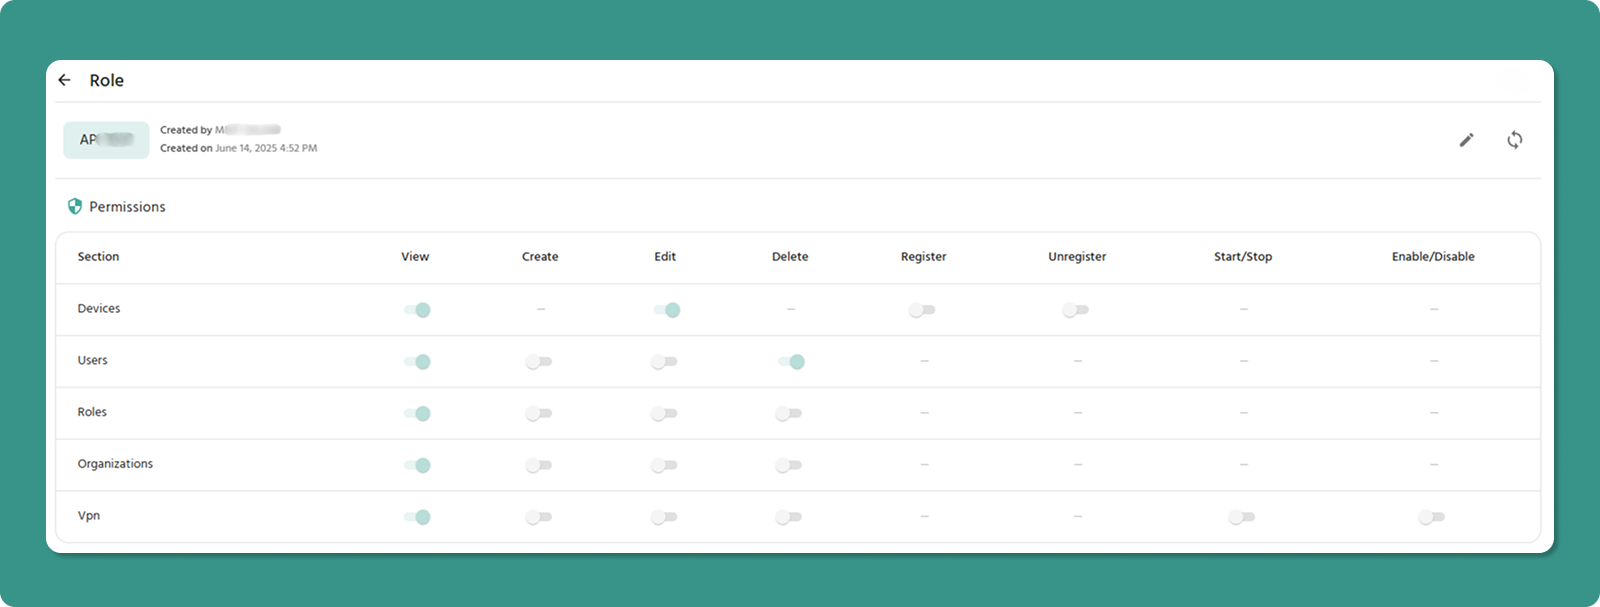
Role Detail Page Shows:
-
Role name and metadata (Created By, Created On)
-
Permissions table with all sections
-
Edit button (✏️) to modify role
-
Refresh button (🔄) to update data
Permissions Table
Displays all permissions in table format with toggle switches.
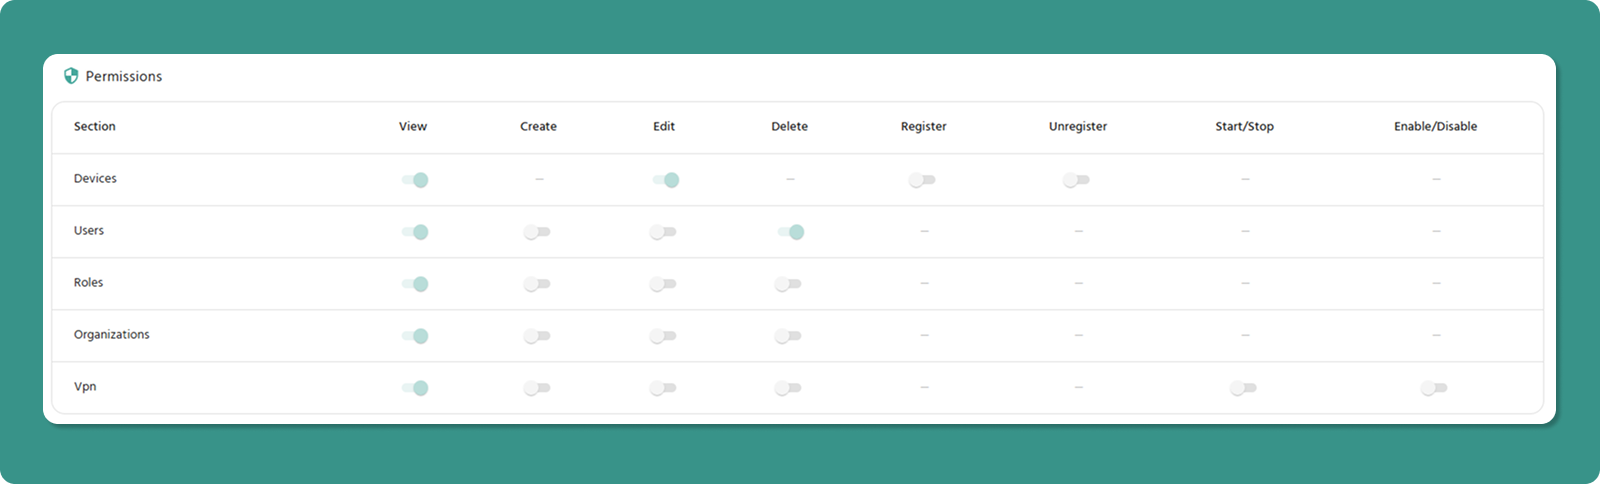
Columns: Section | View | Create | Edit | Delete | Register | Unregister | Start/Stop | Enable/Disable
Toggle States:
-
ON (Teal/Green, right position) - Permission granted
-
OFF (Gray, left position) - Permission not granted
Section-Specific Columns:
-
Register/Unregister - Devices only
-
Start/Stop, Enable/Disable - VPN only
-
Dashes (-) - Not applicable
Editing a Role
Entering Edit Mode
-
Open Role Detail Page (click role name)
-
Click Edit button (✏️) in header
-
Page becomes editable
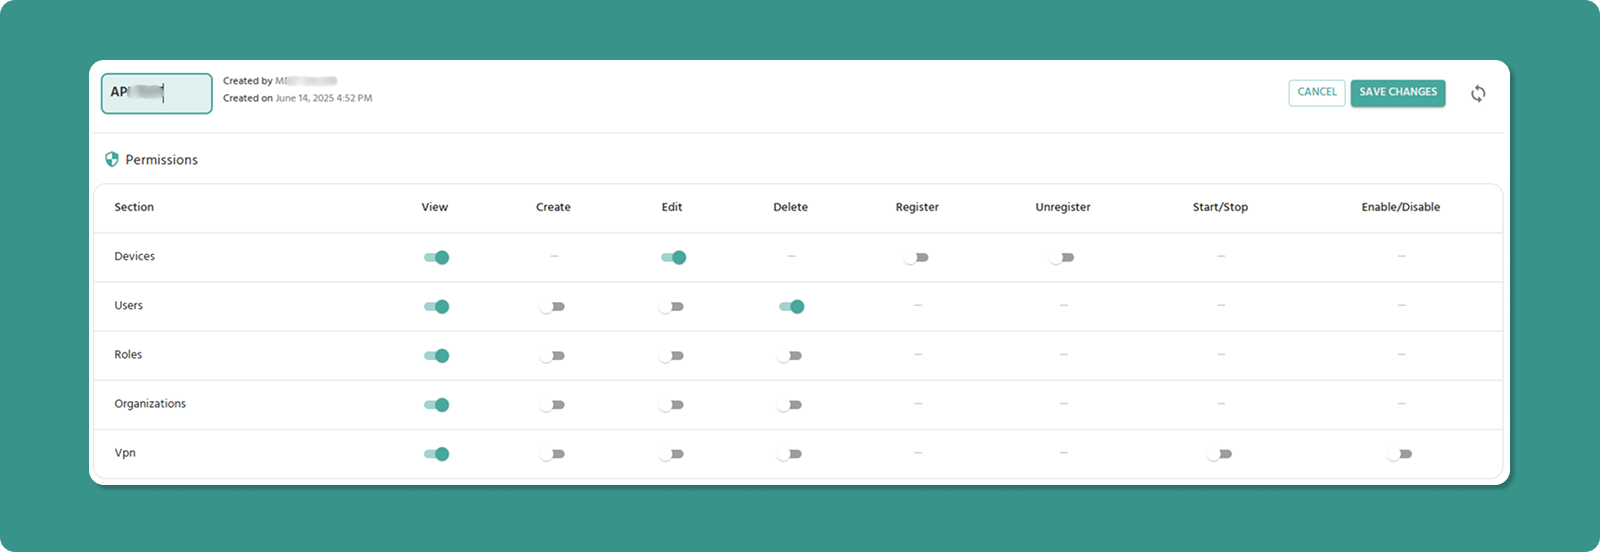
What Changes in Edit Mode
Role Name: Becomes text input field (editable)
Toggle Switches: Become active (clickable)
Buttons: SAVE CHANGES and CANCEL appear
Modifying Permissions
To Grant Permission:
-
Click toggle switch (currently OFF/gray)
-
Switch moves right, turns teal/green
-
Permission granted when saved
To Revoke Permission:
-
Click toggle switch (currently ON/teal)
-
Switch moves left, turns gray
-
Permission revoked when saved
Dependency Enforcement
System automatically maintains dependencies:
View Dependency:
-
Turning ON any permission → Auto-enables View
-
Turning OFF View → Auto-disables other permissions in that section
VPN Dependency:
-
Turning ON any VPN permission → Auto-enables Devices View
-
Turning OFF Devices View → Auto-disables all VPN permissions
Saving Changes
-
Review all modifications
-
Click SAVE CHANGES button (teal)
-
Changes apply immediately to all users with this role
To Discard Changes: Click CANCEL button (red)
Important Notes
Company Admin Role
⚠️ Cannot be edited - System-protected role with full access. Edit button is hidden.
Need custom admin? Create a new role with desired permissions.
Permission Changes
✅ Take effect immediately after saving
⚠️ Users may need to refresh browser to see changes
💡 Best practice: Notify users before major permission changes
Browser Refresh
⚠️ Refreshing browser in Edit Mode loses all unsaved changes
Roles & Permissions FAQs
Quick Troubleshooting
Can't see Edit button?
-
Check you have "Roles Edit" permission
-
Verify not trying to edit Company Admin role
Can't toggle switches?
Changes not saving?
-
Check role name follows rules (3-50 chars)
-
Verify dependencies satisfied
-
Check internet connection
Role not appearing when inviting users?
-
Verify role created in correct organization
-
Refresh page
Permission Matrix
|
Section |
View |
Create |
Edit |
Delete |
Register |
Unregister |
Start/Stop |
Enable/Disable |
|
Devices |
✓ |
- |
✓ |
- |
✓ |
✓ |
- |
- |
|
Users |
✓ |
✓ |
✓ |
✓ |
- |
- |
- |
- |
|
Roles |
✓ |
✓ |
✓ |
✓ |
- |
- |
- |
- |
|
Organizations |
✓ |
✓ |
✓ |
✓ |
- |
- |
- |
- |
|
VPN |
✓ |
✓ |
✓ |
✓ |
- |
- |
✓ |
✓ |
Legend: ✓ = Available | - = Not applicable
Summary
Role Management Workflow:
-
Create role → Define permissions
-
View role details → Check permissions table
-
Edit role → Modify permissions as needed
-
Assign to users → Permissions apply immediately
Key Points:
-
Always enable View when enabling other permissions
-
Enable Devices View when enabling VPN permissions
-
Company Admin role cannot be edited
-
Changes take effect immediately upon saving
-
Test roles before production deployment
Atra VPN Desktop Application
The Atra VPN Client is a secure desktop application that provides users with a fast and reliable way to connect to their organization’s VPN. Unlike apps that only act as a front-end, Atra VPN Client integrates directly with the OpenVPN.exe binaries and drivers, ensuring enterprise-grade security and stability.
With just a few clicks, users can:
- Launch the app and start a VPN tunnel securely.
- Quickly connect to pre-configured VPN servers or tunnels.
- Monitor session details such as IP address, connection duration, and status in real time.
Configuration and management of VPN tunnels (creating, editing, or deleting) are handled by administrators, while end-users can easily connect to available VPN sessions through the app without extra setup.
This approach gives the best of both worlds:
- Simplicity for users (one-click connect experience).
- Visibility into connected devices and session logs.
Key Features
- One-Click Connect: Simple interface for quick tunnel connection
- Real-Time Monitoring: View connection status, IP address, duration
- Auto-Update: Automatic notification and installation of updates
- Theme Support: Light and dark mode options
- Session Management: Remember credentials, auto-login
Installation
System Requirements
Supported Operating Systems:
-
Windows 10 (64-bit) - Build 1809 or later
-
Windows 11 (64-bit)
Hardware Requirements:
-
Processor: Dual-core 2.0 GHz or faster
-
RAM: 4 GB minimum
-
Disk Space: 200 MB
-
Administrator privileges for installation
⚠️ Important: App is currently in BETA. Minor bugs may be encountered. Report issues to support.
Download Process
Step 1: Access Download
-
Log in to Atra RMS (web interface)
-
Navigate to VPN section
-
Locate Download button (top-left corner)
-
Click Download button
Step 2: Locate Installer
-
Installer downloads to your default Downloads folder
-
Filename: AtraVPNClientSetup.exe
-
Locate file in Downloads folder
Step 3: Run Installer
-
Double-click AtraVPNClientSetup.exe
-
Windows SmartScreen warning may appear.
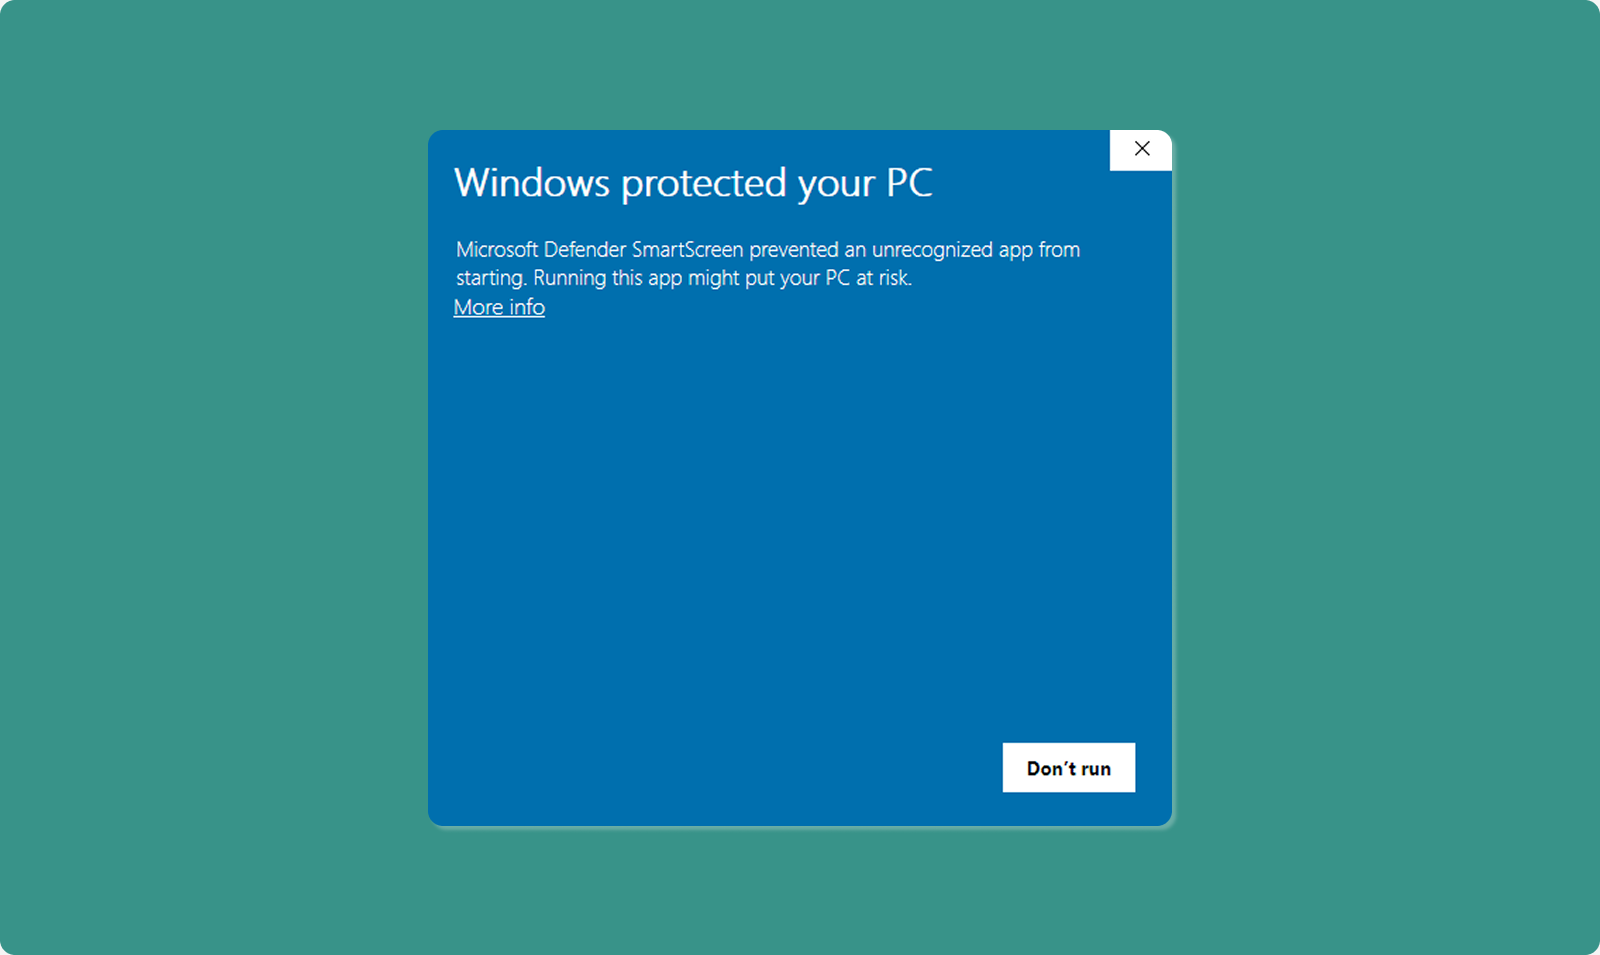
Windows SmartScreen Warning
Why This Appears:
-
Standard Windows security check
-
Appears for BETA apps not yet widely distributed
-
Does NOT indicate malicious software
-
Atra VPN Client is developed and signed by Atreyo,you can safely proceed.
How to Proceed Safely:
-
SmartScreen window appears: "Windows protected your PC"
-
Click "More info" link
-
"Run anyway" button appears
-
Click "Run anyway"
-
Installation proceeds
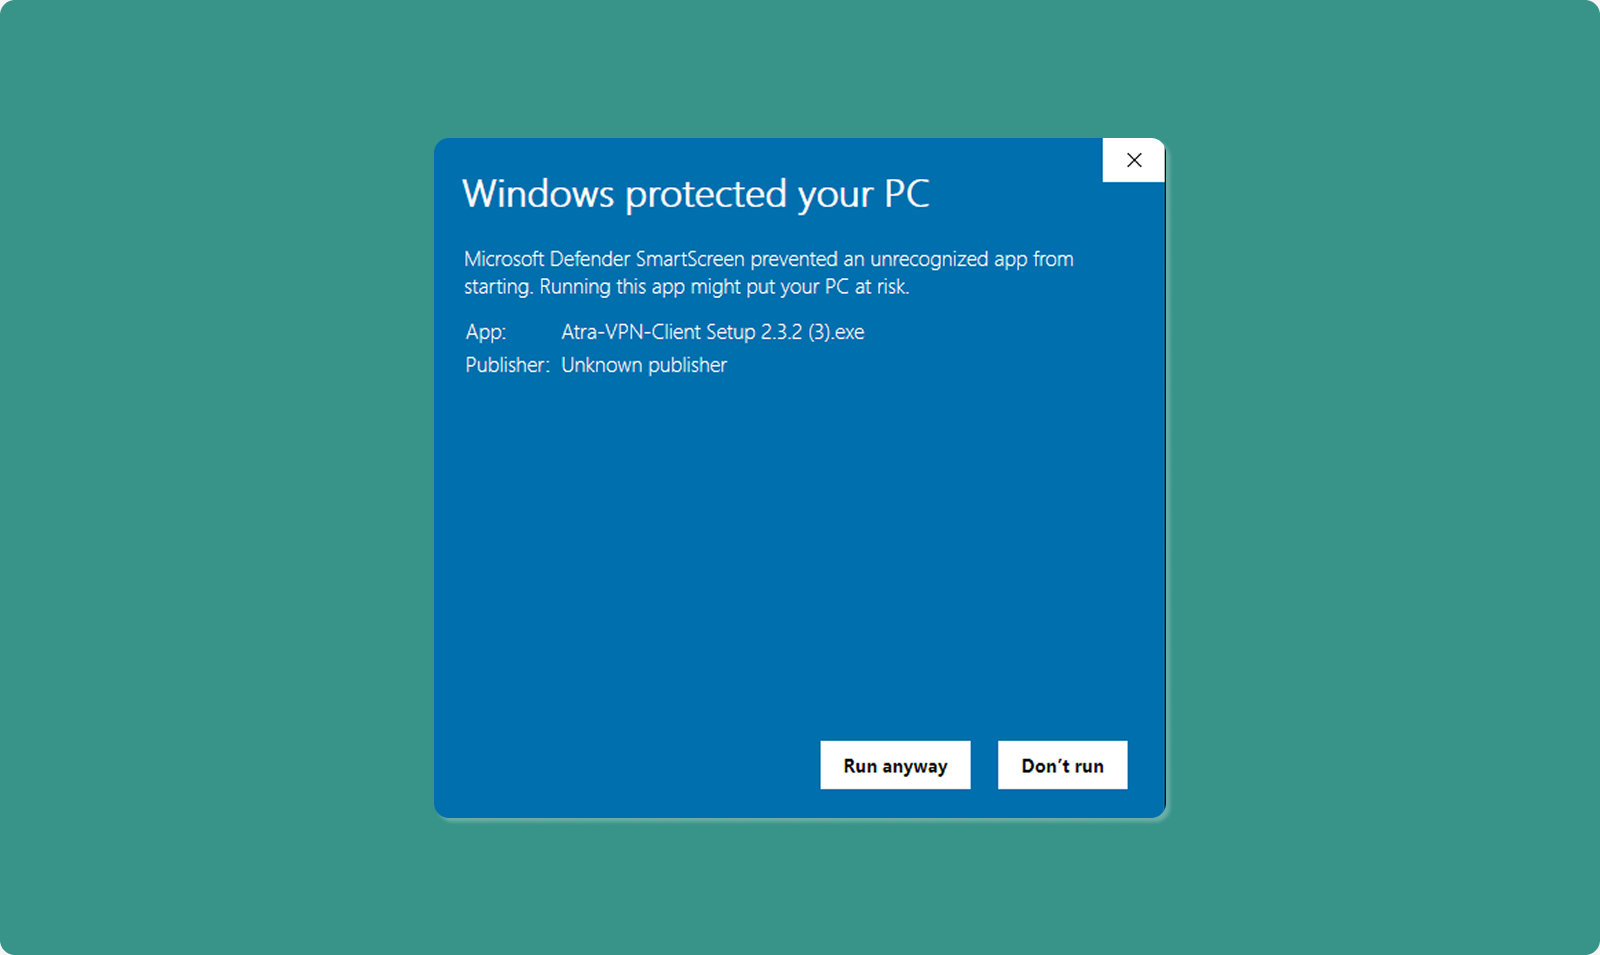
Step 4: Administrator Permission
Windows User Account Control (UAC) prompt appears.
-
Message: "Do you want to allow this app to make changes?"
-
Click "Yes" to grant administrator privileges
-
Installation wizard opens
Why Administrator Rights Needed:
-
Install OpenVPN drivers
-
Create system network interfaces
-
Modify network routing tables
-
Write to Program Files directory
Step 5: Installation Wizard
Follow on-screen installation steps:
-
Welcome Screen: Click "Next"
-
License Agreement: Read and click "I Agree"
-
Installation Location: Use default or choose custom (click "Next")
-
Install: Click "Install" button
-
Progress Bar: Wait for installation (typically 1-2 minutes)
-
Completion: Click "Finish"
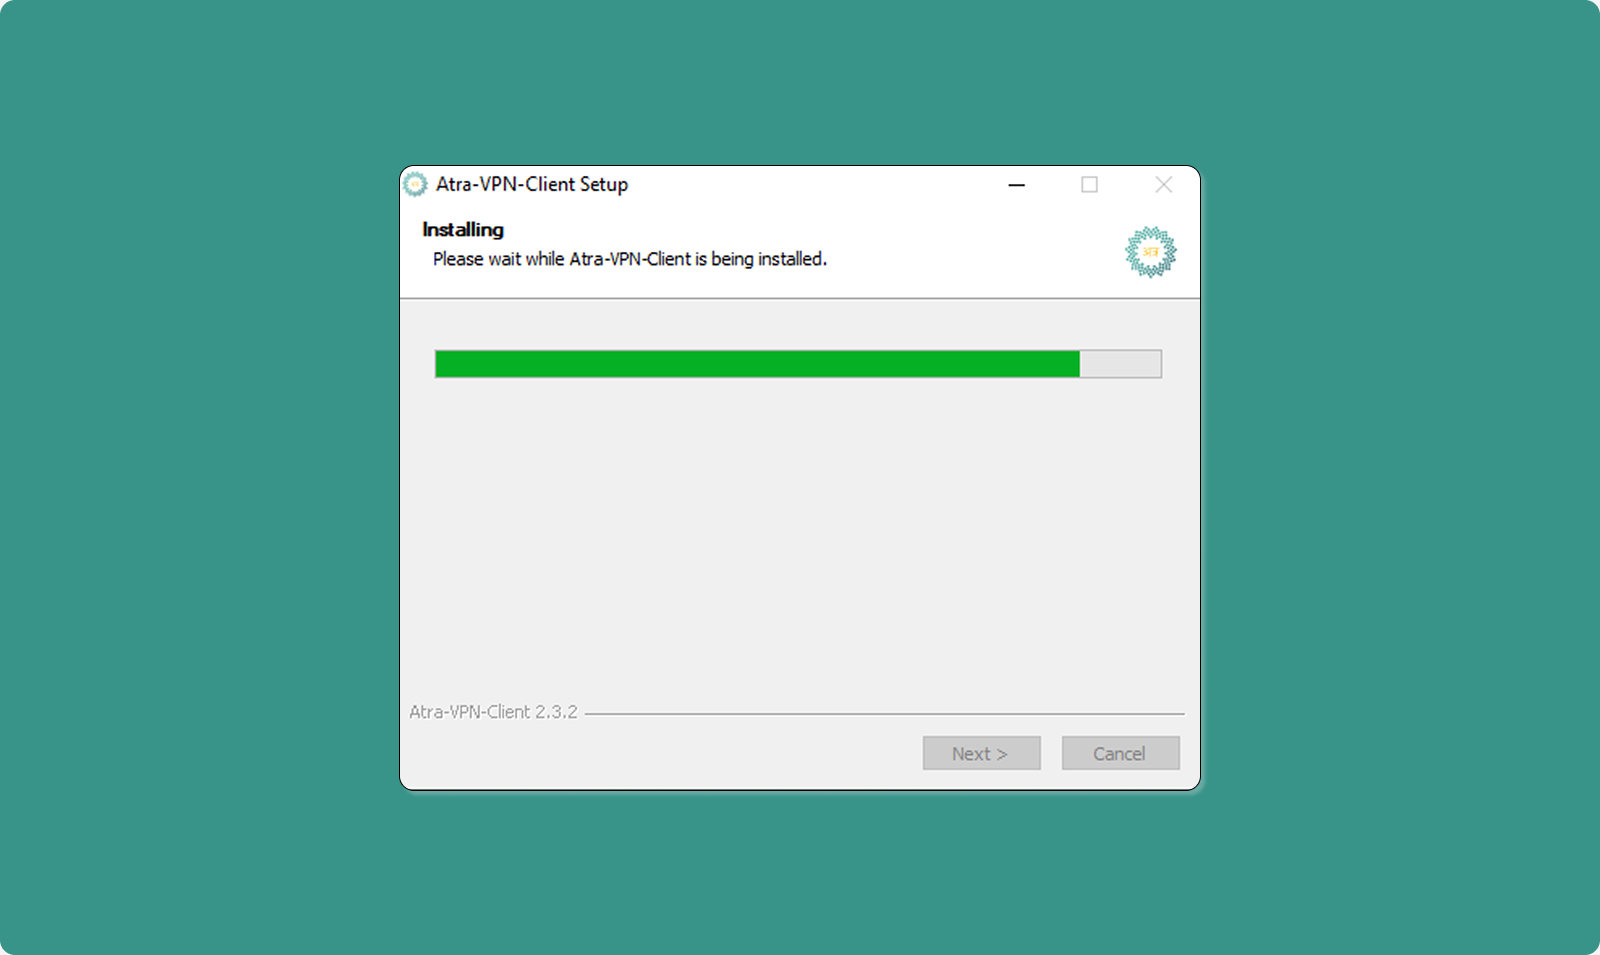
Step 6: Launch Application
After installation completes:
-
Atra VPN Client automatically launches
-
Login page displays
-
Ready for authentication
Desktop Shortcut: Installer creates desktop icon for future launches.
Signing In to the Atra VPN App

First-Time Login
Step 1: Enter Credentials
Use the same credentials as Atra RMS web platform.
Email Field:
-
Enter your registered email address
-
Example: user@company.com
Password Field:
-
Enter your Atra RMS password
Step 2: Click Login
Authentication Success
Upon successful login:
-
Main dashboard displays
-
VPN tunnels list loads
-
Associated organization shown
-
Profile avatar appears (top-right)
Getting Started with the Atra VPN App
Application Dashboard Overview
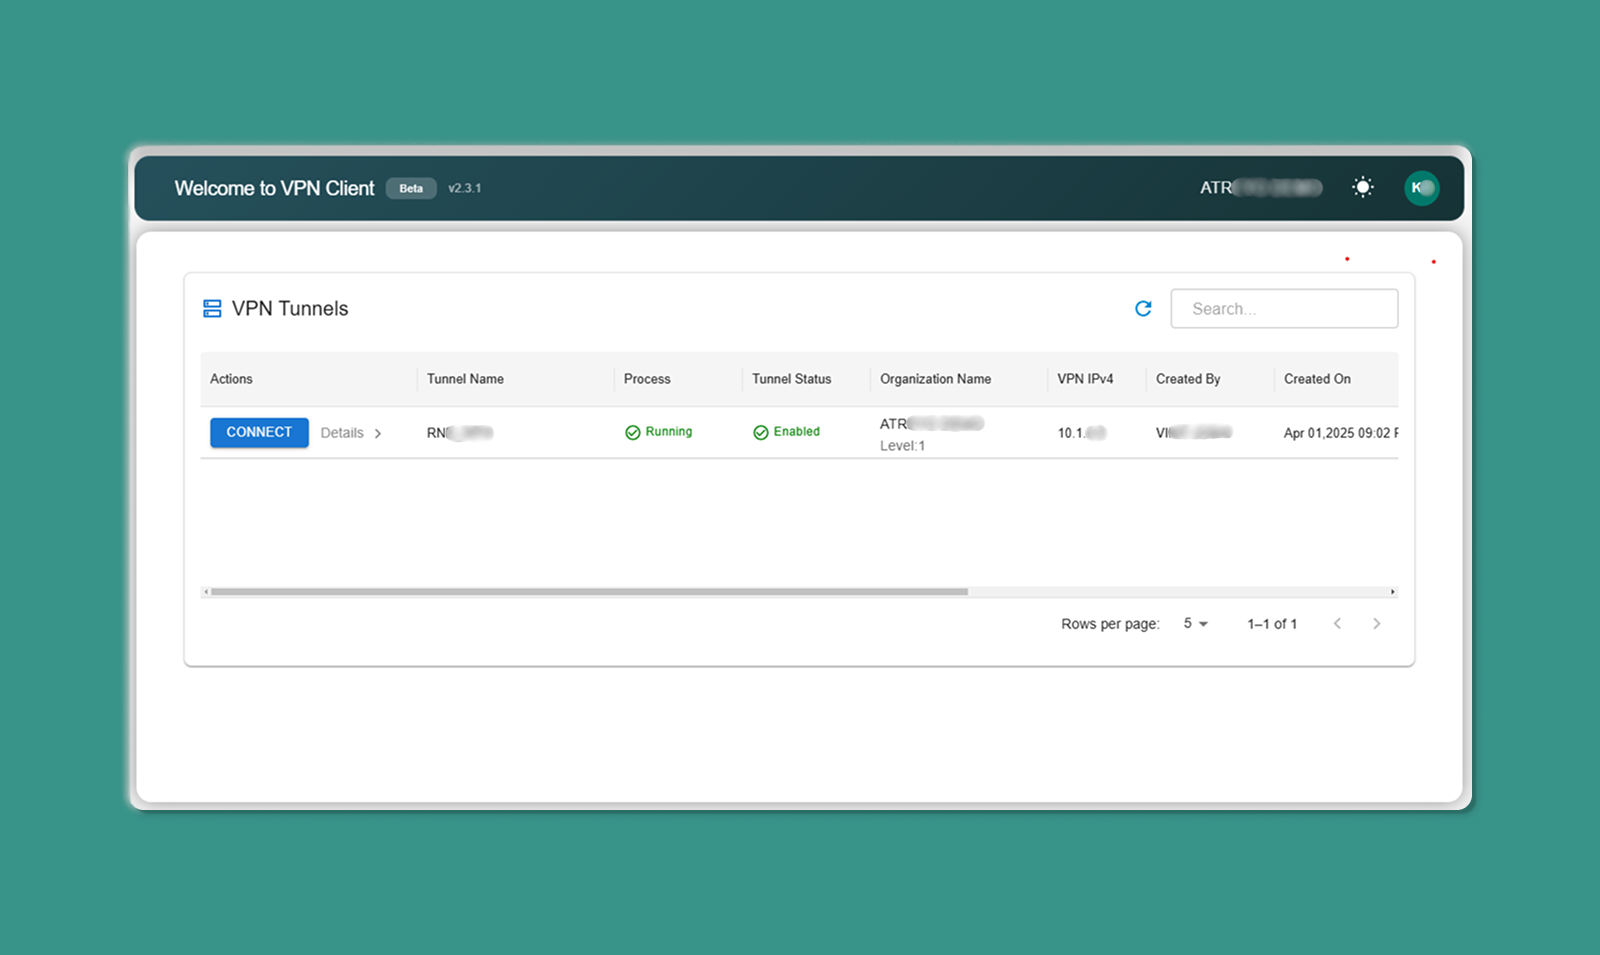
The main dashboard has three sections:
Top Bar:
-
App Version: Current version number (e.g., v1.2.3)
-
Organization Name: Your associated organization
-
Theme Toggle: Switch between light/dark mode
-
Profile Avatar: Access account menu
Middle Section:
- Search Bar: Filter tunnels by name/organization
- Refresh Icon: Manually update tunnel list
- Table Navigation: Rows per page, page controls
Main Area:
-
VPN Tunnels Table: List of available tunnels
Top Bar Elements

1. App Version
Display: Top-left corner
Format: "Atra VPN Client v1.2.3"
Purpose: Shows current installed version
When to Check:
-
Troubleshooting issues
-
Verifying you have latest version
-
Reporting bugs to support
2. Associated Organization
Display: Below app version
Format: "Organization: [Your Org Name]"
Purpose: Confirms which organization's tunnels you see
What This Means:
-
You see tunnels created in your organization
-
You see tunnels your organization has access to
-
Cannot see tunnels from unrelated organizations
3. Theme Toggle
Location: Top-right area
Options: Light Mode | Dark Mode
How to Use:
-
Click theme toggle switch
-
Interface immediately switches themes
-
Preference saved automatically
-
Applied on next launch
Benefits:
-
Light Mode: Better for bright environments
-
Dark Mode: Reduces eye strain in low-light conditions
4. Profile Avatar

Location: Top-right corner
Icon: Circle with user initials or icon
-
Email Address (display only)
-
Organization Name (display only)
-
Logout option (click to sign out)
VPN Tunnels Table
The main table displays all VPN tunnels you have access to.
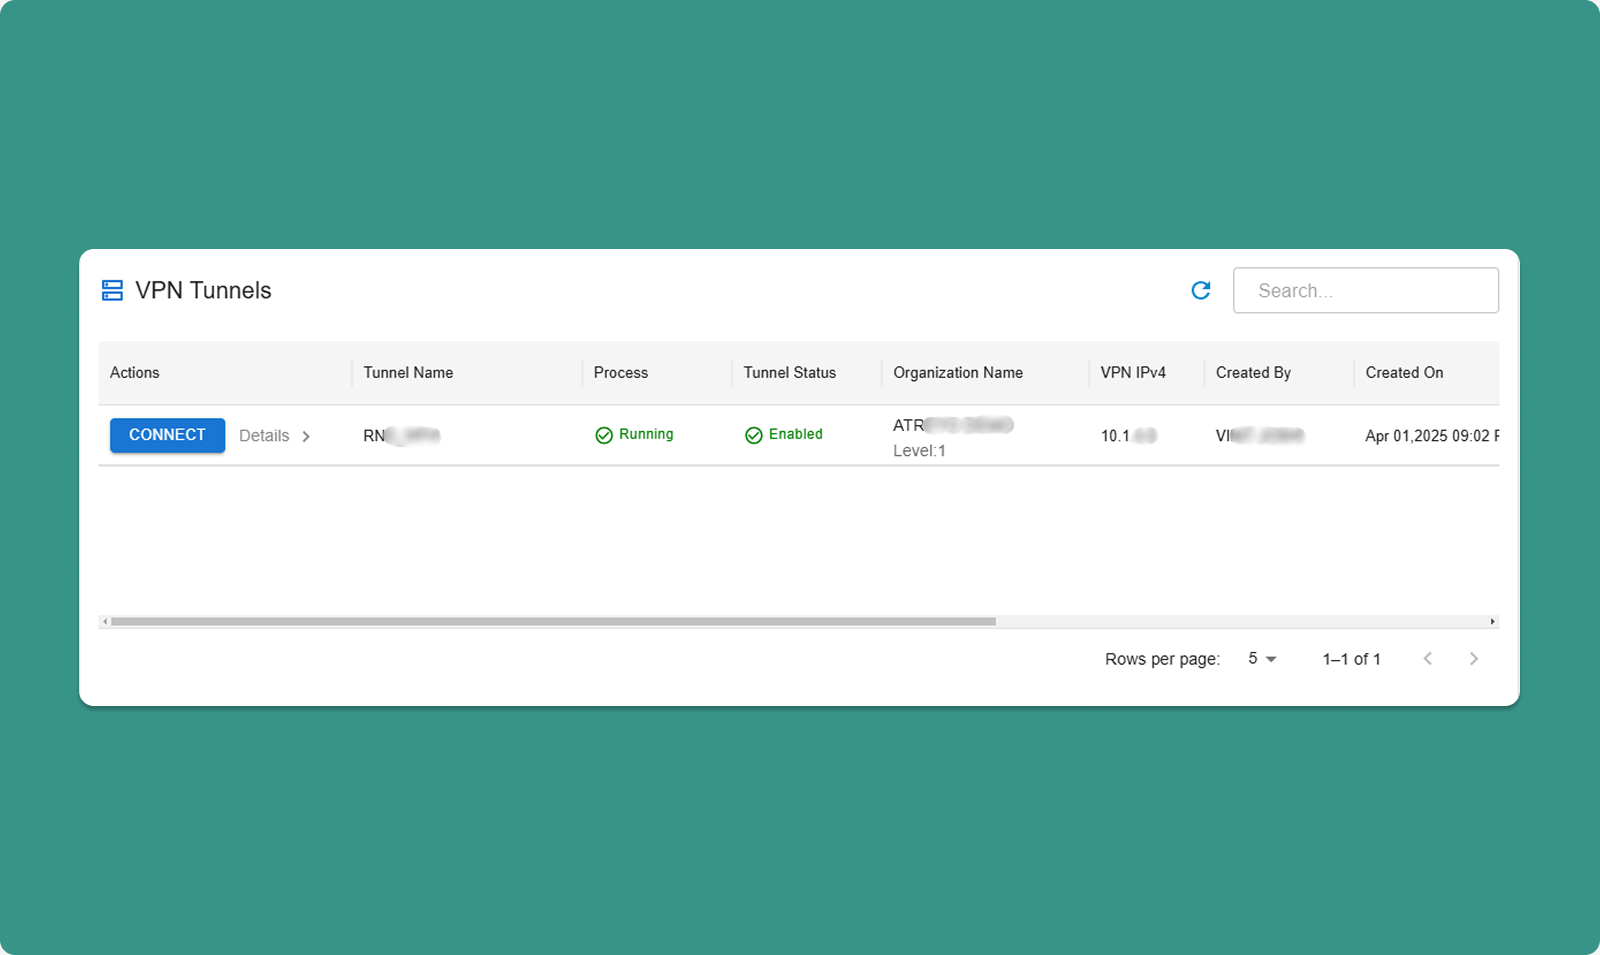
Table Search & Refresh
Search Bar:
-
Type keywords to filter tunnels
-
Searches: Tunnel name, organization, created by
-
Real-time filtering (results update as you type)
Refresh Icon:
-
Click to manually update tunnel list
-
Useful after tunnels are created/deleted in web interface
-
Rows per page: 10, 25, 50, 100
-
Total Count: "Showing 1-10 of 25 tunnels"
-
Page Navigation: Previous, Next, page numbers
Table Columns
|
Column |
Description |
Values |
|
Connect Button |
Connect/disconnect from tunnel |
"Connect" or "Disconnect" |
|
Details |
Opens sidebar with device info |
Button with icon |
|
Process Status |
VPN server process state |
Running, Exited |
|
Tunnel Status |
Management state |
Enabled, Disabled |
|
Organization Name |
Tunnel's organization |
ATREYO DEMO |
|
Organization Level |
Hierarchy level |
Level: 1, 2, 3 |
|
VPN IPv4 |
Tunnel gateway IP |
10.8.0.1 |
|
Created By |
Creator's email |
test@atreyo.in |
|
Created On |
Creation date |
2025-09-15 |
|
Total Users |
Users in tunnel |
10 |
|
Total Devices |
Devices in tunnel |
5 |
|
Max Clients |
Maximum capacity |
253 |
|
Allocated Clients |
Current users + devices |
15 |
|
Remaining Clients |
Available slots |
238 |
Connecting to a Tunnel
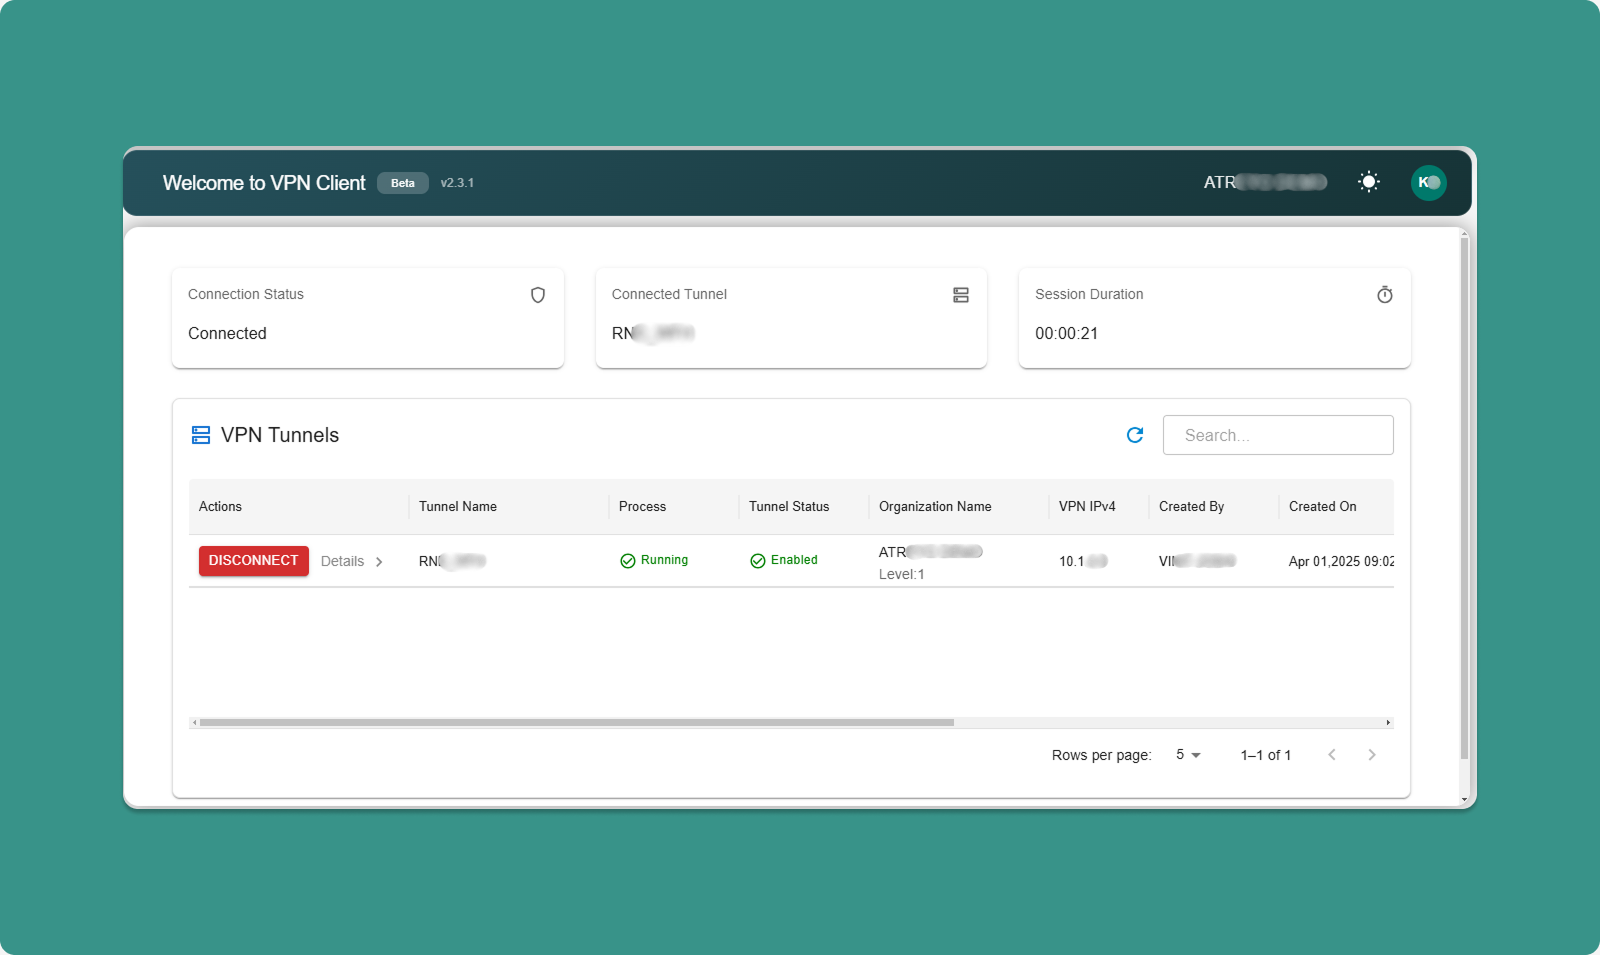
[INSERT SCREENSHOT: Connect_Process.png]
Before Connecting
Prerequisites: ✅ Tunnel Process Status = "Running"
✅ Tunnel Status = "Enabled"
✅ You are added to tunnel (by administrator)
✅ No other tunnel currently connected
⚠️ One Tunnel at a Time: You can only connect to ONE tunnel at a time.
Connection Steps
Step 1: Locate Tunnel
-
Find tunnel in table
-
Verify Process Status = "Running"
-
Verify Tunnel Status = "Enabled"
Step 2: Click Connect
-
Click "Connect" button for desired tunnel
-
Application initiates VPN connection
-
OpenVPN process starts in background
-
Connection established (typically 5-15 seconds)
Visual Feedback:
Step 3: Connected State
Once connected, three status cards appear at top of application:
Card 1: Connected Tunnel
-
Shows tunnel name you're connected to
-
Example: "Connected to: Factory_Production_VPN"
Card 2: Connection Details
-
Your VPN IP address
-
Example: "Your VPN IP: 10.8.0.25"
-
Gateway IP
-
Connection speed/status
Card 3: Session Duration
-
Time connected
-
Example: "Connected for: 00:45:23"
-
Updates in real-time
While Connected
What You Can Do:
-
✅ Access devices in tunnel via their VPN IPs
-
✅ Access devices' local networks (if Network Forwarding enabled)
-
✅ View connection details in status cards
-
✅ Monitor session duration
-
✅ Click "Details" to view device information
What You Cannot Do:
-
❌ Connect to other tunnels (must disconnect first)
-
❌ Close application (minimizes to system tray, stays connected)
Other Tunnels:
-
While connected, other "Connect" buttons are disabled (grayed out)
Disconnecting from Tunnel
Manual Disconnect
Step 1: Click Disconnect
-
Locate "Disconnect" button on active tunnel row
-
Click "Disconnect" button
-
VPN session cleanly closes
-
OpenVPN process terminates
Step 2: Disconnected State
After disconnection:
-
Status cards disappear from top
-
Button changes back to "Connect"
-
Other tunnels become available (buttons enabled)
-
Can connect to different tunnel
Effects:
-
Cannot access tunnel devices anymore
-
Local network access lost
-
VPN IP deallocated until next connection
Automatic Disconnect
Scenarios Where App Auto-Disconnects:
1. Internet Connection Lost:
-
VPN requires active internet
-
If internet drops, VPN disconnects automatically
-
Notification appears: "Connection lost"
-
Attempt to reconnect when internet restores
2. Tunnel Stopped by Administrator:
-
Administrator stops tunnel process
-
All connections terminate
-
Notification: "Tunnel stopped by administrator"
3. Tunnel Disabled by Administrator:
-
Administrator disables tunnel
-
Process stops, all connections drop
-
Notification: "Tunnel disabled"
4. User Removed from Tunnel:
-
Administrator removes you from tunnel
-
Connection immediately terminates
-
Notification: "Access revoked"
Device Details Sidebar
Click "Details" button to view devices in the tunnel.
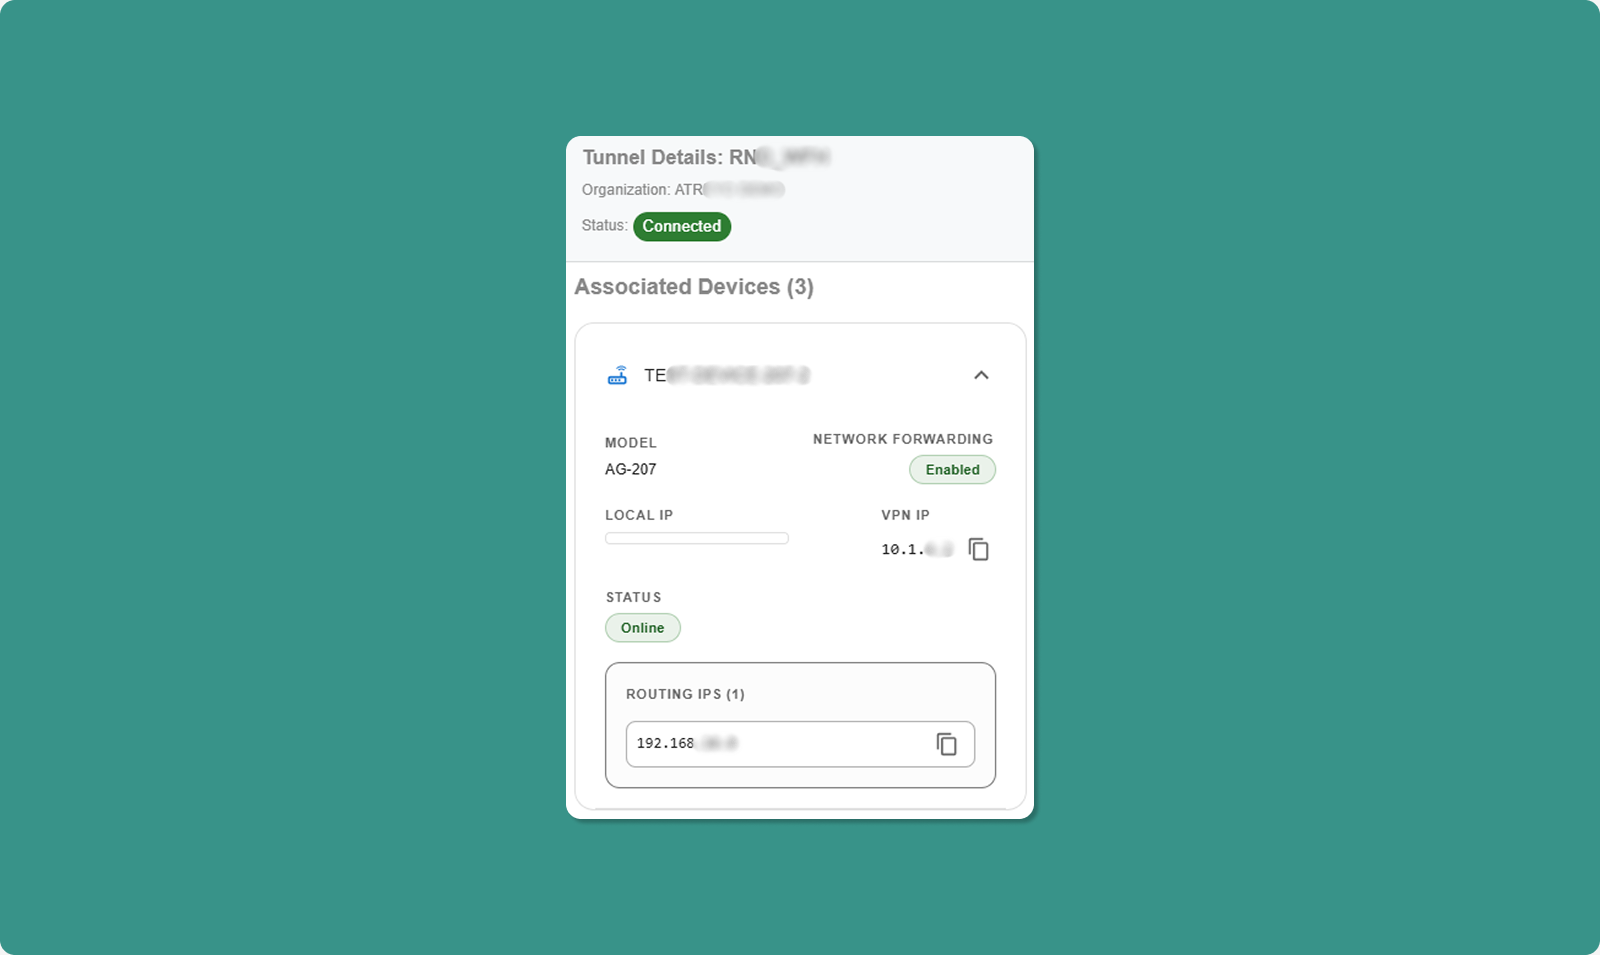
Opening Details Sidebar
-
Locate tunnel in table
-
Click "Details" button (typically icon button)
-
Sidebar slides in from right side
Sidebar Contents
Header:
-
Tunnel name
-
Close button (X) to dismiss sidebar
Device List:
For each device, displays:
|
Field |
Description |
Example |
|
Device Model |
Hardware model name |
AG-702-LT-EU-V48 |
|
Local IP |
Device's LAN/WAN IP |
192.168.1.50 |
|
VPN IP |
Device's tunnel IP |
10.8.0.10 |
|
Network Forwarding |
Forwarding state |
Enabled or Disabled |
|
Connection Status |
Device online/offline |
Connected, Disconnected |
|
Routing IP |
Available network routes |
192.168.1.0 |
Understanding Routing IP
What is Routing IP?
-
Lists network ranges accessible through this device
-
Only shown when Network Forwarding = Enabled
-
CIDR notation (e.g., 192.168.1.0)
Example:
Device VPN IP: 10.8.0.10
Network Forwarding: Enabled
Routing IP: 192.168.1.0
What This Means:
-
You can access device at 10.8.0.10
-
You can also access any device on 192.168.1.x network (192.168.1.1 through 192.168.1.254)
-
Traffic routes through 10.8.0.10 to reach local network
Use Case:
Your Computer (VPN: 10.8.0.25)
↓
Connect to: 192.168.1.100 (PLC on device's LAN)
↓
Routes through: 10.8.0.10 (gateway device)
↓
Reaches: PLC at 192.168.1.100
Key Features of the Atra VPN App
Auto-Updater
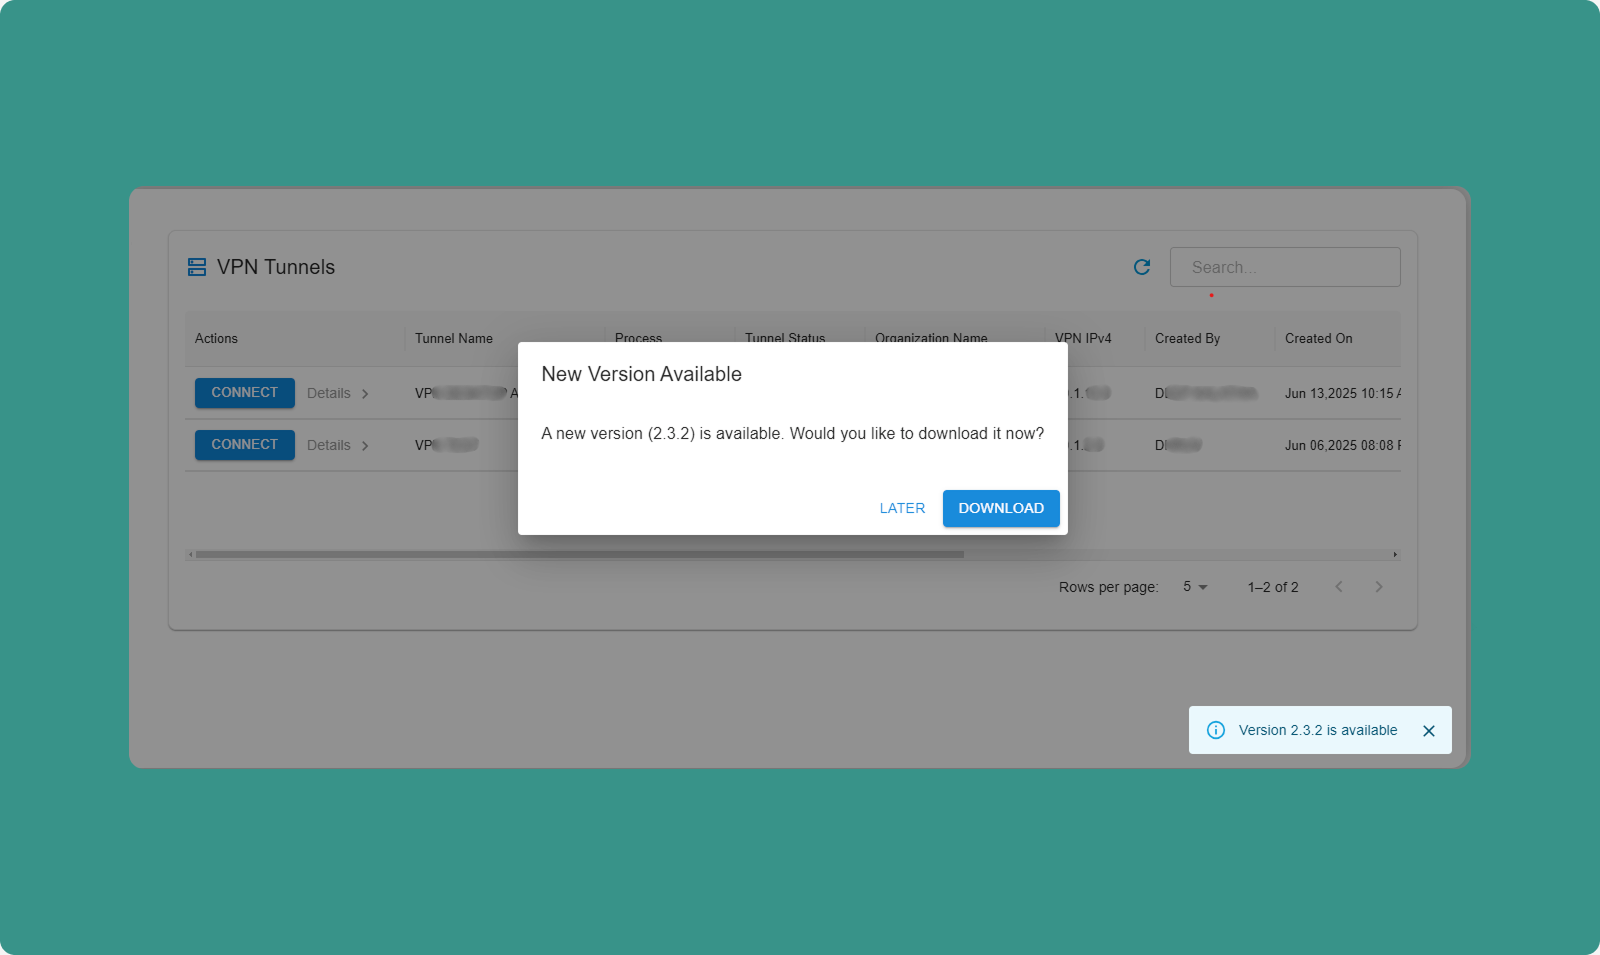
The app automatically checks for updates on launch.
Update Available:
-
Dialog appears: "Update Available"
-
Message shows for available version.
-
Options:
-
Download Now: Download update immediately
-
Skip: Skip for now, check again next launch
Download Process:
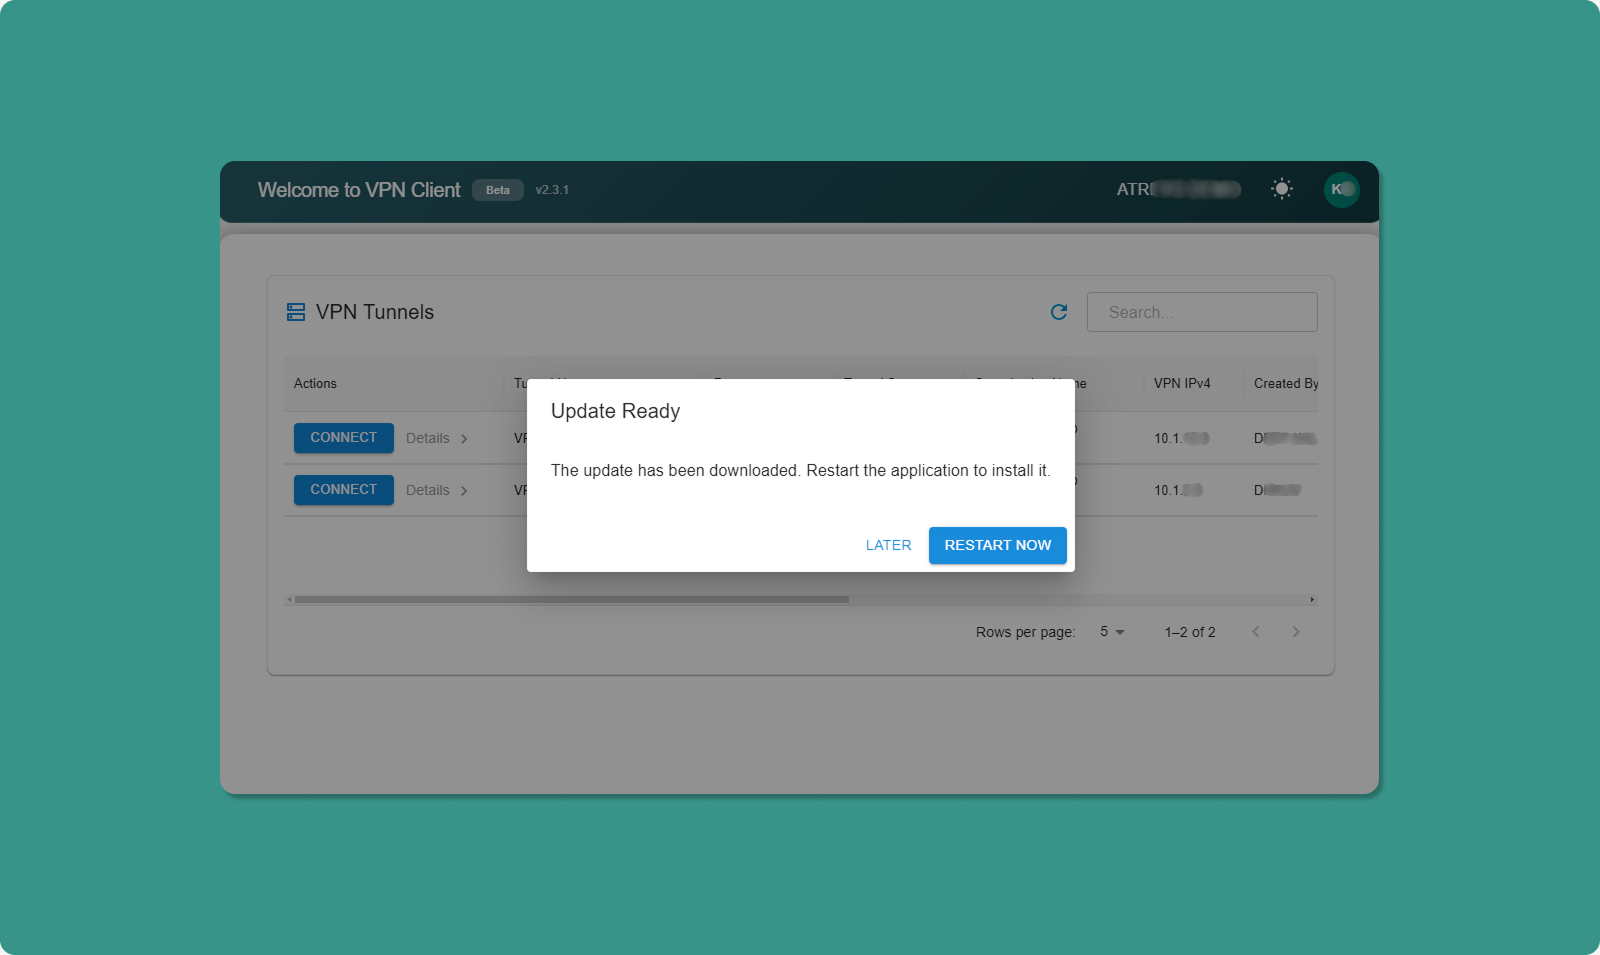
-
Click "Download Now"
-
Progress bar shows download status
-
When complete: "Restart to Update" button appears
-
Click "Restart to Update"
-
App closes and reopens with new version
Already Up to Date:
If you have the latest version:
-
Message appears: "You have the latest version"
-
No action needed
-
Dialog closes automatically
💡 Best Practice: Always keep app updated for latest features, security patches, and bug fixes.
Theme Toggle
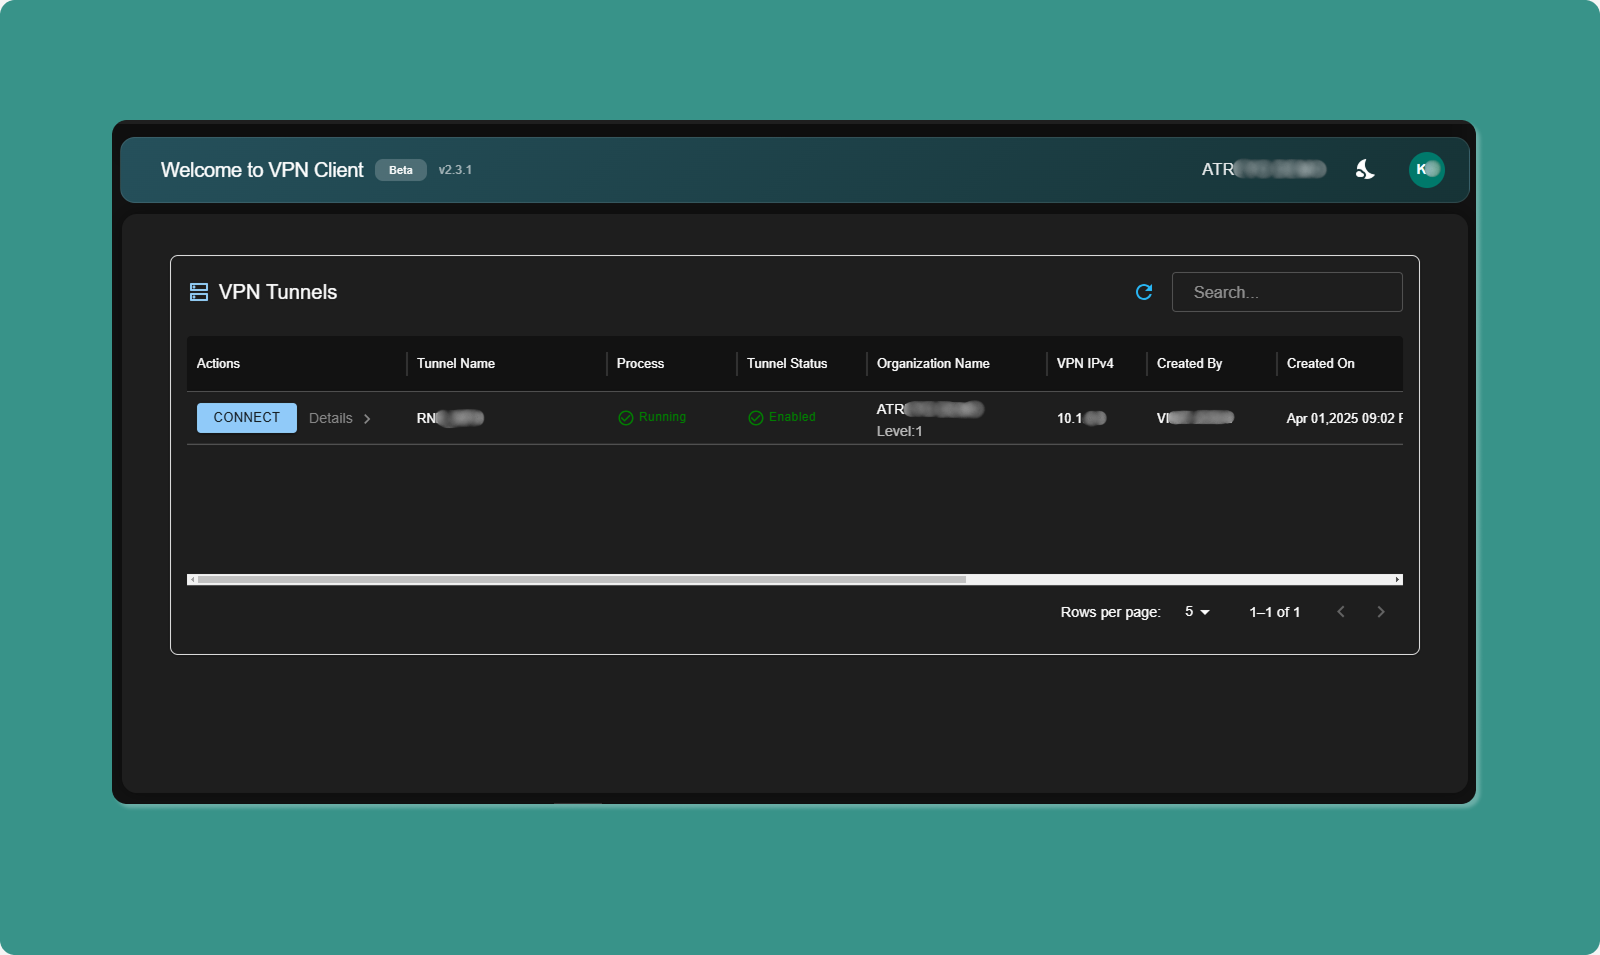
Switching Themes:
-
Locate theme toggle (top-right area)
-
Click toggle switch
-
Interface switches immediately:
-
Light Mode: White background, dark text
-
Dark Mode: Dark background, light text
Persistence:
-
Your choice is saved automatically
-
Next time you launch app, your preferred theme applies
-
No need to reselect each time
Benefits:
-
Light Mode: Easier reading in bright rooms, office environments
-
Dark Mode: Reduces eye strain in low light, saves battery (OLED screens)
Troubleshooting Common Atra VPN App Issues
Installation Issues
Problem 1: Windows Protection Screen
Symptom: Blue screen: "Windows protected your PC"
Solution:
-
Click "More info" link
-
Click "Run anyway" button
-
Click "Yes" on UAC prompt (grant administrator permission)
Why: Standard Windows security for BETA apps. Safe to proceed.
Problem 2: App Not Launching After Install
Symptoms:
-
Double-click desktop icon, nothing happens
-
No application window appears
-
No error message
Solutions:
Check Task Manager:
-
Press Ctrl+Shift+Esc (open Task Manager)
-
Look for "AtraVPNClient.exe" in Processes tab
-
If found, right-click → End Task
-
Try launching again
Run as Administrator:
-
Right-click desktop icon
-
Select "Run as administrator"
-
Click "Yes" on UAC prompt
Reinstall:
-
Uninstall via Control Panel → Programs and Features
-
Delete remaining files from C:\Program Files\Atra VPN Client
-
Download fresh installer from Atra RMS
-
Reinstall following steps above
Login Issues
Problem 3: Invalid Credentials Error
Symptom: "Invalid email or password" message
Solutions:
Verify Credentials:
-
Confirm email is correct (check for typos)
-
Verify password is correct
-
Check Caps Lock is OFF
-
Try copying/pasting password from secure location
Reset Password:
-
Go to Atra RMS web platform
-
Use "Forgot Password?" link
-
Reset password
-
Use new password in VPN client
Check Account Status:
-
Verify account setup was completed
-
Confirm account hasn't been disabled
-
Contact administrator if needed
Problem 4: Auto-Login Not Working
Symptom: App asks for login every time despite successful previous login
Solutions:
Manual Logout Clears Auto-Login:
-
If you clicked Logout last time, auto-login disabled
-
Simply log in once to re-enable
Clear and Re-Login:
-
Log out if currently logged in
-
Close application completely
-
Reopen application
-
Log in manually
-
Auto-login should work on next launch
VPN Connection Issues
Problem 5: Cannot Connect to Tunnel
Symptom: Click "Connect" but connection fails
Solutions:
Verify Tunnel State:
-
Check Process Status = "Running" (not "Exited")
-
Check Tunnel Status = "Enabled" (not "Disabled")
-
If Exited: Contact administrator to start tunnel
-
If Disabled: Contact administrator to enable tunnel
Check Current Connection:
-
Verify you're not already connected to another tunnel
-
If connected elsewhere, disconnect first
-
Then try connecting to desired tunnel
Check Internet Connection:
-
Verify your computer has active internet
-
Try opening website in browser
-
Check Wi-Fi/Ethernet connection
-
Restart router if necessary
Contact Administrator:
-
Verify you're added to the tunnel
-
Confirm you haven't been removed
-
Check tunnel hasn't been deleted
Problem 6: Connection Drops Frequently
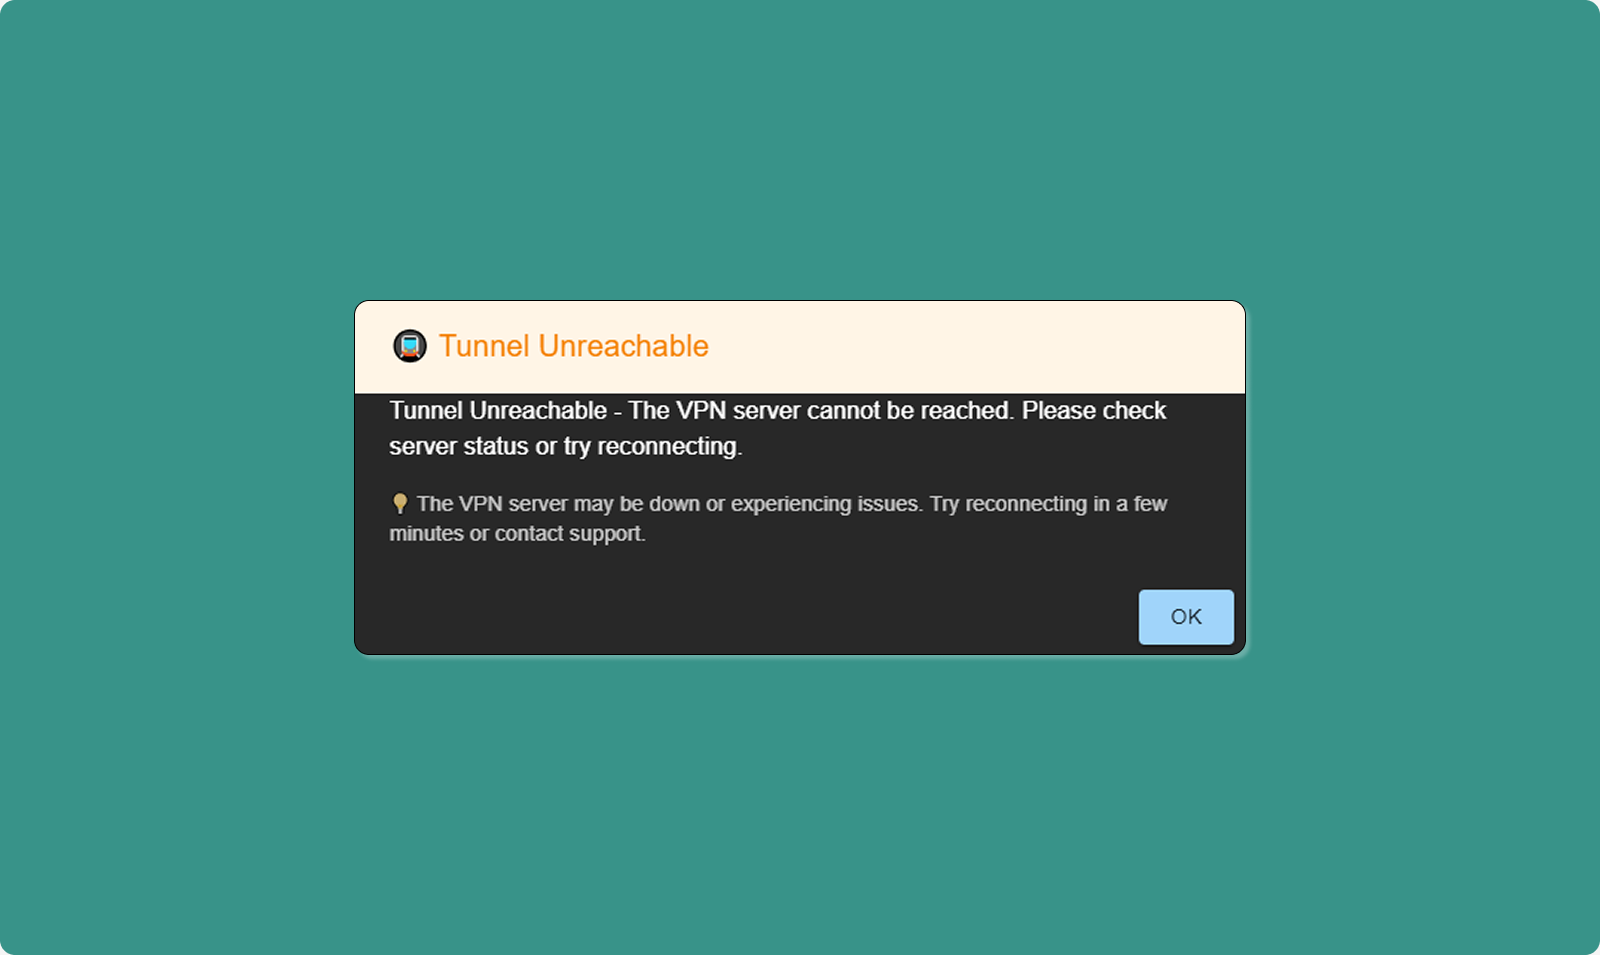
Symptom: Connection established but drops after few minutes
Solutions:
Check Internet Stability:
-
Test internet connection quality
-
Run speed test (speedtest.net)
-
Check for packet loss (ping test)
-
Switch to wired connection if using Wi-Fi
Check Firewall/Antivirus:
-
Temporarily disable firewall
-
Test VPN connection
-
If works, add VPN client to firewall whitelist
-
Re-enable firewall
Router Configuration:
-
Ensure UDP port 1194 is open (OpenVPN default)
-
Check router isn't blocking VPN traffic
-
Update router firmware if outdated
Network Congestion:
-
Close bandwidth-heavy applications
-
Pause downloads/uploads
-
Disconnect other devices from network temporarily
-
Test connection during low-usage period
Problem 7: Device Not Showing in Sidebar
Symptom: Open Details sidebar but expected device missing
Solutions:
Verify Device Added:
-
Check Atra RMS web interface
-
Navigate to tunnel Overview page
-
Check Devices tab
-
Confirm device is in the list
-
If missing, administrator must add it
Refresh Application:
-
Click Refresh icon (top of VPN client)
-
Wait for data to update
-
Check Details sidebar again
General Issues
Problem 8: App Stuck or Frozen
Symptom: Application unresponsive, cannot click anything
Solutions:
Force Close:
-
Press Ctrl+Alt+Delete
-
Select Task Manager
-
Find "AtraVPNClient.exe"
-
Right-click → End Task
-
Relaunch application
System Restart:
-
Close all applications
-
Restart computer
-
Launch VPN client after restart
Problem 9: Still Not Resolved
Contact Atreyo Support:
Email: support@atreyo.io
Information to Include:
-
Your name and email
-
Organization name
-
App version number (from top-left of dashboard)
-
Operating System (Windows 10/11, build number)
-
Detailed description of issue
-
Steps to reproduce the problem
-
Screenshots of error messages
-
Log files (if accessible)
Atra VPN Desktop App FAQs
Q: Where can I download the Atra VPN Client?
A: Log in to Atra RMS web interface → VPN section → Download button (top-right corner). Currently available for Windows 10/11 only.
Q: Is the Atra VPN Client available for macOS or Linux?
A: Not currently. The app is only available for Windows 10/11 (64-bit). macOS and Linux versions are under development.
Q: Why do I see a Windows protection warning during installation?
A: This is a standard Windows SmartScreen security check for BETA applications. The Atra VPN Client is developed and signed by Atreyo and is safe. Click "More info" → "Run anyway" to proceed with installation.
Q: Do I need different login credentials for the VPN Client?
A: No. Use the same email and password as your Atra RMS web platform account.
Q: Can I connect to multiple VPN tunnels at once?
A: No. You can only connect to ONE tunnel at a time. All other tunnels will be disabled while one is active. Disconnect first to switch tunnels.
Q: Can the app work without the internet?
A: No. The Atra VPN Client requires an active internet connection to authenticate your account and establish VPN tunnels.
Q: What should I do if the app is not working properly?
A: First, try restarting the app. If the problem persists, refer to the Troubleshooting section above. For unresolved issues, contact Atreyo Support with details and log files.
Q: Can I run multiple instances of the Atra VPN Client?
A: No. The app only allows one instance to run at a time. If the app is already open, you cannot launch another window.
Q: What happens if I lose the internet while connected to VPN?
A: The app will automatically disconnect for security. When the internet is restored, you'll need to manually reconnect to the tunnel.
Q: How do I access devices through the VPN?
A: Once connected, use the device's VPN IP address (shown in Details sidebar) to access it. If Network Forwarding is enabled, you can also access devices on the device's local network using their local IP addresses.
Password Recovery Guide
If you forget your password, use this process to reset it securely.
Step 1: Password Recovery Page
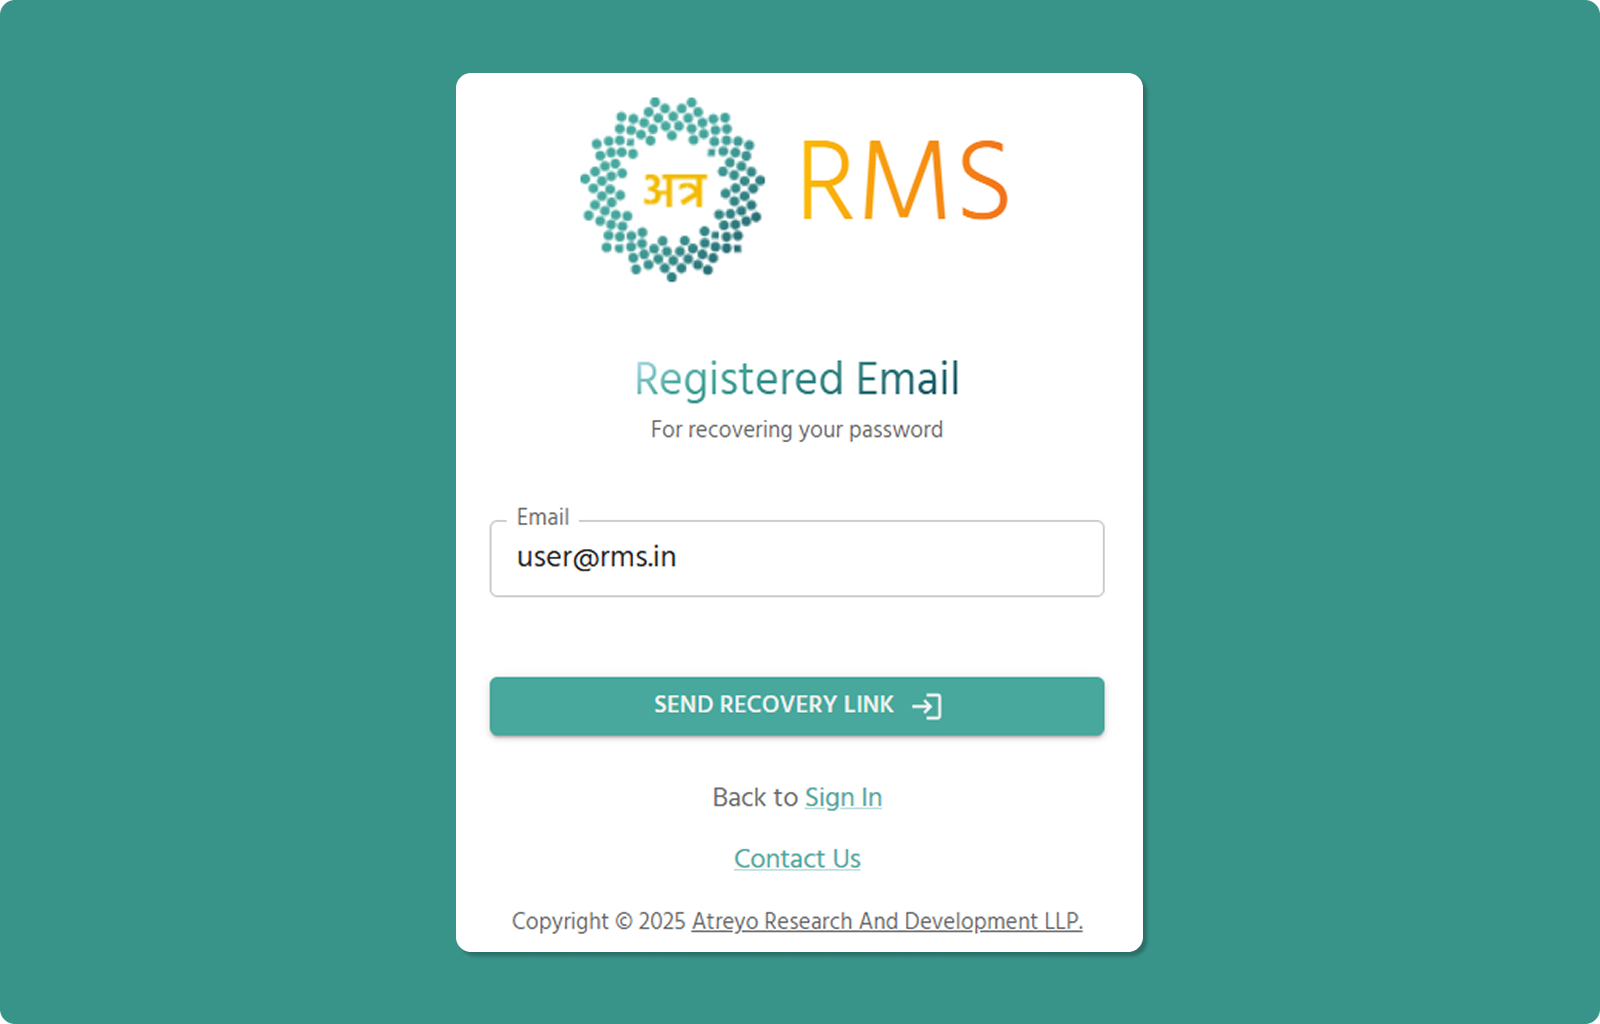
Accessing Recovery Page:
-
Go to login page
-
Click "Forgot password?" link
-
Password Recovery page opens
Step 2: Enter Registered Email
Steps:
-
Click in "Email" field (📧)
-
Type the email address associated with your Atra RMS account
-
Verify email is correct (check for typos)
-
Click "SEND RECOVERY LINK →" button
System Processes:
-
Validates email exists in system
-
Generates secure recovery token
-
Sends recovery email to address
Step 3: Check Email for Recovery Link
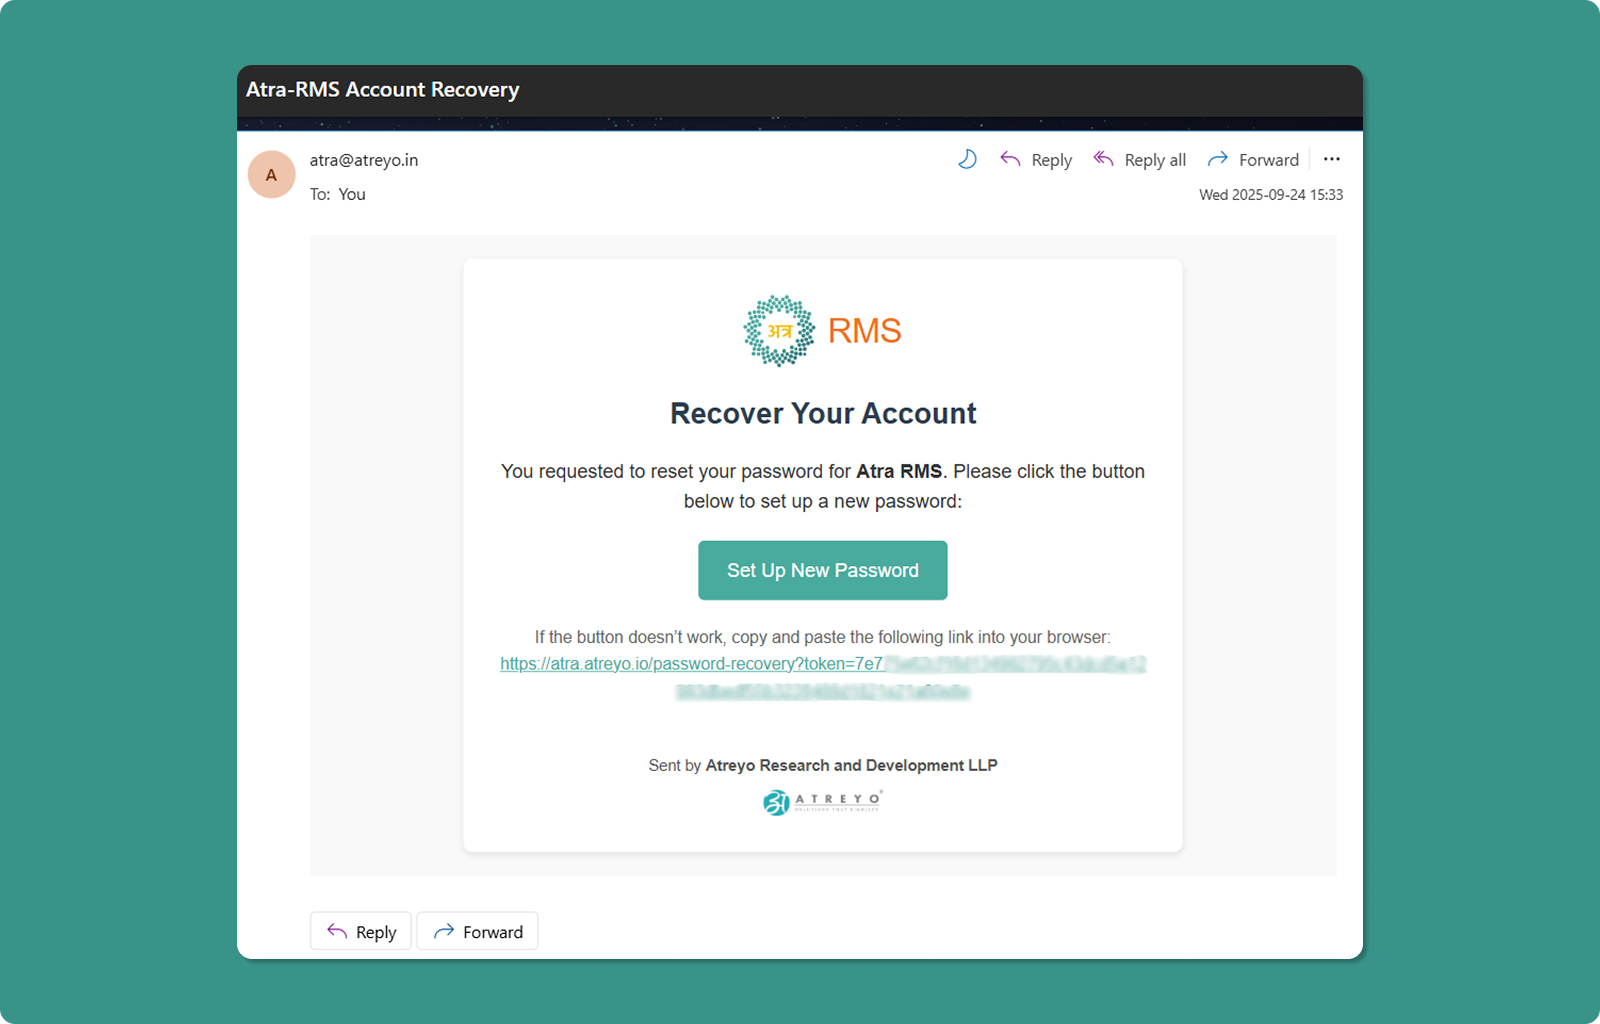
Email Arrives:
-
Subject: "Atra-RMS Account Recovery"
-
Delivery Time: Usually within 1-5 minutes
-
Check Spam: If not in inbox, check junk/spam folder
Email Contents:
-
Recovery confirmation message
-
"Set Up New Password" button (teal)
-
Backup recovery URL below button
Step 4: Click Recovery Link
Method A: Click Button
-
Open recovery email
-
Click "Set Up New Password" button
-
Browser opens password reset page
Method B: Copy/Paste URL
-
Locate full URL in email (below button)
-
Copy entire URL
-
Paste into browser address bar
-
Press Enter
Step 5: Setup New Password Page
The password reset page allows you to create a new password.
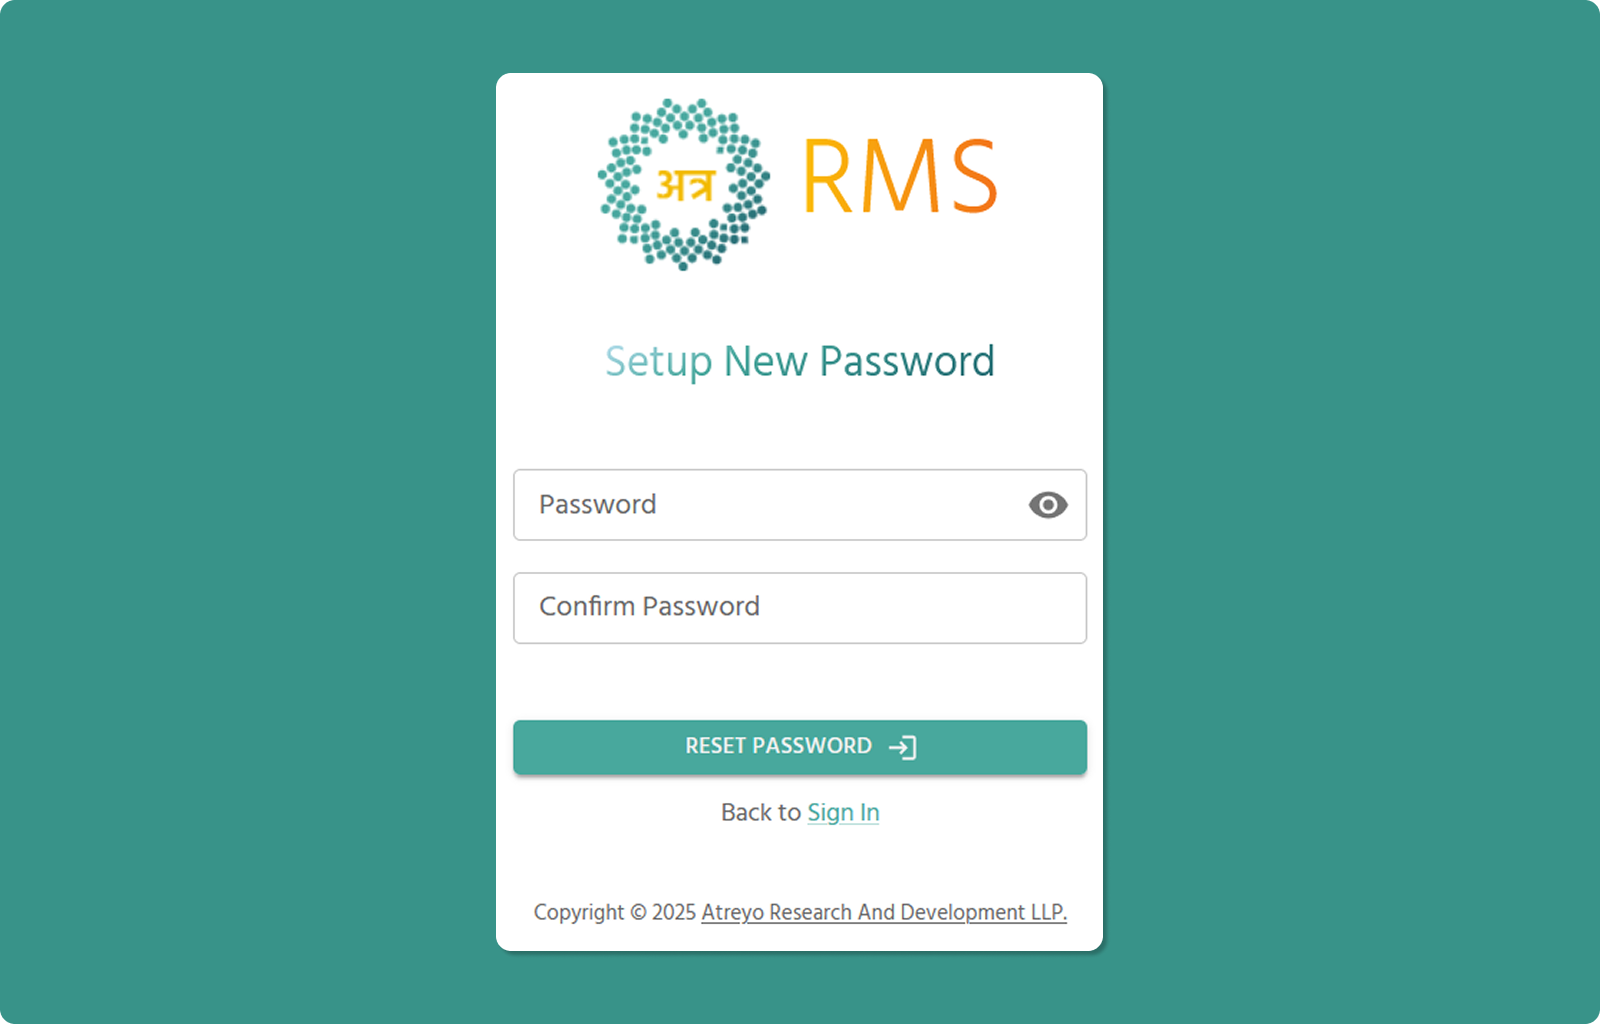
Step 6: Enter New Password
[INSERT SCREENSHOT: New_Password_Input.png]
Password Requirements:
-
Minimum 8 characters
-
At least one lowercase letter (a-z)
-
At least one uppercase letter (A-Z)
-
At least one number (0-9)
-
At least one special character (!@#$%^&*)
-
Cannot start with hyphen (-)
-
Cannot contain parentheses ( )
Steps:
-
Enter new password in "Password" field
-
Click eye icon (👁️) to toggle visibility if needed
-
Re-enter same password in "Confirm Password" field
-
Verify both fields match
Step 7: Reset Password
-
Verify all requirements met
-
Confirm passwords match
-
Click "RESET PASSWORD →" button
System Processes:
-
Validates password meets requirements
-
Updates password
-
Expires recovery link
-
Sends confirmation email
Password Recovery Success
After successful password reset:
Message:
"Your account has been successfully recovered"
Next Steps:
-
Click "Sign In" link
-
Go to login page
-
Use your email and new password to log in
Password Recovery Success Email
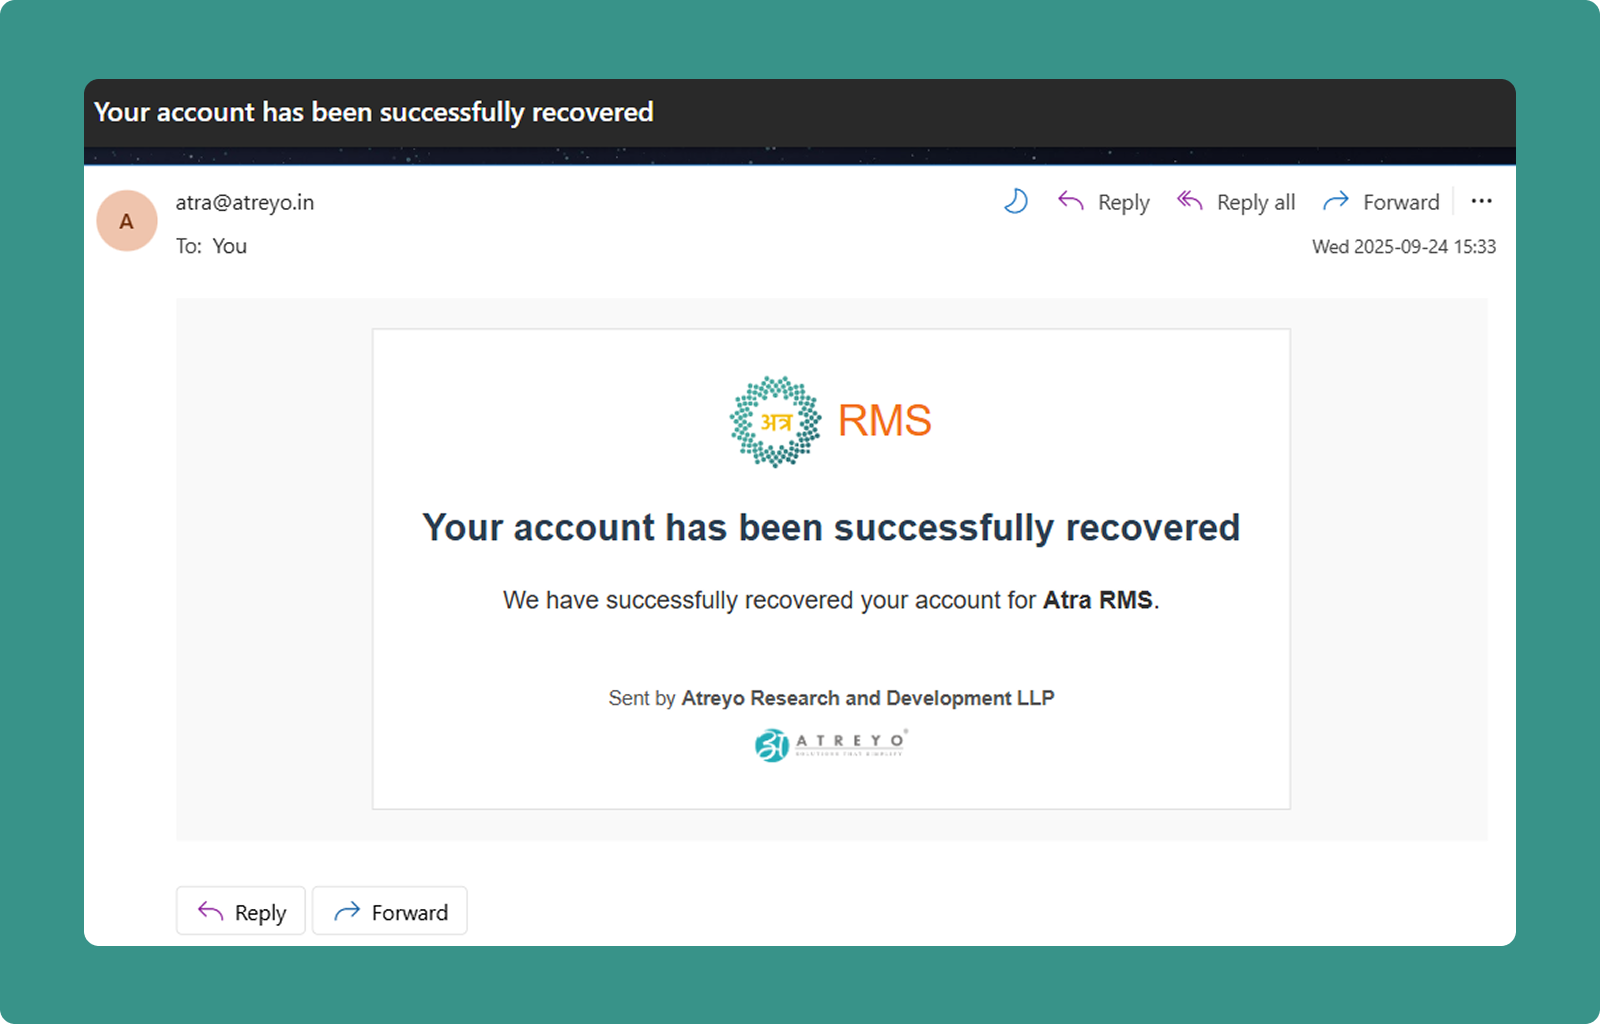
Confirmation email sent after successful password reset.
Email Contents:
-
Subject: "Atra RMS Account Recovery Successful"
-
Confirmation message
Purpose:
-
Confirms password was changed
-
Security notification
Important Validity Information
⏰ 24-Hour Validity:
Recovery links are valid for 24 hours from email receipt.
After 24 Hours:
-
Link expires automatically
-
"Recovery link has expired" page displays
-
Must restart recovery process from beginning
✅ Post-Recovery Expiration:
After successful password reset:
-
Recovery link expires immediately
-
Prevents reuse of recovery link
-
Security measure
Multiple Requests:
-
If you request recovery multiple times, only the latest link works
-
Previous recovery links are automatically invalidated
-
Use the most recent email received
Other Actions on Recovery Pages
Back to Sign In:
-
Click "Sign In" link
-
Returns to main login page
-
Use if you remember your password
Contact Us:
-
Click "Contact Us" link
-
Opens atreyo.in contact us form
-
Get help with recovery issues
Account Profile
Account Menu & Profile Options
Access user-specific settings and account information through the account menu.

Accessing Account Menu
Location: Bottom-left corner of sidebar
Steps:
-
Look for your name at bottom of left sidebar
-
Click on your name
-
Pop-up menu appears
User Information Display
The top section of the menu displays your account details:
Information Shown:
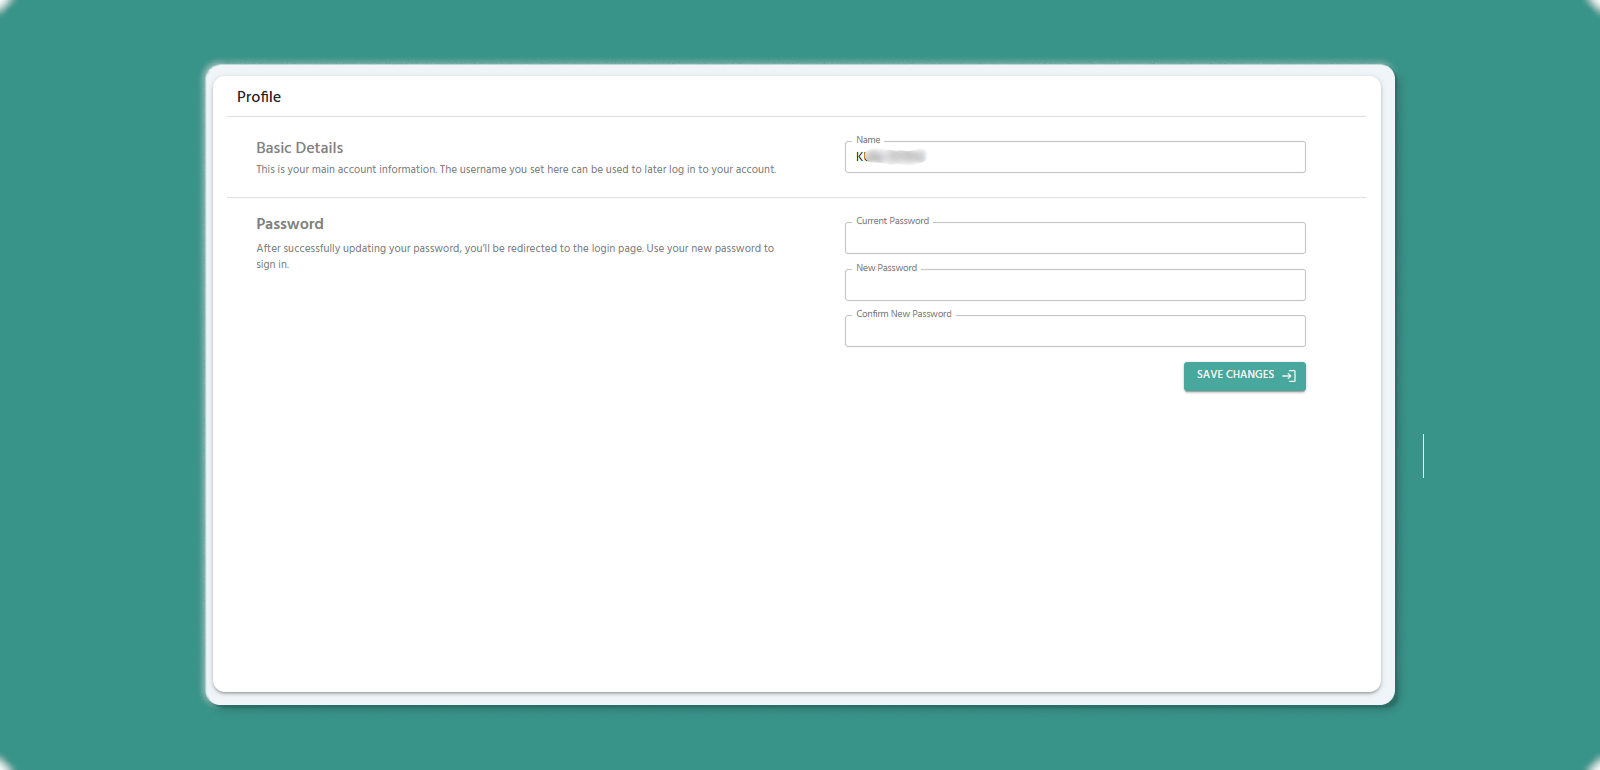
-
Name: Your full name
-
Email: Your registered email address
-
Organization: Your assigned organization
Purpose:
-
Quick reference to confirm logged-in account
-
Verify organization context
-
Check account details without navigating away
Available Actions
Profile (Person Icon 👤)
Action: Click Profile option
Result:
Password Change Fields:
-
Current Password
-
New Password
-
Confirm New Password
Conditions:
-
The current password must be correct.
-
The new password and the confirm password must match.
-
Password input rules are the same as the account setup and recovery password rules.
Results:
-
The password is successfully changed.
-
The user is redirected to the login page.
-
The user must log in using the new password.
Use Cases:
-
Verify account information
-
Change password.
Logout (Exit Icon 🚪)
Action: Click Logout option
Result:
-
Immediately logs you out of Atra RMS
-
Session terminated securely
-
Redirected to login page
-
Must re-enter credentials to access again
Comprehensive Troubleshooting
This section consolidates troubleshooting guidance across all Atra RMS features.
Device Connection Issues
Device Shows "Offline" After Registration
[INSERT SCREENSHOT: Device_Disconnected.png]
Symptoms:
-
Device appears in Device List
-
Status shows "Offline"
-
Device was just registered
Root Causes:
-
Device never powered on after registration
-
Device was running before registration and wasn't restarted
-
Network connectivity issue
-
Incorrect Serial ID during registration
Solutions:
First-Time Device:
-
Power on the physical device
-
Connect gateway to internet
-
Wait 1-2 minutes for initial connection
-
Refresh Device List manually
-
Status should change to "Online"
Already-Running Device:
-
MUST restart device to complete registration
-
Power cycle: Unplug power, wait 10 seconds, reconnect
-
OR reboot via device admin interface
-
Wait 1-2 minutes after restart
-
Refresh Device List
-
Status should change to "Online"
Network Issues:
-
Ethernet: Verify cable connected, check link lights
-
Cellular: Verify SIM card inserted correctly, has active plan
Serial ID Issues:
-
Go to Device List
-
Click device name → Device Detail Page
-
Verify Serial-ID matches physical device label
-
If incorrect: re-register with correct Serial ID
Device Shows "Offline" Unexpectedly
Symptoms:
-
Device was "Online" previously
-
Now shows "Offline" with timestamp
-
Device is physically powered on
Root Causes:
-
Network connection lost (cable unplugged, Wi-Fi down, cellular signal lost)
-
Device powered off or crashed
Solutions:
Check Physical Device:
-
Verify power LED is on
-
Check network LED indicators (link lights, cellular signal)
-
Verify ethernet cable securely connected
-
For cellular: Check SIM card seated properly
Network Diagnostics:
-
Ethernet: Try different cable, different port on switch/router
-
Cellular: Check signal strength (if accessible), verify carrier coverage
-
Restart network equipment (router, switch)
-
Check for network outages with ISP/carrier
Device Restart:
-
Power cycle device (unplug, wait 10 seconds, reconnect)
-
Wait 1-2 minutes for boot and connection
-
Refresh Device Detail Page
-
Check if status changes to "Online"
Check Atra RMS Status:
-
Try accessing Atra RMS from different device
-
Check if other devices in your fleet are also offline
-
If widespread, may be server issue
-
Contact support if affecting all devices
User Management Issues
Cannot Invite New User
Symptoms:
Root Causes:
-
Lack "Users Create" permission
-
Email already registered in system
-
Invalid email format
-
Organization or role not selected
Solutions:
Permission Check:
-
Verify your role has "Users Create" permission
-
Contact administrator to update role if needed
Email Validation:
-
Already Registered: Try different email address
-
Invalid Format: Ensure email contains @ and valid domain
-
Typo Check: Verify email is typed correctly
Form Completion:
-
Ensure all required fields filled (Name, Email, Organization, Role)
-
Check Role dropdown activated (requires Organization selection first)
-
Verify Organization selected before choosing Role
User Doesn't Receive Invitation Email
Symptoms:
-
Invited user successfully
-
User reports no email received
-
Checked spam/junk folder
Solutions:
Wait Period:
-
Email delivery can take up to 5-10 minutes
-
Ask user to wait and check again
Check Spam Folder:
-
User should check Spam, Junk, Promotions folders
-
Look for sender: atra@atreyo.in or similar
-
Add sender to safe list/whitelist
Email Address Verification:
-
Go to Users List
-
Verify email address is correct
-
If incorrect: Delete user, re-invite with correct email
Resend Invitation:
-
Delete the invited user (if invitation wasn't accepted)
-
Re-invite user with same email
-
New invitation email sent
Cannot Delete User
Symptoms:
-
Click Delete on user
-
Error message appears
-
User not removed
Root Cause:
-
User is currently in one or more VPN tunnels
-
System prevents deletion to maintain VPN integrity
Solution:
-
Identify VPN Tunnels:
-
Go to VPN section
-
Check each tunnel's Users tab
-
Find tunnels containing this user
-
Remove from VPN Tunnels:
-
For each tunnel containing user:
-
Open tunnel Overview page
-
Go to Users tab
-
Click Remove button for this user
-
Confirm removal
-
Delete User:
-
Return to Users section
-
Try deleting user again
-
Should now succeed
VPN Connection Problems
VPN Tunnel Process Won't Start
Symptoms:
Root Causes:
-
Tunnel is Disabled
-
Server resource exhaustion
-
Configuration error
-
Port conflict (another VPN using same port)
Solutions:
Check Tunnel Status:
-
Verify Tunnel Status = "Enabled"
-
If Disabled, click Enable button first
-
Then click Start button
Refresh and Retry:
Contact Administrator:
-
If repeated failures, may be server-side issue
-
Contact Atreyo support
Cannot Add Device to VPN Tunnel
Symptoms:
-
Click Add Devices button
-
Device not in selection list
-
OR device added but doesn't appear in tunnel
Root Causes:
-
Device belongs to different organization
-
Maximum clients (253) reached
Solutions:
Organization Check:
-
Verify device's organization matches tunnel's organization
-
Or device is in child organization of tunnel's organization
-
If mismatch, cannot add device to this tunnel
Client Limit:
-
Check Allocated Clients count
-
If = 253, cannot add more
-
Must remove users or devices to free slots
Device Availability:
-
Verify device exists and is registered
-
Check Device List to confirm device is in system
-
If missing, register device first
"Maximum Clients Reached"
Context: Adding user/device to VPN tunnel
Meaning: Tunnel has reached maximum capacity (253 clients total)
Solutions:
Remove Unused Clients:
-
Go to tunnel Overview page
-
Review Users tab: Remove inactive users
-
Review Devices tab: Remove decommissioned devices
-
Each removal frees one slot
Create Additional Tunnel:
-
If all 253 slots legitimately used
-
Create a second VPN tunnel
-
Distribute users/devices across both tunnels
VPN Desktop Client Cannot Connect
Symptoms:
-
Click Connect in VPN client app
-
Connection fails
-
Error message or timeout
Root Causes:
-
Tunnel process not running
-
Tunnel disabled
-
User not in tunnel
-
Internet connection issue
Solutions:
Verify Tunnel State (Web Interface):
-
Log in to Atra RMS web interface
-
Navigate to VPN section
-
Check tunnel Process Status = "Running"
-
Check tunnel Tunnel Status = "Enabled"
-
If not, contact administrator
Verify User Access:
-
In web interface, open tunnel Overview page
-
Go to Users tab
-
Verify your name appears in list
-
If not, contact administrator to add you
Internet Connection:
-
Test internet connectivity (open website)
-
Check Wi-Fi/Ethernet connection
-
Restart router if necessary
-
Try wired connection if using Wi-Fi
App Restart:
-
Disconnect if partially connected
-
Close VPN client app completely
-
Reopen app
-
Try connecting again
Permission Errors
"Access Denied" When Trying to Perform Action
Symptoms:
-
Try to perform action (register device, invite user, etc.)
-
Error: "Access Denied" or "Permission Required"
-
Action doesn't complete
Root Cause:
-
Your role lacks the required permission for this action
Solution:
Identify Required Permission:
|
Action |
Required Permission |
|
Register device |
Devices Register |
|
View device list |
Devices View |
|
Edit device description |
Devices Update |
|
Unregister device |
Devices Unregister |
|
Invite user |
Users Create |
|
View users list |
Users View |
|
Edit user name/role |
Users Update |
|
Delete user |
Users Delete |
|
Create role |
Roles Create |
|
View role details |
Roles View |
|
Edit role permissions |
Roles Update |
|
Delete role |
Roles Delete |
|
Create child org |
Organizations Create |
|
View org list |
Organizations View |
|
Edit org name |
Organizations Update |
|
Delete org |
Organizations Delete |
|
Create VPN tunnel |
VPN Create, Devices View |
|
View VPN tunnels |
VPN View, Devices View |
|
Edit VPN tunnel |
VPN Update, Devices View |
|
Delete VPN tunnel |
VPN Delete, Devices View |
|
Start/Stop VPN |
VPN Start/Stop, Devices View |
|
Enable/Disable VPN |
VPN Enable/Disable, Devices View |
Request Permission:
-
Identify which permission you need (see table above)
-
Contact your organization administrator
-
Request role update to include required permission
-
Administrator edits your role or assigns different role
-
Refresh browser after role update
-
Try action again
Can See Resource But Cannot Manage It
Symptoms:
-
Can view devices/users/organizations/VPN tunnels
-
Cannot edit, delete, or perform actions
-
Buttons missing
Root Cause:
-
Have "View" permission only
-
Lack "Create", "Update", or "Delete" permissions
Common Error Messages
"Serial ID Already in Use"
Context: Registering device
Meaning: Device with this Serial ID already registered in Atra RMS
Solutions:
Check Device List:
-
Go to Device List
-
Search for Serial ID
-
If found, device already registered
-
If it's your device in wrong organization, contact administrator to transfer
Typo Check:
-
Verify Serial ID entered correctly
-
Check for character confusion (0 vs O, 1 vs I)
-
Re-enter Serial ID carefully
"Invitation Link Has Expired"
Context: User trying to set up account
Meaning: Invitation link valid for 24 hours; time limit exceeded OR account already set up
Solutions:
Already Set Up:
-
Check if you completed account setup previously
-
Click "Sign In" link
-
Use your email and password to log in
Time Limit Exceeded:
-
Contact person who invited you
-
Request new invitation email
-
Complete setup within 24 hours of new email
"Email Already Registered"
Context: Inviting user
Meaning: Account with this email already exists in Atra RMS
Solutions:
User Already Exists:
-
Check Users List for this email
-
User may already have account in different organization
-
Cannot create duplicate account
Use Different Email:
-
Ask user for alternative email address
-
Invite using different email
"Recovery Link Has Expired"
Context: Password recovery
Meaning: Password recovery link valid for 24 hours; time limit exceeded OR password already reset
Solutions:
Already Reset:
-
If you completed password reset
-
Click "Sign In" link
-
Use your email and NEW password
Time Limit Exceeded:
-
Return to login page
-
Click "Forgot password?" again
-
Enter email
-
Receive new recovery link
-
Complete reset within 24 hours
Accessing Industrial Systems Remotely
PLC Access Setup Guide
This use case explains how a PLC connected to an AG-702 gateway can be securely accessed from a remote location using ATRA RMS and the ATRA VPN Client , without exposing the PLC or local network to the public internet.
1. Network Setup (AG-702 and PLC)
1.1 Configure Static IP on AG-702 Gateway
Purpose: Configure the AG-702 with a static LAN IP that belongs to the same subnet as the PLC.
Steps to Configure Static IP:
-
Connect AG-702 ETH2 (LAN) to your laptop/PC using an Ethernet cable.
-
Open Terminal / Command Prompt on the laptop.
-
Verify connectivity with the gateway:
ping 192.168.1.1. Ensure that a reply is received. -
Open a web browser and navigate to:
http://192.168.1.1
-
Log in with the following credentials:
-
Username:
root -
Password:
root
-
-
Navigate to: Network → Interfaces
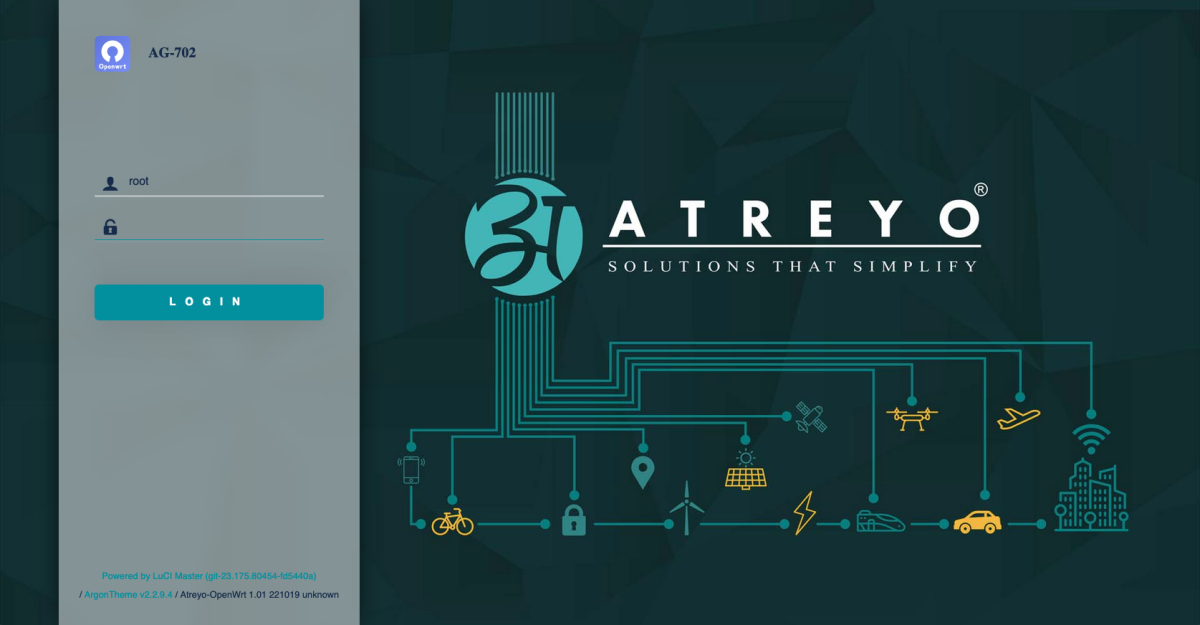
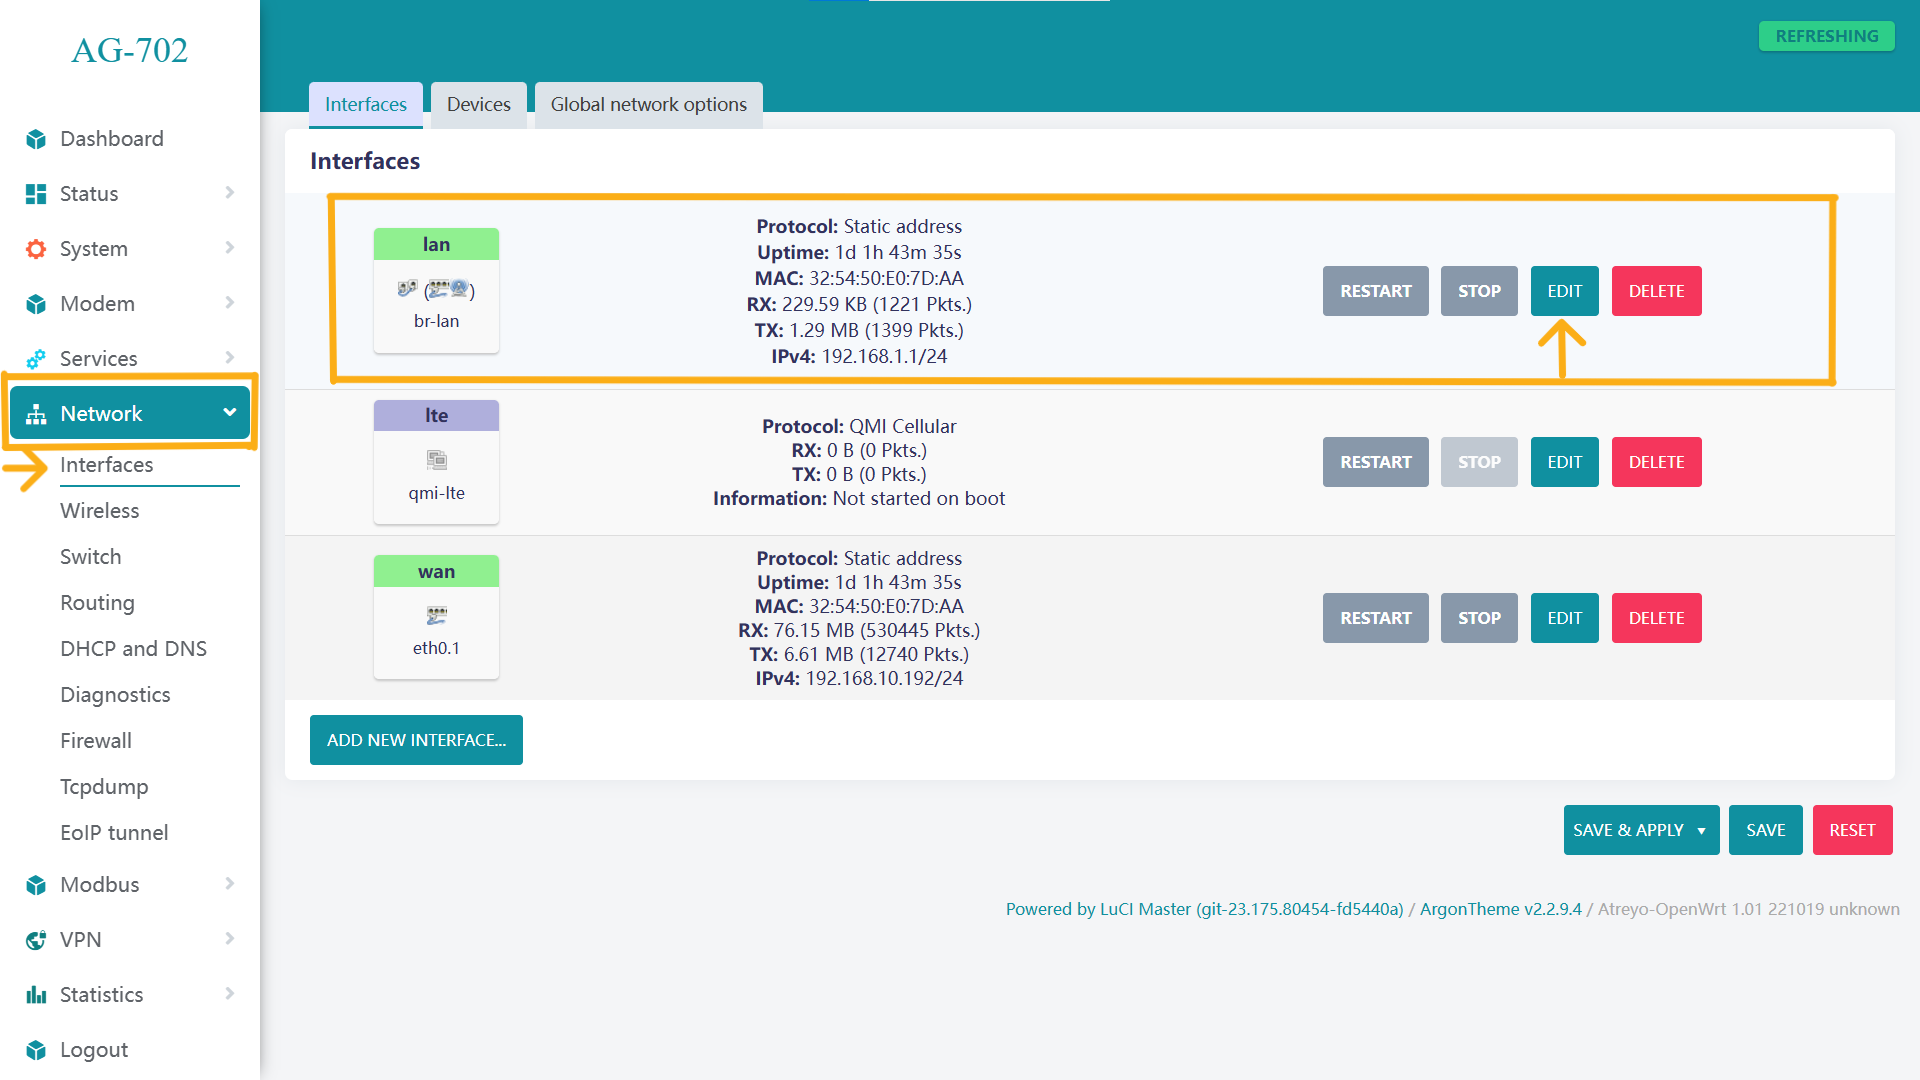
-
Click Edit on the br-lan interface.
-
Change the IPv4 address to match the PLC subnet.
- Example:
PLC IP:192.168.12.X
AG-702 IP:192.168.12.1

- Example:
-
Click Save, then Save & Apply.
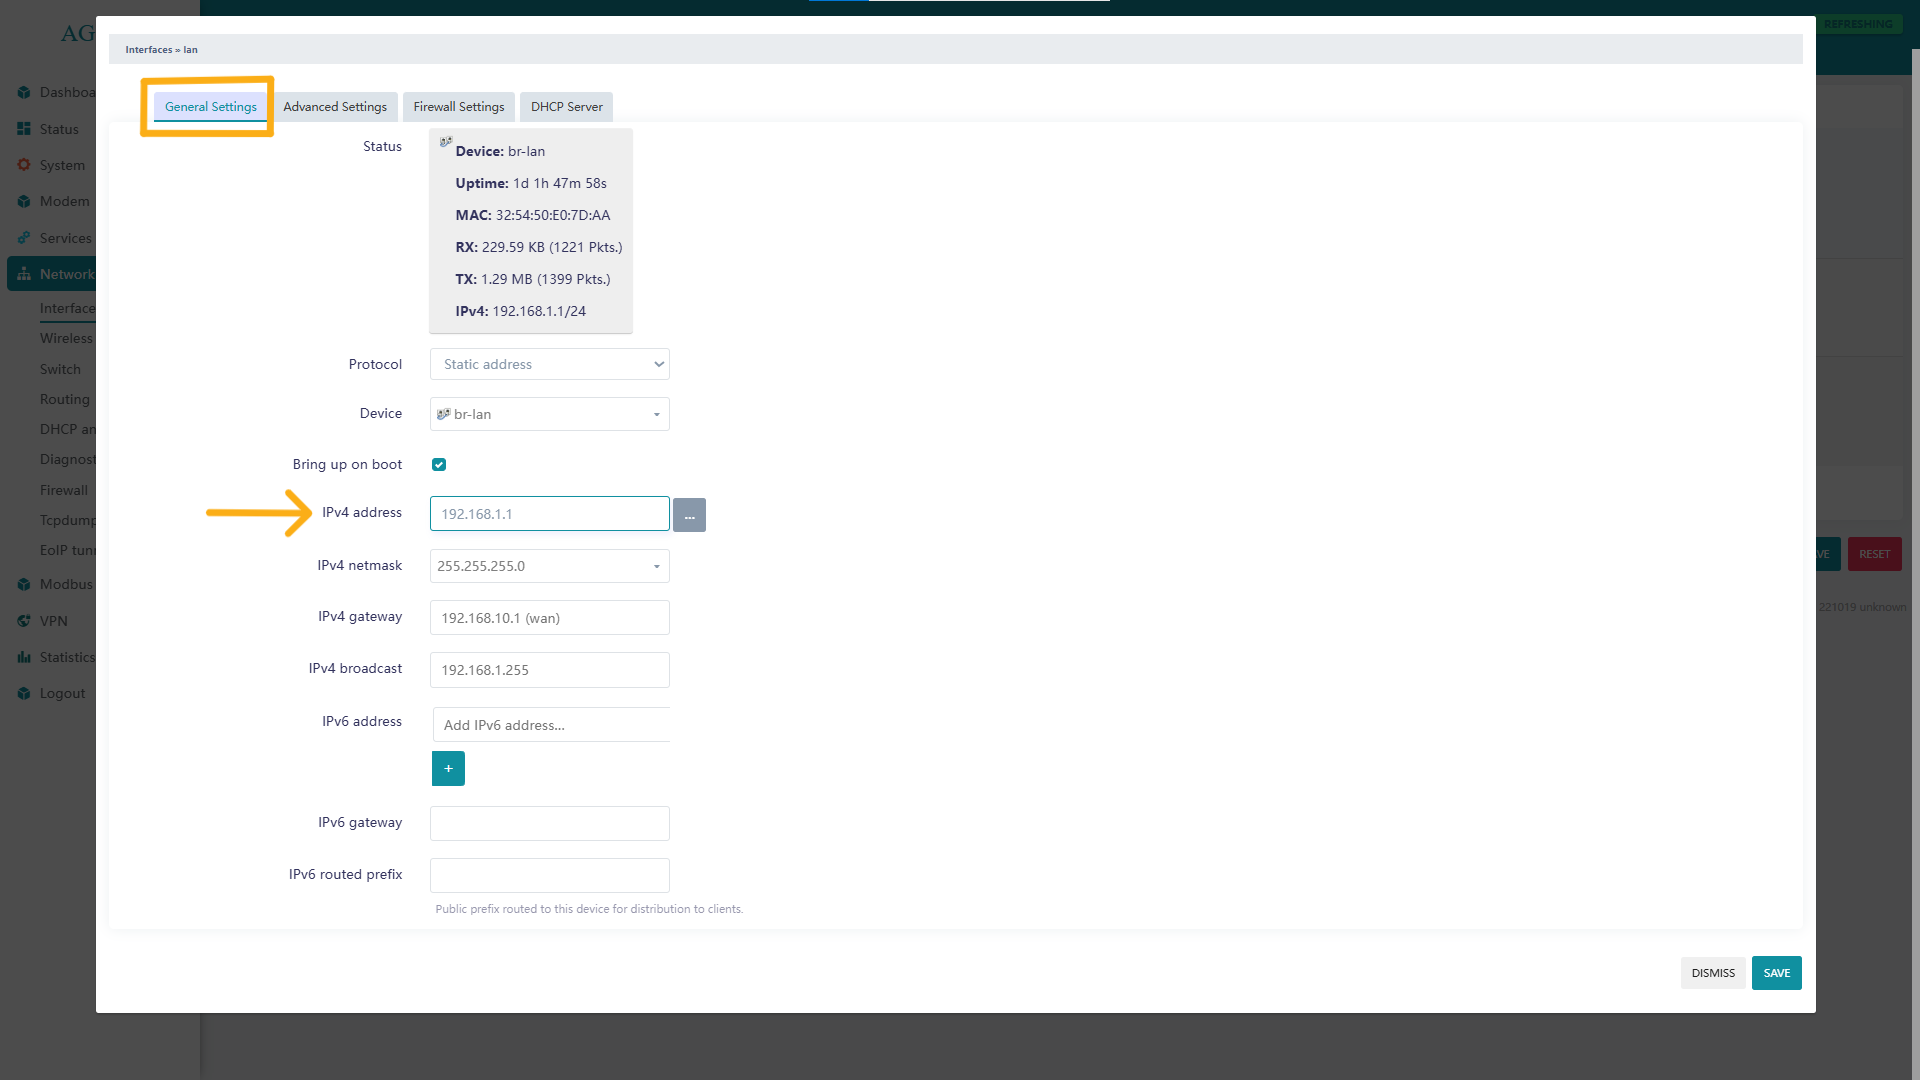
1.2 Firewall Configuration
-
Navigate to: Network → Firewall
-
In the General Settings tab:
-
Set all fields to Accept
-
Select all available Zone checkboxes.
-
-
Click Save

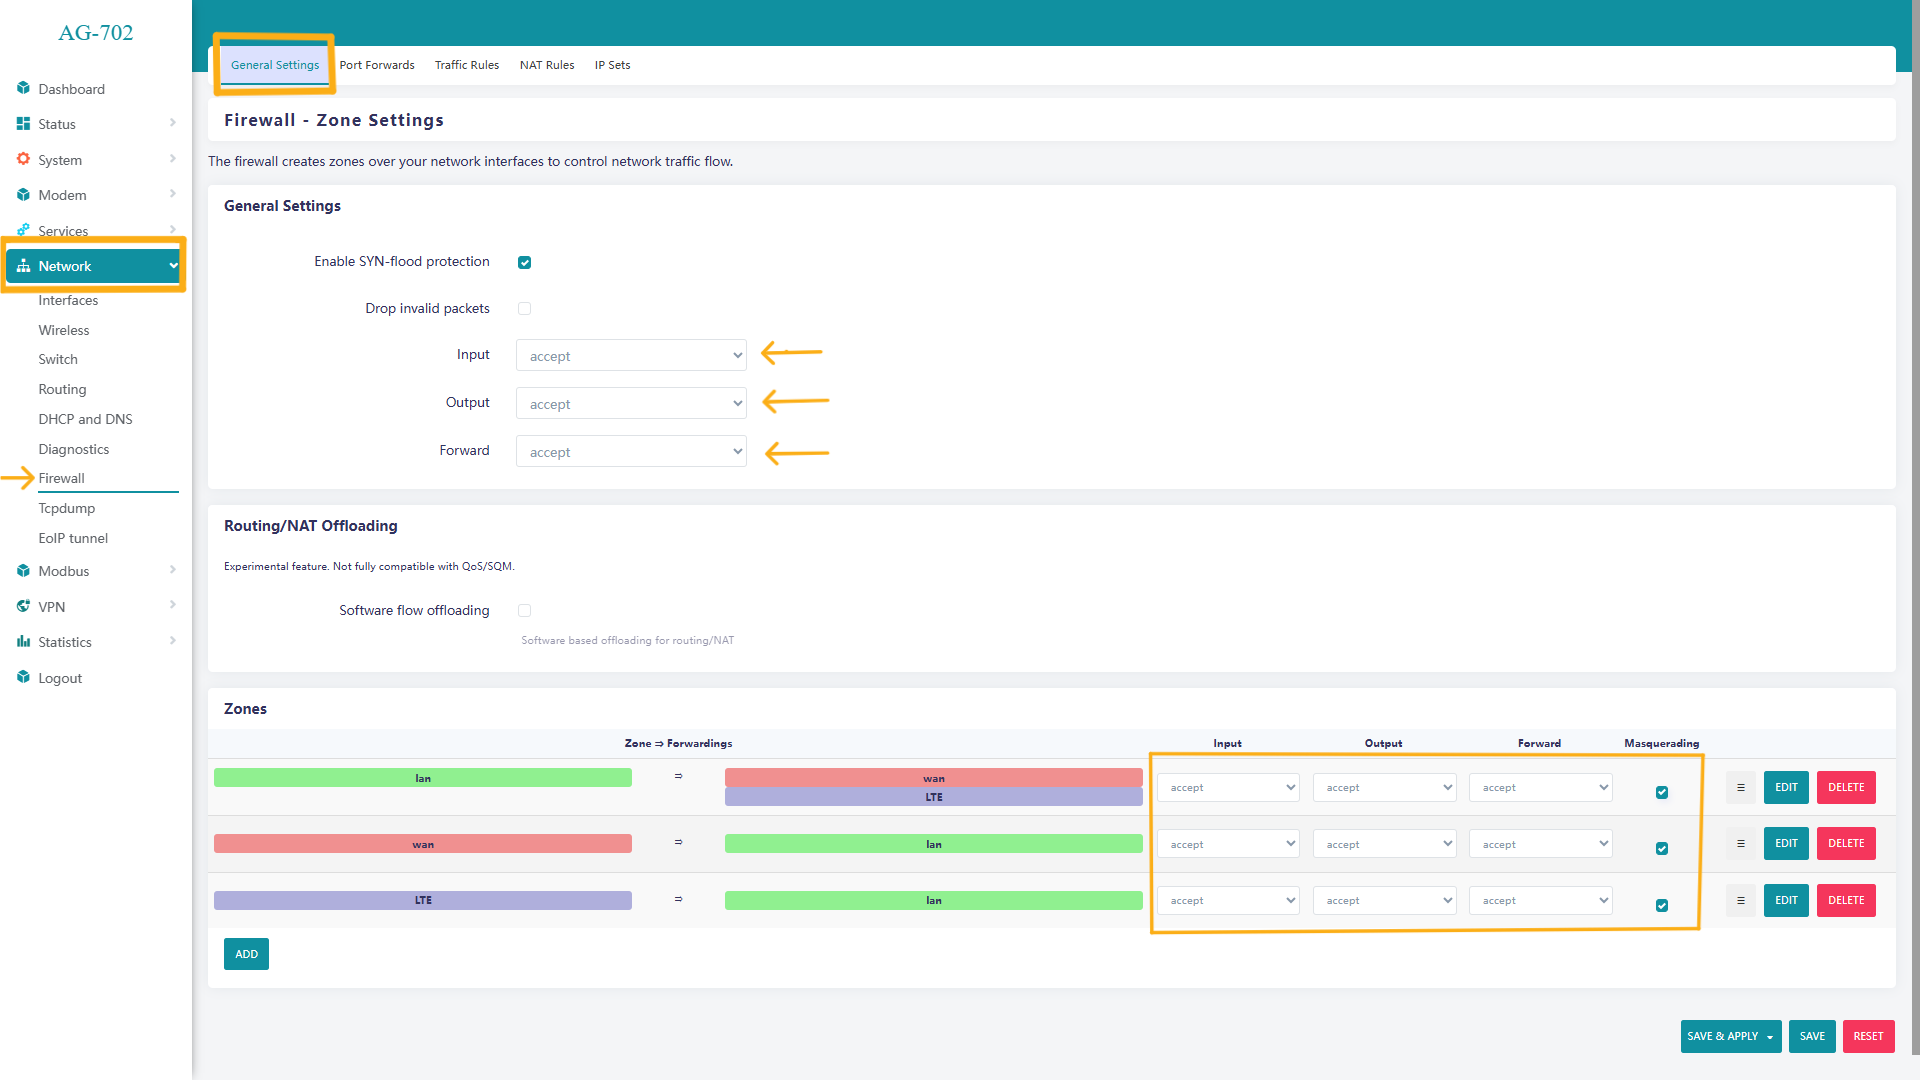
1.3 Port Forwarding Configuration
-
Open the Port Forwards tab.
-
Edit each existing port-forward rule one by one:
- Set Internal IP Address to:
192.168.12.1
- Set Internal IP Address to:
-
Save the rule.
-
Repeat this step for all port-forward entries.

-
Click Save & Apply.
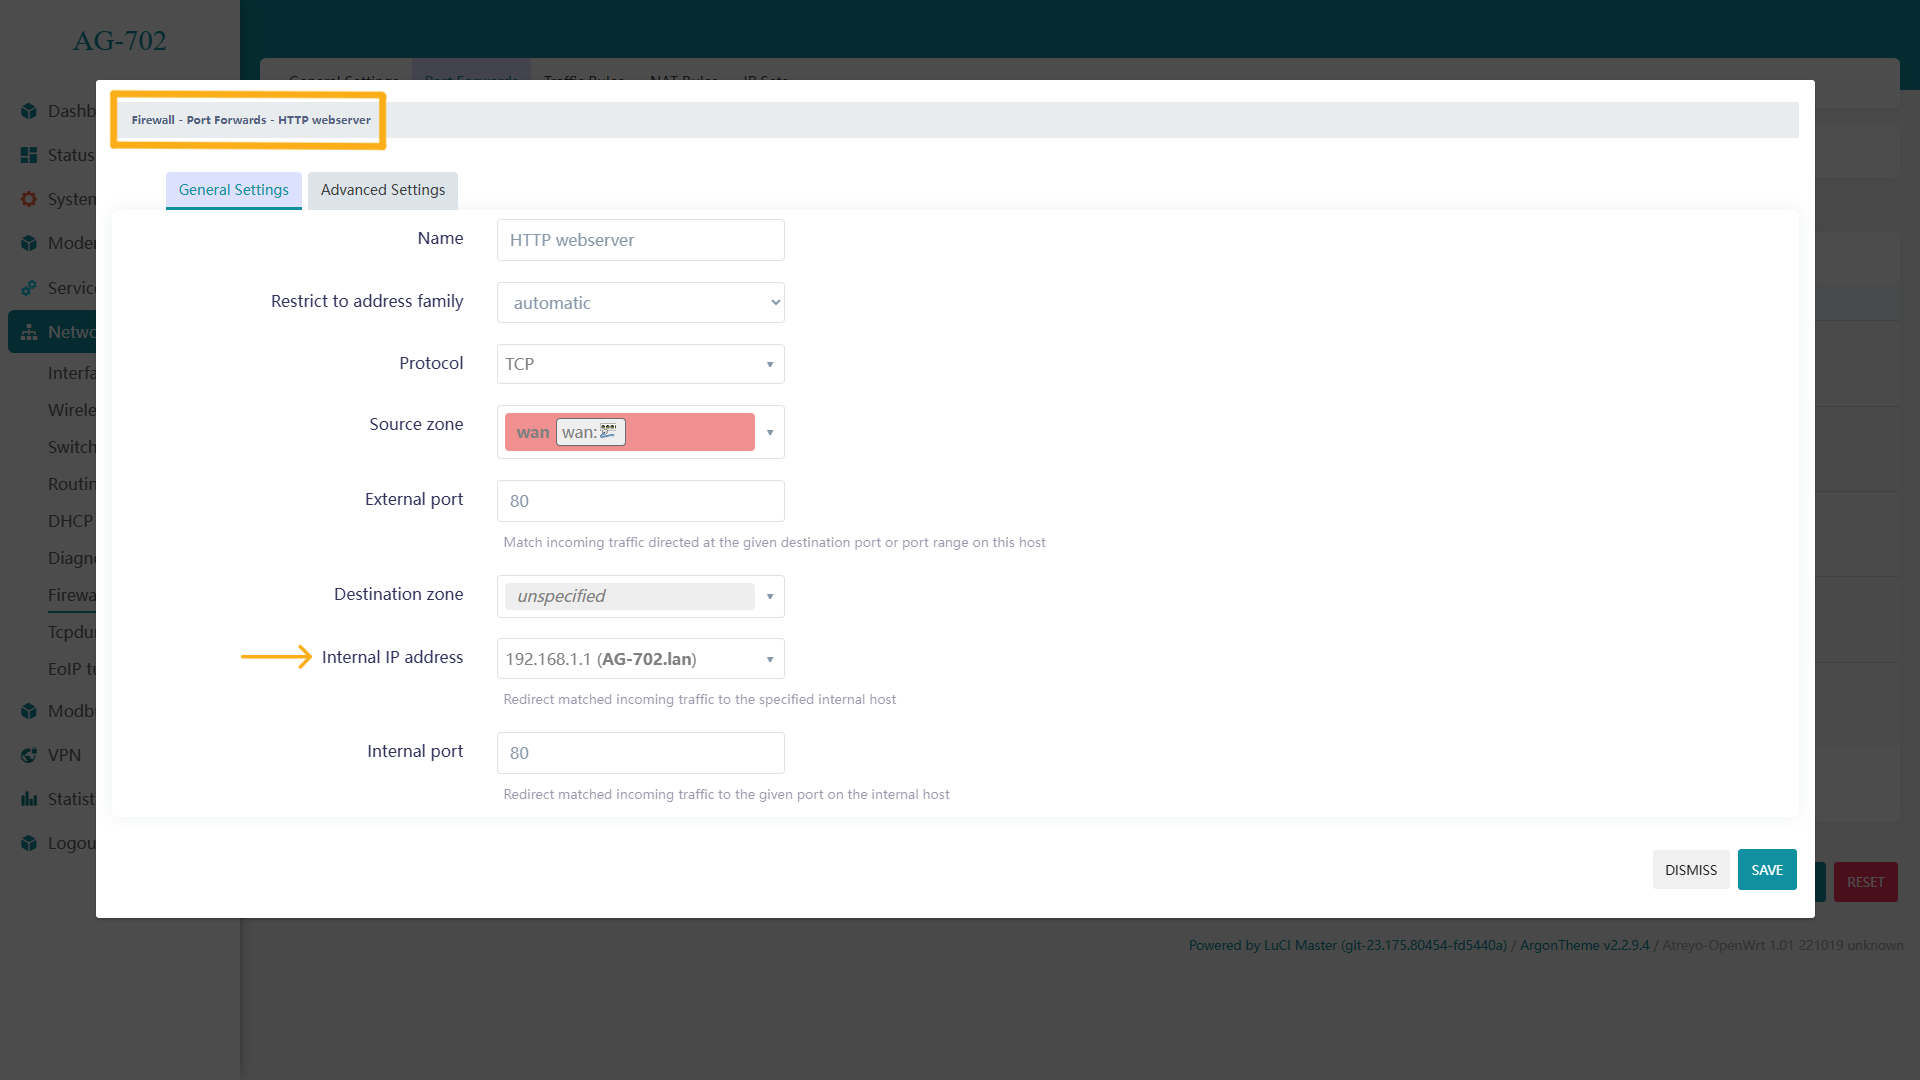
Result of Network Setup: The AG-702 gateway is now configured with a static LAN IP (192.168.12.1) aligned with the PLC subnet and is ready for registration in ATRA RMS.
2. Device Registration in ATRA RMS
-
Log in to ATRA RMS.
- Navigate to the Devices section.
-
Register the AG-702 gateway.
-
Verify that the device status shows Online.
3. VPN Tunnel Configuration in ATRA RMS
-
Navigate to the VPN section in ATRA RMS.
-
Create a new VPN tunnel.
-
Enable the VPN tunnel.
-
Add the registered AG-702 device to the tunnel.
-
Enable Network Forwarding.
-
Add the PLC network/subnet to the forwarding list.
- Example:
PLC IP:192.168.12.X
Network Forwarding IP 1:192.168.12.0/24
- Example:
-
Add the device to a Device Group.
-
Add required users to the VPN tunnel.
-
Start the VPN tunnel.
4. Remote PLC Access via ATRA VPN Client
-
Open the ATRA VPN Client (Windows Application).
-
Log in using your ATRA RMS credentials.
-
Connect to the configured VPN tunnel.
-
Open a terminal/command prompt.
-
Verify PLC connectivity:
ping 192.168.12.X- A successful reply confirms that the PLC is reachable through the VPN.
5. PLC Programming
-
Open the PLC programming software.
-
Go online with the PLC.
-
Perform program upload or download securely over the VPN connection.
Outcome
The PLC is now securely accessible from a remote location through ATRA RMS, using the AG-702 gateway and an encrypted VPN tunnel.
All communication is routed through the gateway, ensuring secure and controlled access without exposing the PLC or the local industrial network to the public internet.