
System Configuration Manual
Please read carefully before starting. Also read the product safety information.
1. First start
After unpacking, the gateway is ready to use, but requires configuration to adapt to the required functions.
1.1 Power supply
First, connect the power supply according to the power supply information.
2. Opening inbuilt website
2.1 Through the WAN interface
To access the built-in website, connect the gateway by WAN to the local network and enter the DHCP assigned IP address in the address window of the browser. Please note that it may take some time from powering on to booting up the system. When the LEDs next to the RJ45 socket start flashing, after about 10 seconds the built-in website becomes available.
user name: root
password: root
2.2 Through the LAN interface
Connect the ETH2 directly to the computer and enter in the address window of the browser default IP of Gateway.
IP: 192.168.1.1
user name: root
password: root
2.3 Through the WiFi interface
By default, the gateway creates its own network with default ESSID "AG-702". The network is secured with default password "atreyo12".
Connect to this network and enter the IP in the address bar of your browser.
IP: 192.168.1.1
user name: root
password: root

ASfter logging in, you are automatically taken to the dashboard page.
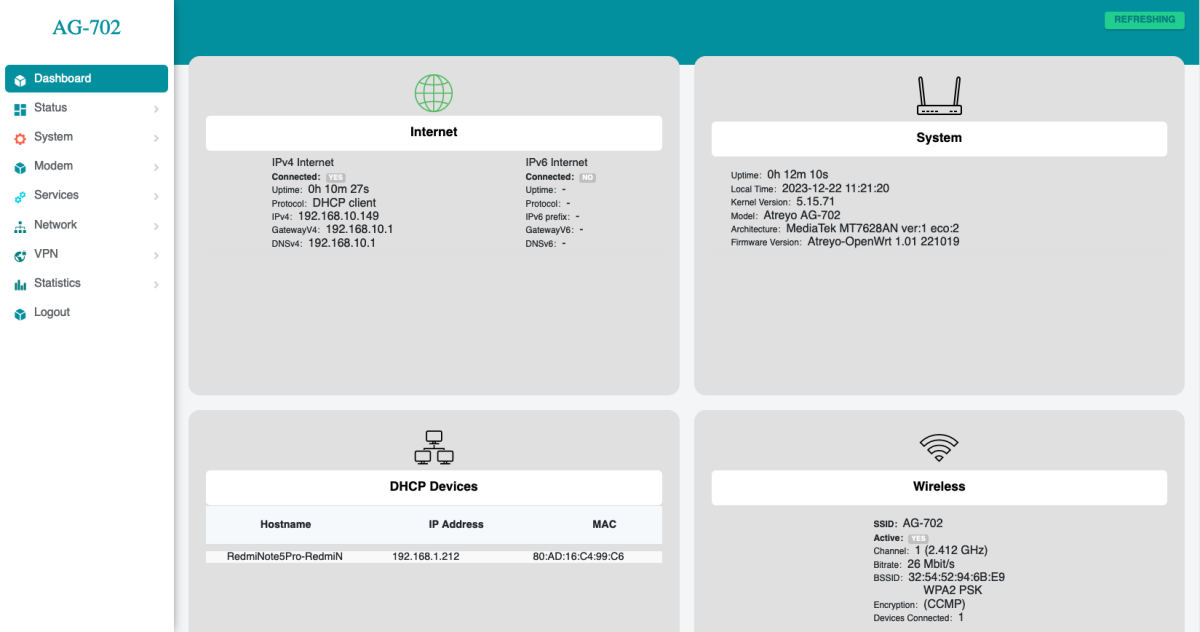
2.4 Password setting
At the top there is a message that no password has been set.
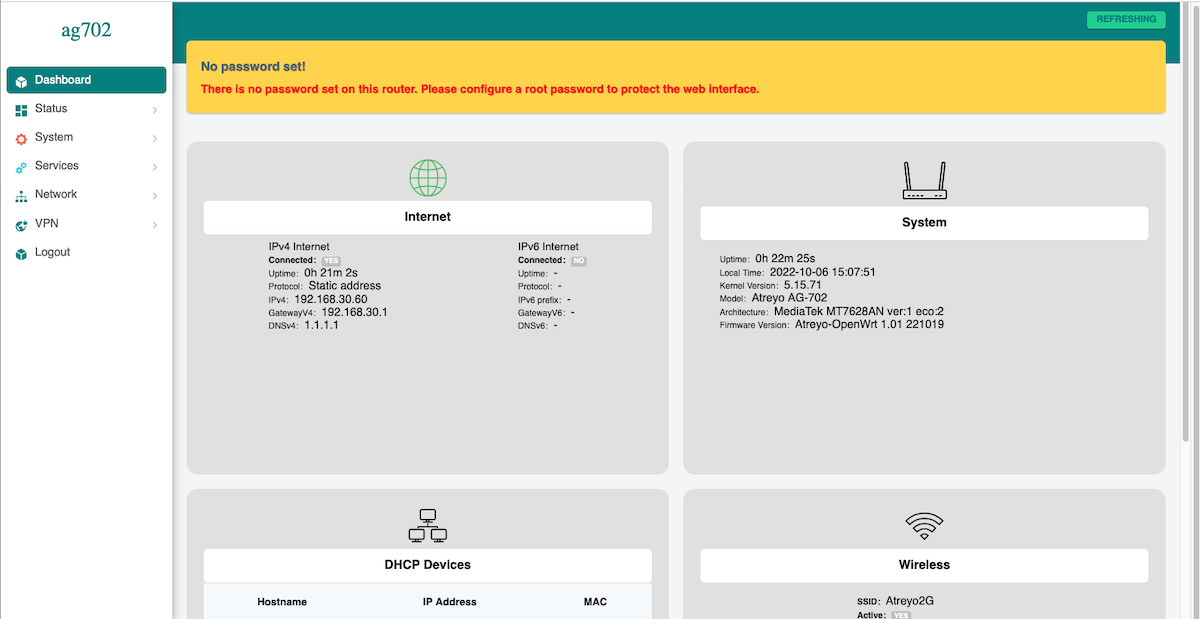
Set a password on the system>administration page:
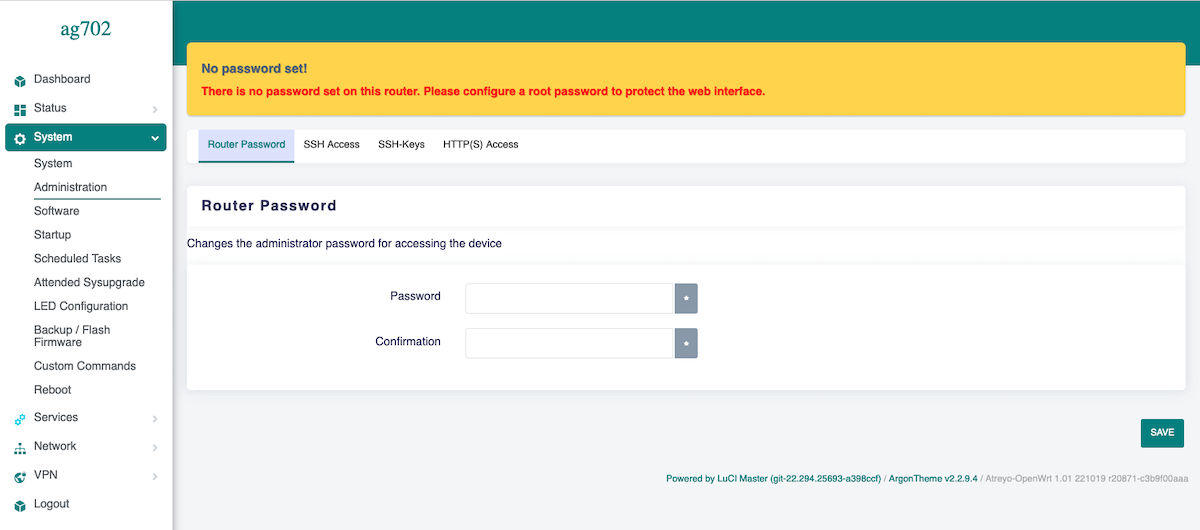
To maintain security, it is recommended to use long and complex passwords.
3. Cellular modem
3.1 Modem
The Gateway in its basic configuration is equipped with an LTE modem that also supports GPRS and SMS functions. Different modems were used depending on the model variant. Here is a table of models.
3.2 SIM card
The Gateway supports two nano SIM cards, both 1.8V and 3V. The card connector is tray type. When installing the SIM card, pay attention to the correct insertion of the card. The used SIM card tray is designed so that the card sticks to the tray. This make easily insert the SIM regardless of the position of the Gateway.
3.3 Using cellular network
The AG-702 has a built-in SIM Switch app. To connect to the Internet using SIM Switch, follow this guide.
We recommend using the SIM Switch app, but you can also start the modem manually by following the instructions below. Do not use both methods at the same time.
3.4 Manual modem configuration
To activate the LTE modem, go to Network > Interfaces and select the lte tab there.
Mostly the network operator requires you to enter the APN, sometimes it also requires a username and password. Enter the required data and save.
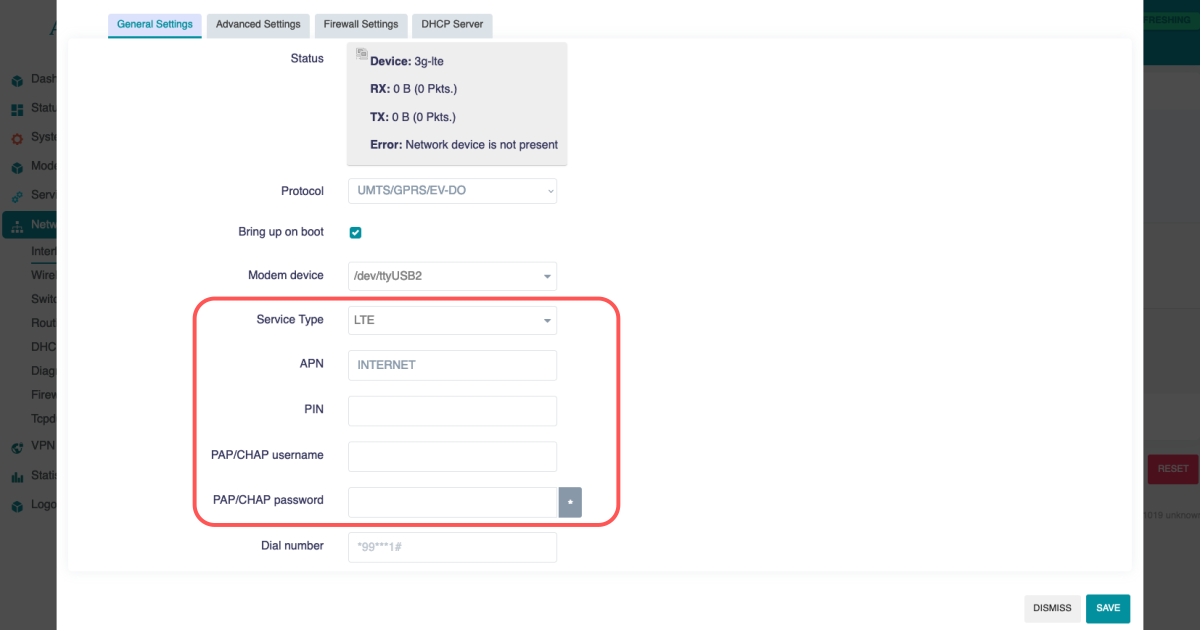
Then go to System > Custom Commands and click on Start modem with SIM1/Start modem with SIM2. Depending on which SIM card you want to start.
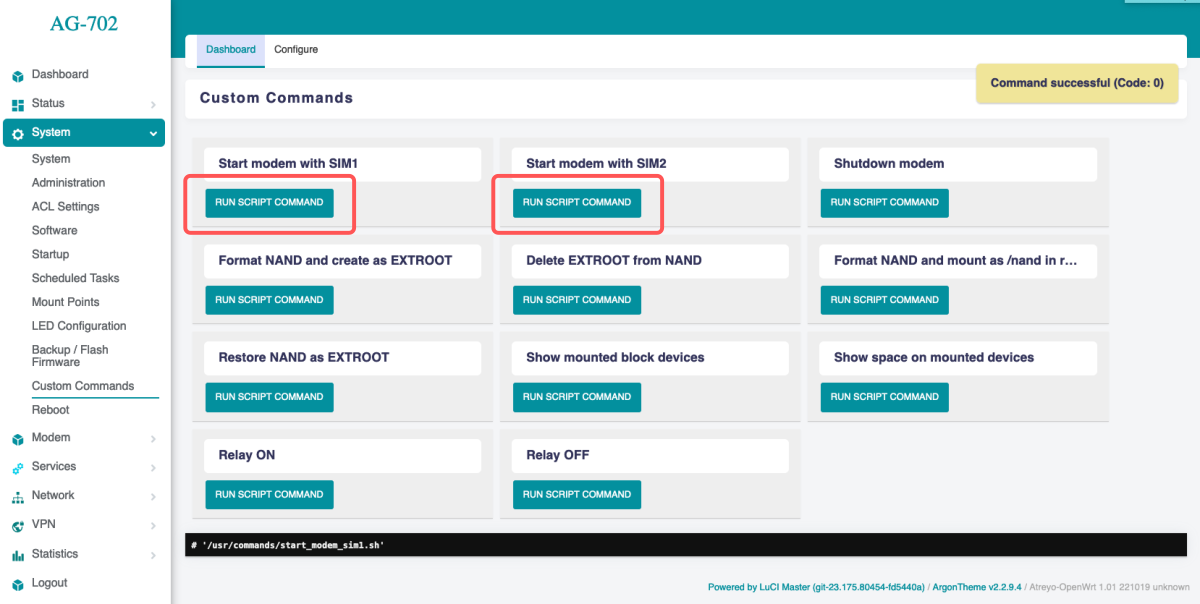
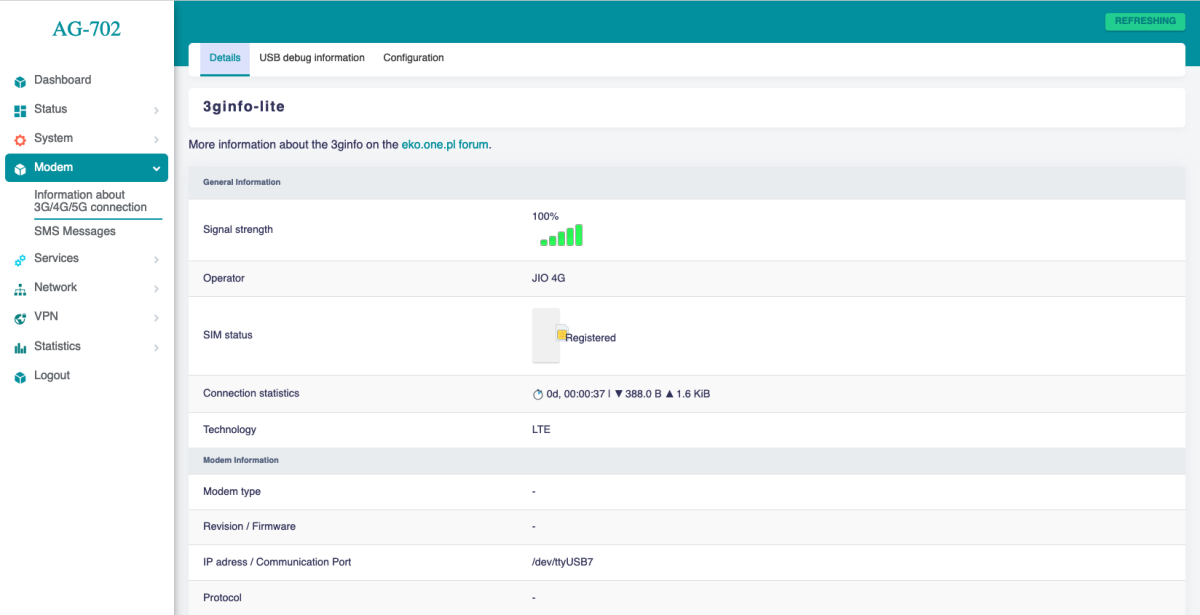
The modem will start up and connect to the Internet. To check if it is working properly and what the signal is, go to Modem > Information about 3G/4G/5G connection. When the modem starts up, the LEDs showing the signal strength will also light up. This makes it easy to see the signal strength in a particular location.
3.5 Cellular modem ON on start
To make the gateway automatically connect to the Internet after startup, you need to add a modem startup in the System > Startup section under Local Startup, add a line before line 'exit 0'.
/usr/commands/start_modem_sim1.sh or /usr/commands/start_modem_sim2.sh. Then save the changes. After each reboot, the gateway will automatically start the modem with the selected SIM card.
Remember, if you're using the SIM Switch app, don't set up a startup script.
3.6 SMS
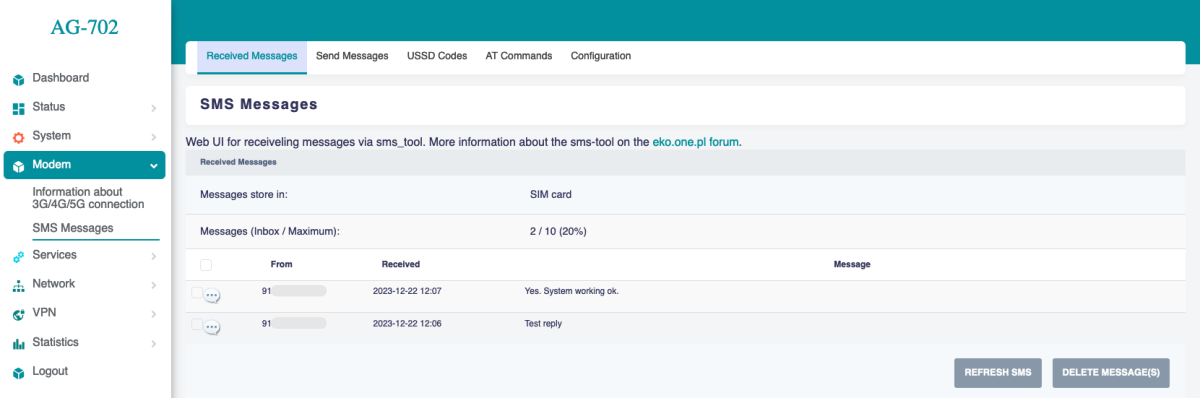
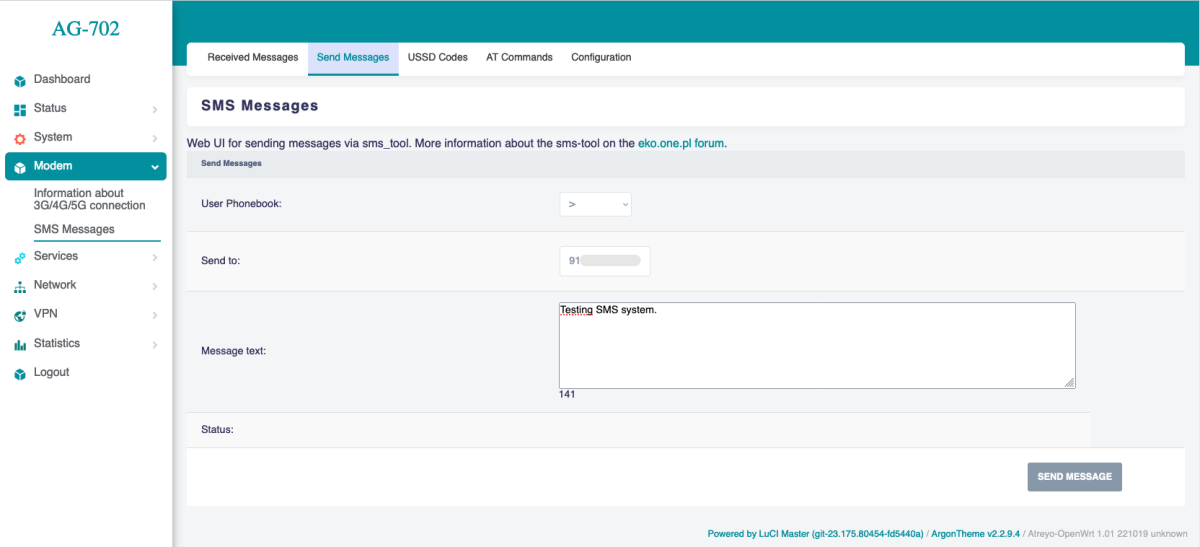
To test the SMS operation, the gateway has an SMS interface installed. Under Modem > SMS Messages. There you can check sent and received SMS. Be sure to enter the phone number together with the country prefix, but without the + sign. The maximum number of characters is 160. The system does not support alphabets such as devanagari. The maximum number of messages in the inbox is 20.
For send SMS go to Send Message tab.
4. System statistics
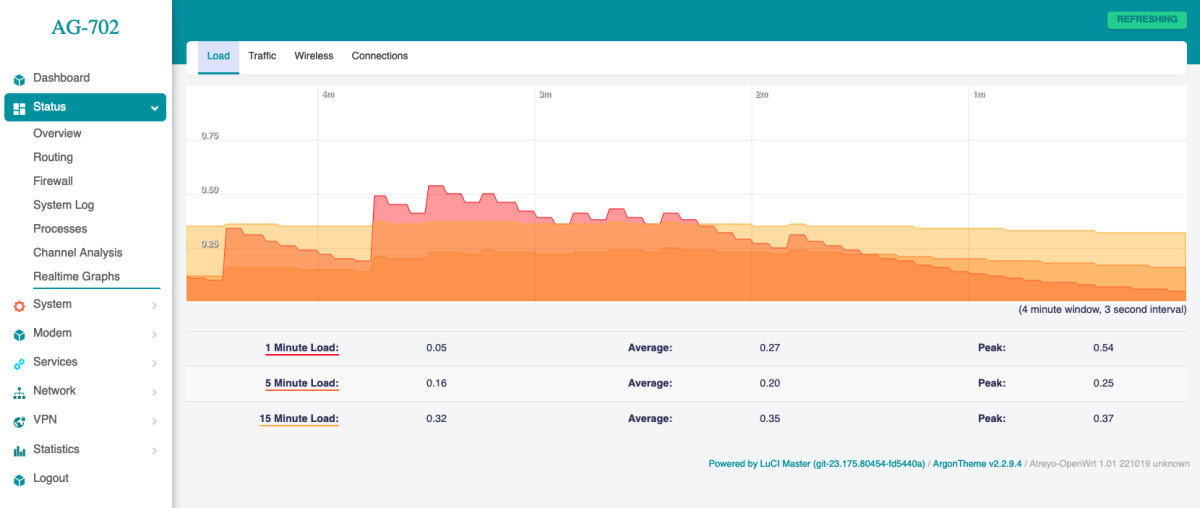
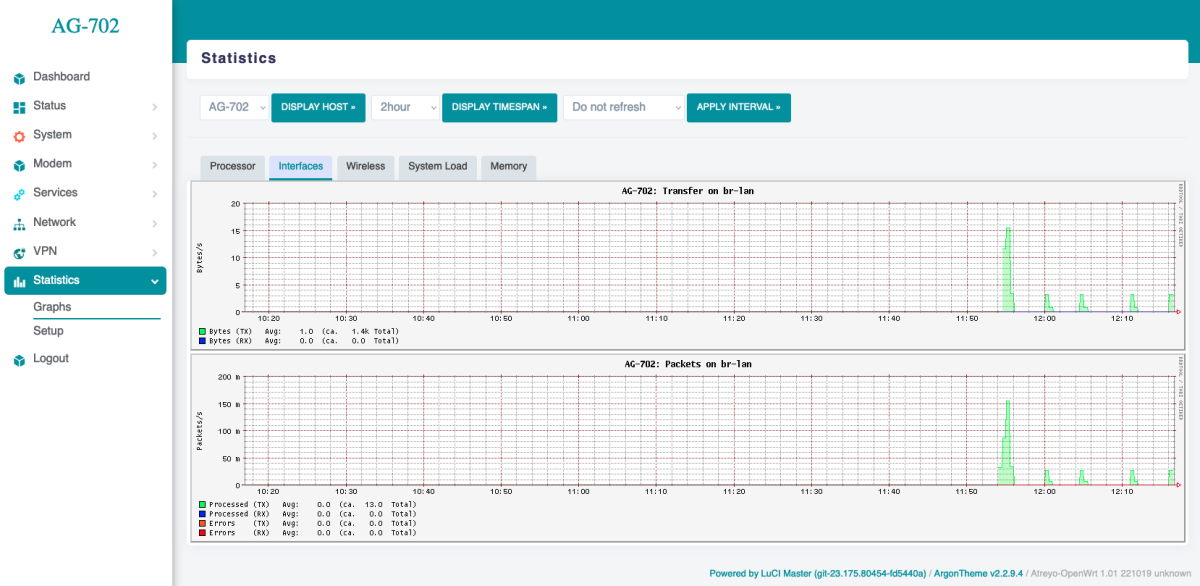
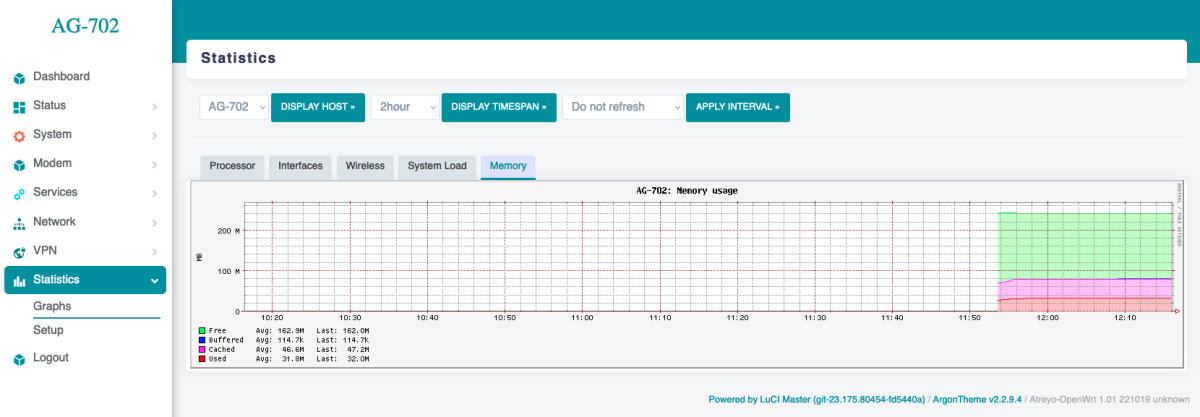
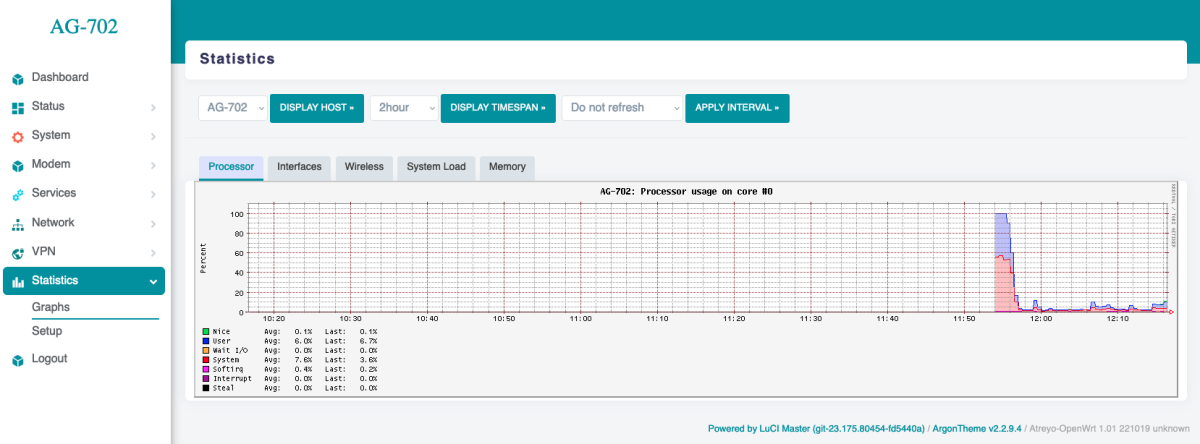
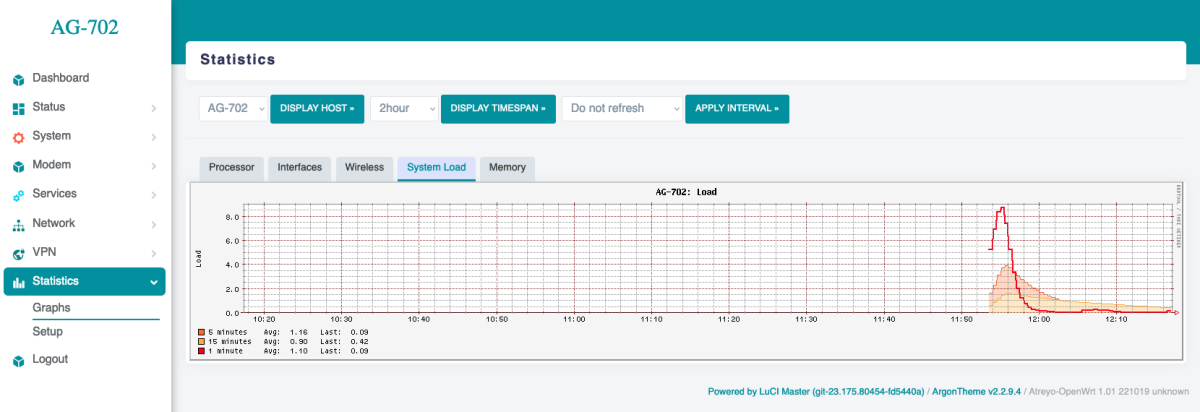
The gateway has a built-in real-time statistics system under Status > Realtime Graphs and accurate statistics with selectable time range under Statistcis > Graph. You can check CPU load, memory usage, network load, etc.
4.1 Realtime load
4.2 Statistics interfaces
4.3 Statistics memory
4.4 Statistics processor
4.5 Statistics system load
5. Serial interface and Modbus
The Gateway has a very advanced Modbus application with a convenient graphical interface. Below are the capabilities of the application:
- Modbus TCP/IP and Modbus RTU support.
- Any number of serial ports
- Support for external USB/serial interfaces
- JSON, TCP/IP and MQTT string formation
- Data logging in the event of no connection to a server
- Storage of all data in internal memory
5.1 Modbus fundamentals
Modbus is an industrial communication protocol used to exchange data between a client/master and one or more server/slave devices. The client starts the request and the server returns the requested data. This guide only covers the Modbus TCP and Modbus RTU functions used by this Modbus Master application.
| Modbus TCP | Uses Ethernet/TCP networking. Configure the slave IP address and TCP port. Port 502 is the standard Modbus TCP port. |
| Modbus RTU | Uses a serial communication link such as RS-485. Configure the serial port and the serial communication settings to match the slave. |
Always start with the slave manufacturer's Modbus map. It tells you the communication settings, slave/unit address, function code, register/coil address, quantity and data format required for that device.
5.2 Select the Communication Method
| Requirement | Use | What the user connects/configures |
|---|---|---|
| Slave is on an Ethernet/IP network | Modbus TCP | AG-702 Ethernet → network/switch → Modbus TCP slave; configure IP address and port. |
| Slave is a field device on a serial bus | Modbus RTU over RS-485 | AG-702 RS-485 → RS-485 slave bus; configure serial port, baudrate, data bits, parity, stop bits and slave ID. |
| Slave requires point-to-point serial | Modbus RTU over RS-232 | Use the AG-702 RS-232 interface only when the slave and application support that serial interface. |
Do not mix the settings. Modbus TCP uses an IP connection; Modbus RTU uses serial communication parameters.
5.3 Wiring & physical connections
Use the examples below as connection patterns. Exact connector names and polarity markings must always be checked against the connected device's own hardware manual.
Example A — Modbus RTU over RS-485 (2-wire)
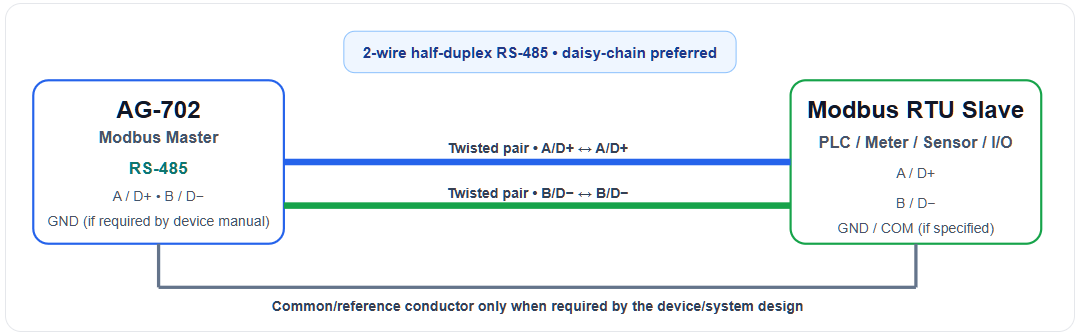
| Use | Use the AG-702 RS-485 interface with a compatible Modbus RTU slave. |
| Cable | Use a twisted-pair cable suitable for RS-485. Keep the bus physically ordered and avoid unnecessary long stubs. |
| Termination | For a properly terminated bus, termination matches the cable impedance; Schneider recommends 100–120 Ω at the two physical ends of the RS-485 network where required. |
| Biasing | Failsafe biasing may be required when the bus can be left electrically idle. Only one node should provide the biasing. |
Example B — Modbus RTU over RS-232 (point-to-point)
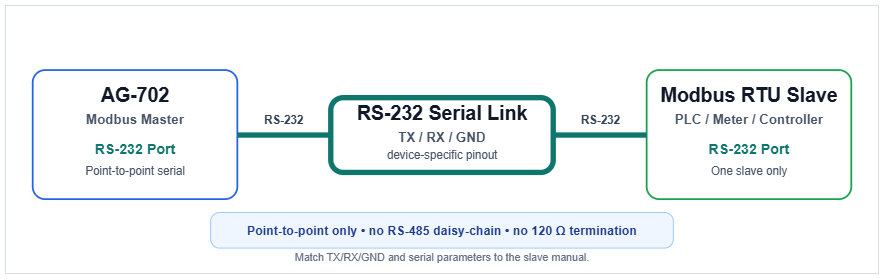
Important: RS-232 is a point-to-point serial interface. Do not use an RS-485 bus wiring model on an RS-232 port. Match TX/RX/GND and the slave's serial parameters exactly as specified by the slave hardware manual.
Example C — Modbus TCP over Ethernet
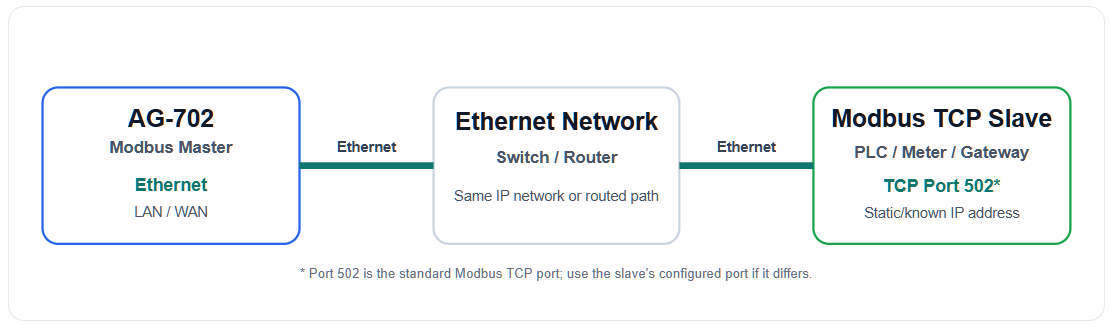
| Use | Connect an AG-702 Ethernet interface to the IP network containing the Modbus TCP slave. |
| Configure | Use the slave IP address and TCP port in the Modbus Master application. Port 502 is the standard Modbus TCP port. |
Modbus Deployment Scenarios
These diagrams show how the AG-702 can collect data from multiple RS-485 Modbus RTU slaves and multiple Modbus TCP/IP slave devices.
3.1 AG-702 Mixed TCP/IP & RS-485 Deployment
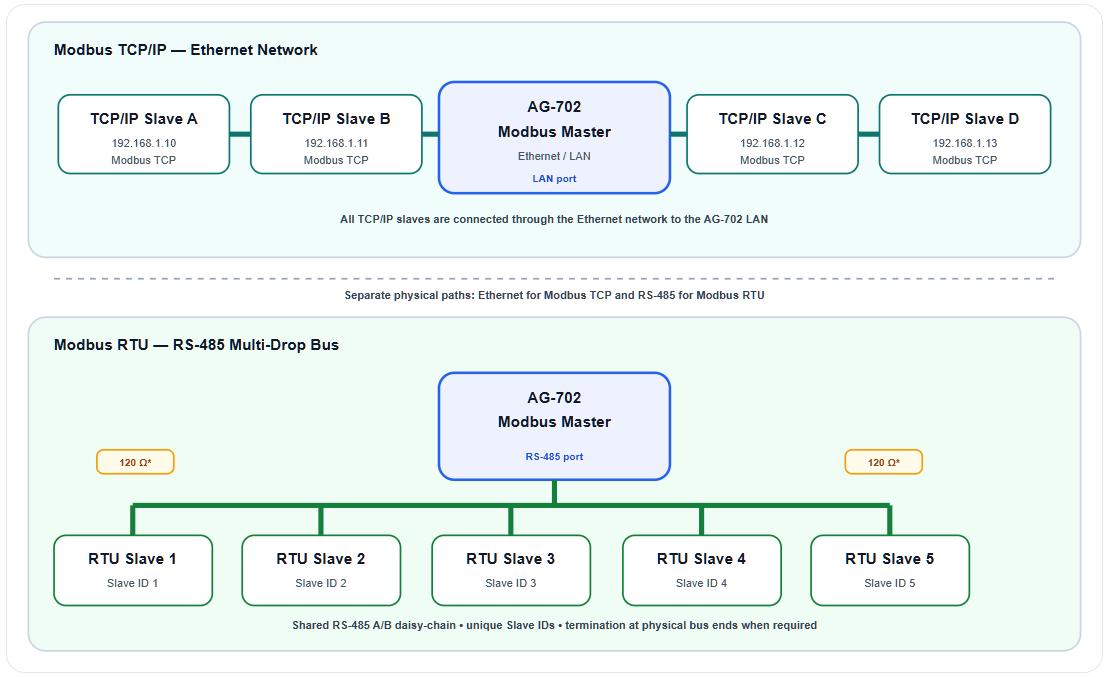
In this example the AG-702 is the central Modbus Master. Five RTU slaves share one RS-485 daisy-chain connected directly to the AG-702 RS-485 port: three slaves are shown on the left and two on the right. Four separate TCP/IP slaves connect through the Ethernet network on the AG-702 LAN side.
| RS-485 side — five RTU slaves |
|
| Ethernet side — four TCP/IP slaves |
|
| Device group | Physical connection | Protocol | Addressing |
|---|---|---|---|
| RTU Slave 1–5 | AG-702 RS-485 → shared A/B bus | Modbus RTU | Slave IDs 1–5 |
| TCP/IP Slave A–D | AG-702 LAN → Ethernet network → slave | Modbus TCP | IP address + device/unit identifier as required |
Important: RTU slaves are connected to the AG-702 RS-485 port. TCP/IP slaves are connected through the AG-702 Ethernet/LAN port. These are two separate physical communication paths.
3.2 RS-485 Daisy-Chain Wiring — Multi-Slave Field Example
A single AG-702 RS-485 port can serve multiple Modbus RTU slave devices on one shared two-wire bus. Connect A (D+) to A (D+) and B (D−) to B (D−) throughout the chain, assign a unique Slave ID to every device, and install a 120 Ω termination resistor between A and B only at the two physical ends of the bus.
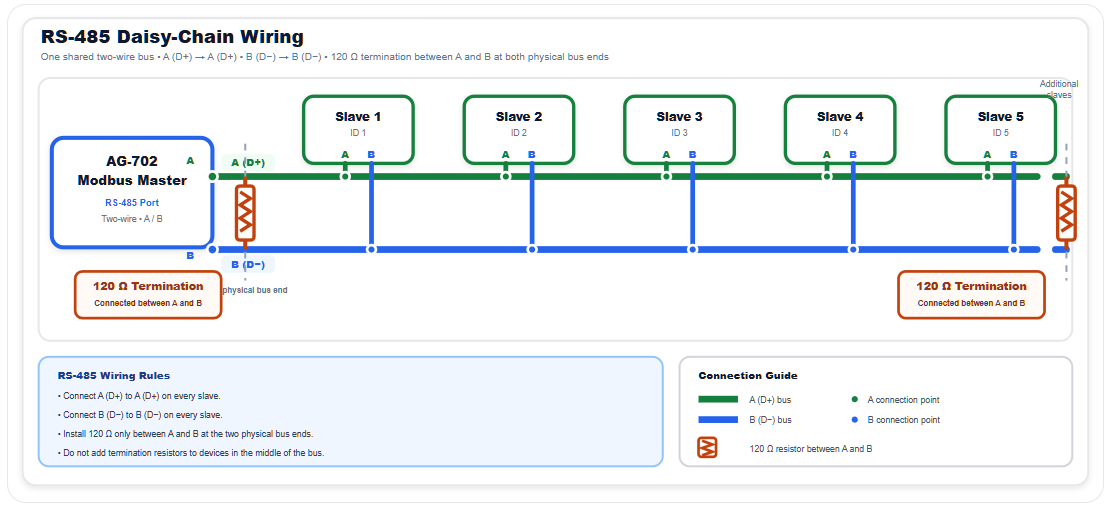
Important: RS-485 is a shared two-wire bus. Keep the topology physically ordered as a daisy-chain, keep drop cables short, connect A to A and B to B consistently, and place 120 Ω termination resistors only at the two physical ends of the bus.
A detailed guide to Modbus configuration is available here.
6. Using the terminal
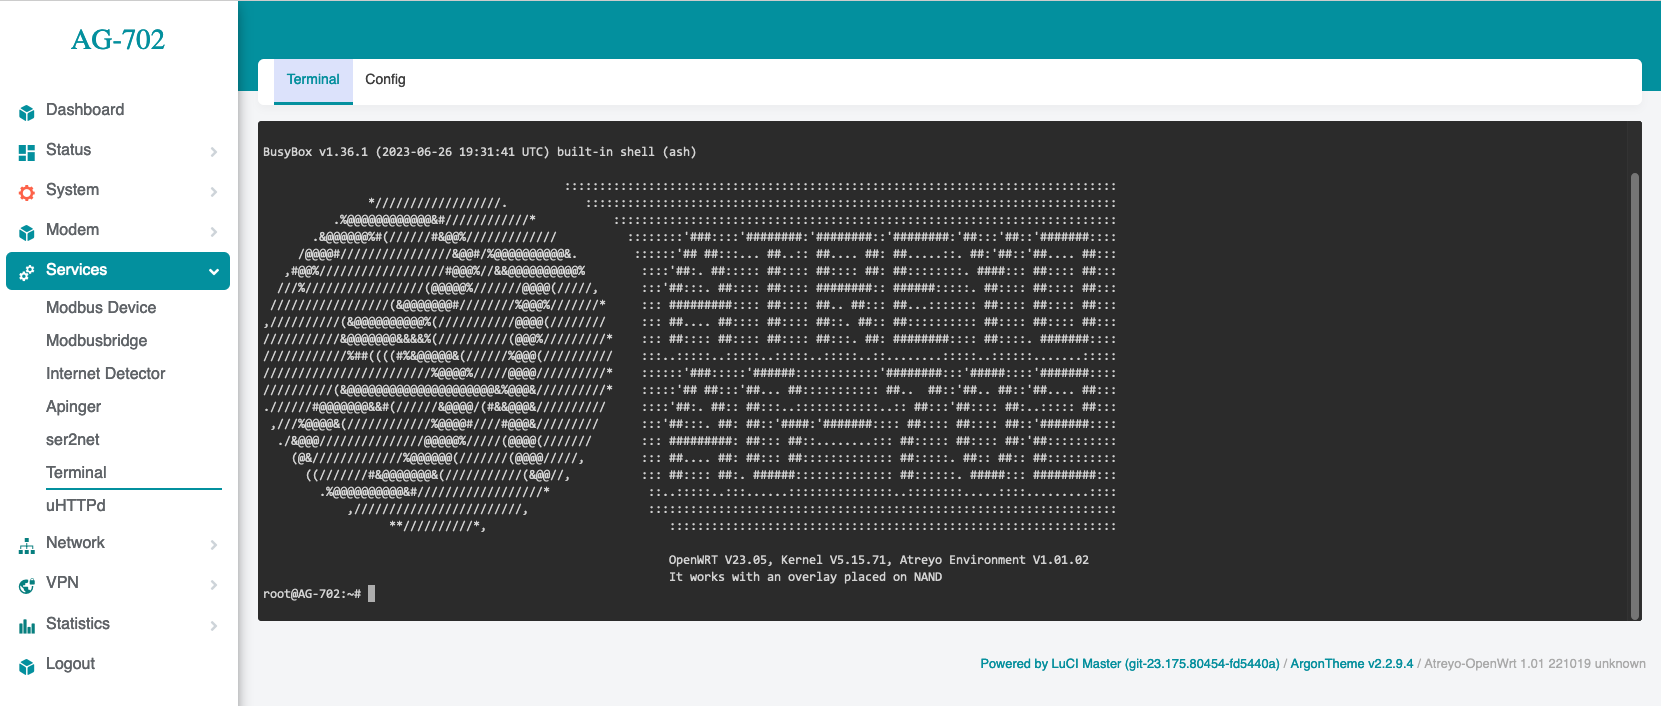
The AG-702 has a built-in bash terminal. With it you can execute all commands in the OpenWRT system. To enter the terminal, go to the tools > terminal section on the built-in website. The default password is the same root/root.
7. Reset and default
7.1 Make factory default
To reset the system to factory settings, hold down the "Default/Reset" button for more than 5 seconds while the device is operational. During the factory reset, all LED indicators will light up for 2 seconds.
7.2 Reset device
To restart the gateway without disconnecting the power supply, press and hold the "Reset/Default" button for less than 5 seconds. During the restart, 4 LED indicators will light up for 1 second (IN-1, IN-2, RS485, RS232)
Do not hold the button for more than 5 seconds, as it will trigger the gateway to restore default settings.