Getting Started
Application Overview
After successful login, the main dashboard of the Atra VPN Client will be displayed. The dashboard provides key information and quick access to essential features:

- App Version : The top section shows the current version of the Atra VPN Client you are running.
- Associated Organization : Displays the organization name linked to your Atra-RMS account.
- Theme Toggler (Dark/Light Mode) :
-
A simple toggle allows you to switch between light theme and dark theme instantly.
- Preferences are saved so the app remembers your last selected mode.
-
- Profile Avatar :
-
Located at the top-right corner of the dashboard.
- Clicking the avatar opens a dropdown with:
- mail Address (your login email)
-
Organization Name
-
Logout option (to securely sign out of the application)
-
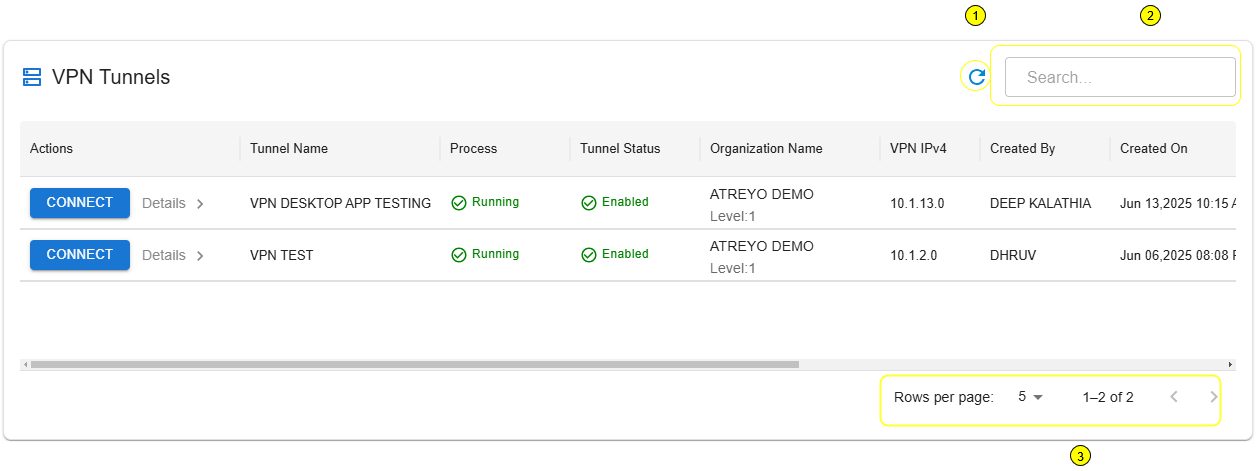
VPN Tunnels Table
On the main page, users will see a table listing all VPN tunnels associated with their organization. This table is the central place to view, and connect to VPN tunnels.
Key Actions and Management Tools:
-
Search Bar: Allows you to quickly find a tunnel by typing in keywords (e.g., tunnel name, organization, or created by).
- Refresh Icon: Refreshes the tunnel list to show the most current data.
- Table Navigation:
- Rows per page : Adjust the number of child organizations shown on the screen.
- Total Count : Displays the total number of child organizations.
- Page Navigation : Move between pages.
📋 Table Columns & Features
| Parameter | Definition | Example |
| Connect Button | Allows the user to connect or disconnect from the selected VPN tunnel. After a successful connection, the button changes from Connect to Disconnect. | Connect / Disconnect |
| Details | Opens a sidebar displaying detailed information about the selected tunnel and its associated devices. | |
| Process Status | Indicates whether the VPN tunnel process is currently running. | Running, Exited |
| Tunnel Status | Shows if the VPN tunnel is enabled and available for use. | Enabled, Disabled |
| Organization Name | The organization to which this tunnel belongs. | Atreyo Demo |
| Organization Level | The hierarchical level of the organization related to the tunnel. |
Level : 1,2 ,3
|
| VPN IPv4 | The IP address assigned to the tunnel for internal VPN communication. |
10.8.0.1 |
| Created By | The username of the creator of the tunnel. |
test@atreyo.in |
| Created On | The date tunnel was created in the system |
2025-09-15 |
| Total Users | Total numbers of users assigned to this tunnel |
10 |
| Total Devices | Total numbers of devices associated with this tunnel |
5 |
| Max Clients | The maximum number of devices associated with this tunnel |
253 |
| Allocated Clients | The number of clients currently connected |
3 |
| Remaining Clients | The number of remaining client slots available |
250 |
📋 Associated Device Details
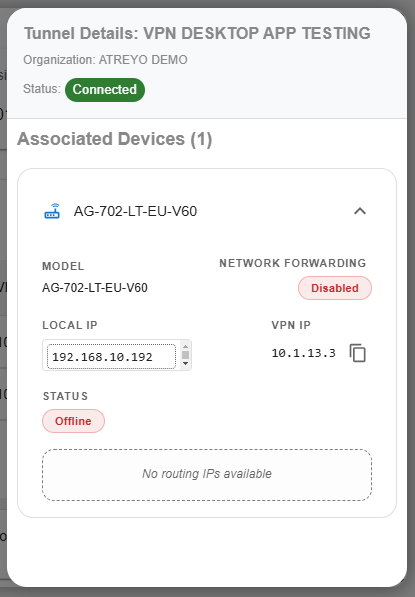
- Device Model : The name or model of the connected device within the selected tunnel.
- Local IP :
- The local (LAN) IP address of the device.
- This IP is used for communication within the local environment and helps identify the device inside your local subnet.
- VPN IP :
- Indicates whether network forwarding is enabled for the device.
- This IP allows the device to communicate securely over the encrypted VPN tunnel.
- Network Forwarding :
- Indicates whether network forwarding is enabled for the device.
- When enabled, the device can forward network traffic through the VPN tunnel, allowing communication between multiple devices or networks securely.
- Connection Status : Shows if the device is currently connected to the VPN.
- Routing IP :
- Lists available routing IPs for data transfer through the VPN tunnel.
- These routing IPs define which network ranges or subnets can be accessed through the VPN tunnel from this device.
🔗 Connecting to a Tunnel
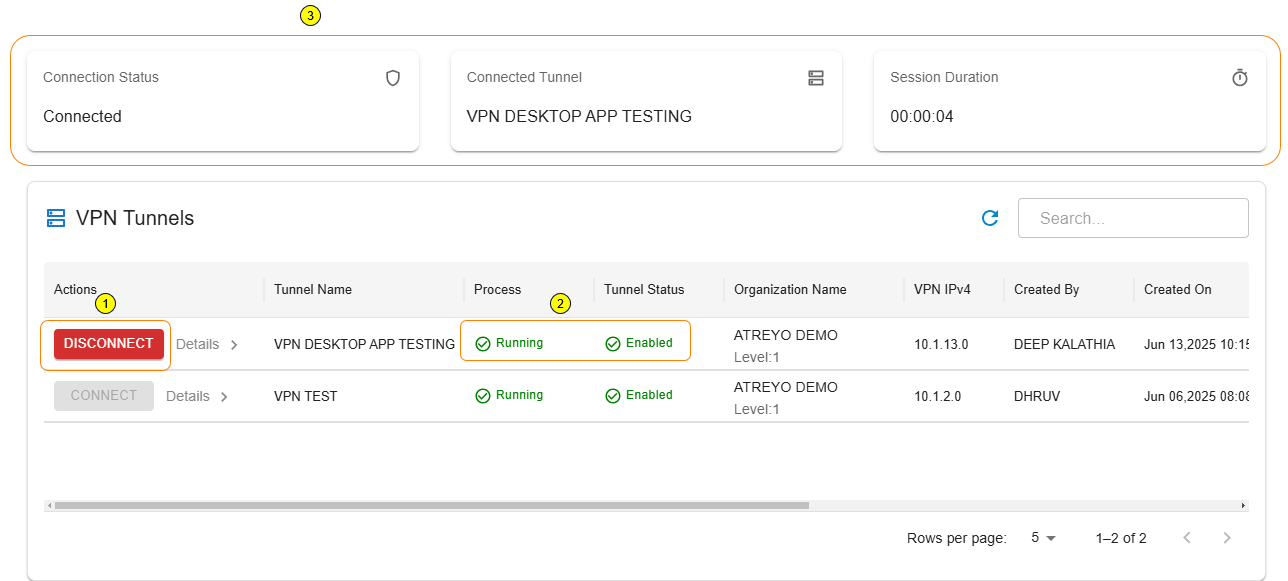
-
Click the Connect button for a desired tunnel.
-
If the tunnel is running and enabled, the app will initiate a secure connection.
- After a successful connection:
-
The Connect button transforms into Disconnect.
- Three status cards appear at the top of the page showing:
-
The currently connected tunnel
- Connection details
-
The session duration
-
-
Important: You can connect to only one tunnel at a time. If a tunnel is already connected, all other tunnels will remain disabled until you disconnect.
🔗 Disconnecting to a Tunnel
-
Click the Disconnect button on the active tunnel row.
- The VPN tunnel session will safely close.
- The status cards (connected tunnel details and duration) will disappear.
- Other tunnels will become available for connection again.
Disconnecting is required before switching to another tunnel.
If the internet connection is lost, the app may auto-disconnect for security.