Getting Started with the Atra VPN App
Application Dashboard Overview
After
The main dashboard has three sections:
Top Bar:
App Version: Current version number (e.g., v1.2.3)
Organization Name: Your associated organization
Theme Toggle: Switch between light/dark mode
Profile Avatar: Access account menu
Middle Section:
Main Area:
VPN Tunnels Table: List of theavailable tunnels
Top Bar Elements

1. App Version
Display: Top-left corner
Format: "Atra VPN Client willv1.2.3"
Purpose: beShows displayed.current Theinstalled dashboardversion
When to essential features:Check:

-
ATroubleshootingsimple toggle allows you to switch between light theme and dark theme instantly.issues PreferencesareVerifying
savedyousohavethelatestappversionremembers
Reporting selectedbugs mode.to support
Profile2. AvatarAssociated :Organization
Display: Below app version
Format: "Organization: [Your Org Name]"
Purpose: Confirms which organization's tunnels you see
What This Means:
-
LocatedYouatseethetunnelstop-rightcreatedcornerinofyourthe dashboard.organization ClickingtheYou
avatarseeopenstunnelsayourdropdownorganizationwith:has access to
Cannot see tunnels from unrelated organizations
3. Theme Toggle
Location: Top-right area
Options: Light Mode | Dark Mode
How to Use:
Click theme toggle switch
Interface immediately switches themes
Preference saved automatically
Applied on next launch
Benefits:
mailLight Mode: Better for bright environments
Dark Mode: Reduces eye strain in low-light conditions
4. Profile Avatar

Location: Top-right corner
Icon: Circle with user initials or icon
Email Address (yourdisplay loginonly)
Organization Name (display only)
Logout option (click to securely sign out of the application)out)
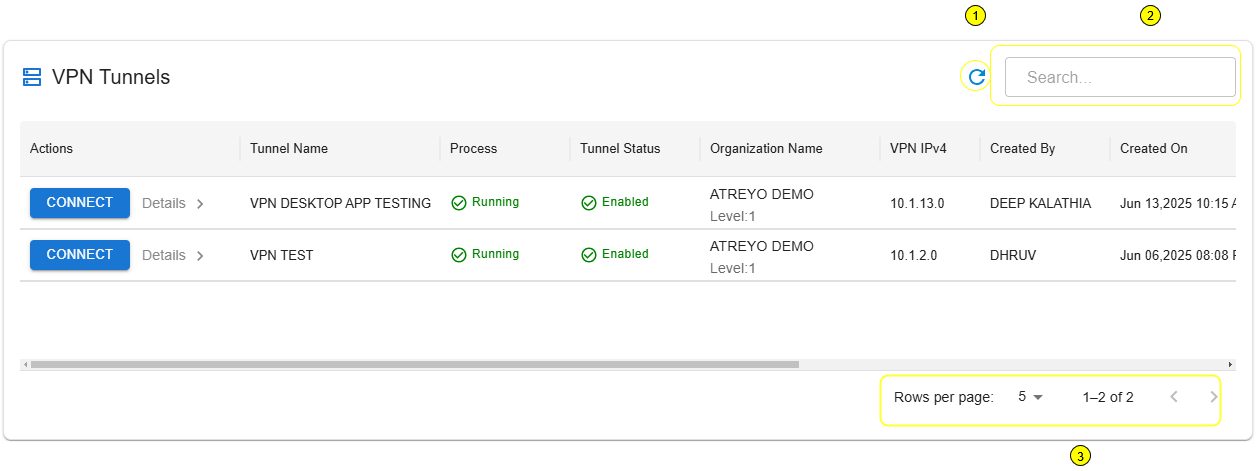
VPN Tunnels Table
On theThe main page, users will see a table listingdisplays all VPN tunnels associatedyou withhave theiraccess organization. This table is the central place to view, and connect to VPN tunnels.to.
Key Actions and Management Tools:
Table
Search & RefreshSearch BarBar::
Type keywords to quicklyfilter findtunnels
Searches: typing in keywords (e.g., tunnelTunnel name, organization, or created by).by
Real-time filtering (results update as you type)
Refresh IconIcon::
Click to manually update tunnel list
Useful after tunnels are created/deleted in web interface
-
Rows per
pagepage::10,Adjust25,the50,number100
Total Count: "Showing 1-10 of child25 organizationstunnels"
Page NavigationNavigation: :Previous, MoveNext, betweenpage pages.numbers
📋 Table Columns & Features
Column |
Description |
Values |
|
Connect Button |
ConnectDisconnectRunningExitedEnabledDisabledLevelConnect/disconnect :from 1,2 ,3tunnel
"Connect" or "Disconnect"
Details
Opens sidebar with device info
Button with icon
Process Status
VPN server process state
Running, Exited
Tunnel Status
Management state
Enabled, Disabled
Organization Name
Tunnel's organization
ATREYO DEMO
Organization Level
Hierarchy level
Level: 1, 2, 3
VPN IPv4
Tunnel gateway IP
10.8.0.1
Created By
Creator's ofemail
test@atreyo.in
Created On
Creation date
2025-09-15
Total Users
Users of users assigned to thisin tunnel
10
Total Devices
Devices of devices associated with thisin tunnel
5
Max Clients
Maximum numbercapacity
253
Allocated Clients
3Current users + devices
15
Remaining Clients
250Available slots
238
📋 Associated Device Details
🔗
Connecting to a Tunnel

[INSERT SCREENSHOT: Connect_Process.png]
Before Connecting
✅ Tunnel Status = "Enabled"
✅ You are added to tunnel (by administrator)
✅ No other tunnel currently connected
⚠️ One Tunnel at a Time: You can only connect to ONE tunnel at a time.
Connection Steps
Step 1: Locate Tunnel
Find tunnel in table
Verify Process Status = "Running"
Verify Tunnel Status = "Enabled"
Step 2: Click Connect
-
Click
the Connect"Connect" button foradesiredtunnel.tunnel
Application initiates VPN connection
OpenVPN process starts in background
Connection established (typically 5-15 seconds)
Visual Feedback:
Button shows "Connecting..." briefly
Progress indicator may appear
Button changes to "Disconnect" when connected
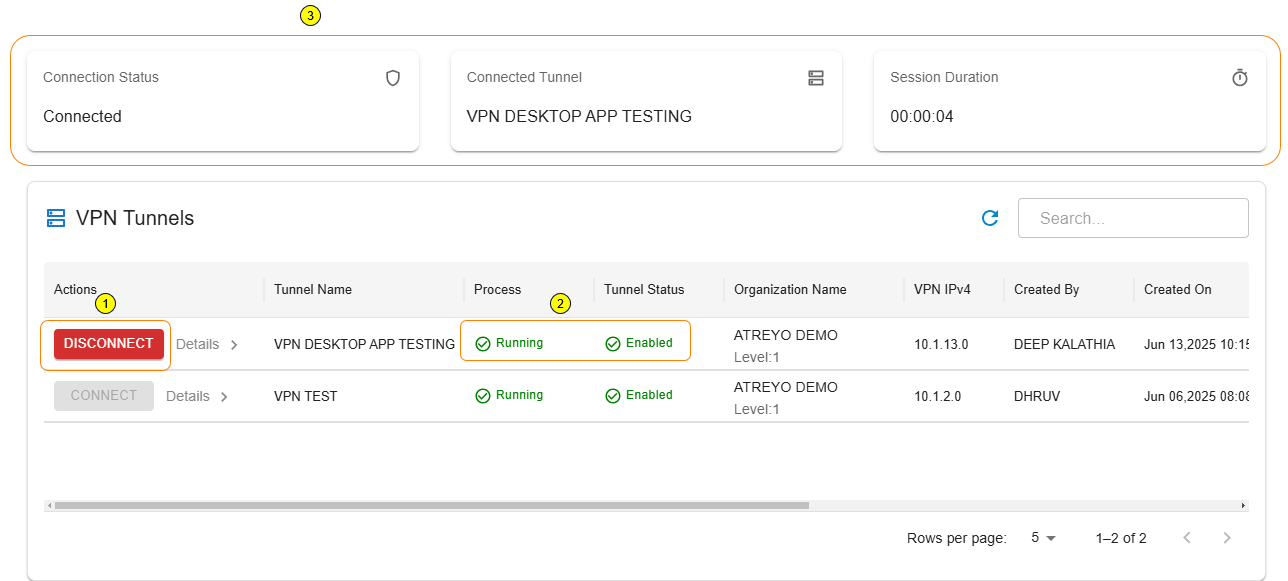
Step 3: Connected State
Once connected, three status cards appear at top of application:
Card 1: Connected Tunnel
Shows tunnel name you're connected to
Example: "Connected to: Factory_Production_VPN"
Card 2: Connection Details
Your VPN IP address
Example: "Your VPN IP: 10.8.0.25"
Gateway IP
Connection speed/status
Card 3: Session Duration
Time connected
Example: "Connected for: 00:45:23"
Updates in real-time
While Connected
What You Can Do:
✅ Access devices in tunnel via their VPN IPs
✅ Access devices' local networks (if Network Forwarding enabled)
✅ View connection details in status cards
✅ Monitor session duration
✅ Click "Details" to view device information
What You Cannot Do:
❌ Connect to other tunnels (must disconnect first)
❌ Close application (minimizes to system tray, stays connected)
Other Tunnels:
While connected, other "Connect" buttons are disabled (grayed out)
Disconnecting from Tunnel
Manual Disconnect
Step 1: Click Disconnect
Locate "Disconnect" button on active tunnel row
Click "Disconnect" button
VPN session cleanly closes
OpenVPN process terminates
Step 2: Disconnected State
After disconnection:
Status cards disappear from top
Button changes back to "Connect"
Other tunnels become available (buttons enabled)
Can connect to different tunnel
Effects:
Cannot access tunnel devices anymore
Local network access lost
VPN IP deallocated until next connection
Automatic Disconnect
Scenarios Where App Auto-Disconnects:
1. Internet Connection Lost:
VPN requires active internet
If theinternet tunneldrops, isVPN runningdisconnects and enabled, the app will initiate a secure connection.automatically
Notification successfulappears: connection:"Connection lost"
Attempt to reconnect when internet restores
2. Tunnel Stopped by Administrator:
-
TheAdministratorConnectstopsbuttontunneltransforms into Disconnect.process ThreestatusAll
cardsconnectionsappearterminateat
Notification: of"Tunnel thestopped pageby showing:administrator"
3. Tunnel Disabled by Administrator:
-
TheAdministratorcurrently connecteddisables tunnel
TheProcess sessionstops, durationall connections drop
Notification: "Tunnel disabled"
4. User Removed from Tunnel:
Administrator removes you from tunnel
Connection immediately terminates
Notification: "Access revoked"
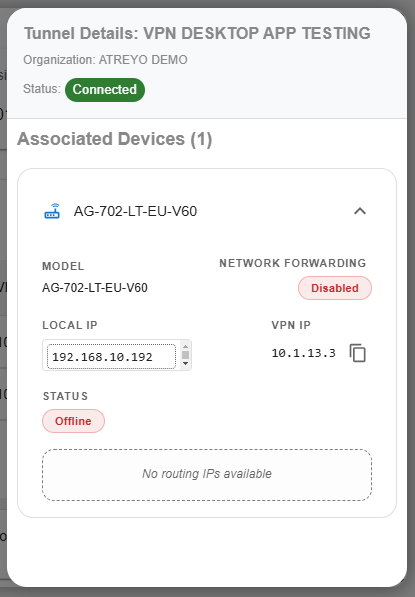
Device Details Sidebar
Click Important:"Details" You can connectbutton to onlyview onedevices tunnelin atthe a time. If a tunnel is already connected, all other tunnels will remain disabled until you disconnect.tunnel.

🔗Opening DisconnectingDetails to a TunnelSidebar
-
Click the Disconnect button on the activeLocate tunnelrow.in table TheVPNClick
tunnel"Details"sessionbuttonwill(typicallysafelyiconclose.button)ThestatusSidebar
cardsslides(connectedintunnelfromdetailsrightandsideduration) will disappear.
Sidebar Contents
DisconnectingHeader:
Tunnel name
Close button (X) to dismiss sidebar
Device List:
For each device, displays:
Field
Description
Example
Device Model
Hardware model name
AG-702-LT-EU-V48
Local IP
Device's LAN/WAN IP
192.168.1.50
VPN IP
Device's tunnel IP
10.8.0.10
Network Forwarding
Forwarding state
Enabled or Disabled
Connection Status
Device online/offline
Connected, Disconnected
Routing IP
Available network routes
192.168.1.0
Understanding Routing IP
What is requiredRouting beforeIP?
Lists tunnel.network ranges accessible through this device
Only shown when Network Forwarding = Enabled
CIDR notation (e.g., 192.168.1.0)
Example:
If theDevice internetVPN connectionIP: is10.8.0.10
Network lost,Forwarding: theEnabled
Routing appIP: may auto-disconnect for security. 192.168.1.0
What This Means:
You can access device at 10.8.0.10
You can also access any device on 192.168.1.x network (192.168.1.1 through 192.168.1.254)
Traffic routes through 10.8.0.10 to reach local network
Use Case:
Your Computer (VPN: 10.8.0.25)
↓
Connect to: 192.168.1.100 (PLC on device's LAN)
↓
Routes through: 10.8.0.10 (gateway device)
↓
Reaches: PLC at 192.168.1.100