Installation
GetSystem the appRequirements
TheSupported appOperating Systems:
Windows 10 (64-bit) - Build 1809 or later
Windows 11 (64-bit)
Hardware Requirements:
Processor: Dual-core 2.0 GHz or faster
RAM: 4 GB minimum
Disk Space: 200 MB
Administrator privileges for installation
⚠️ Important: App is currently available in Atra-RMSBETA. (only for windows 10/11).
Windows: Get the appAtra VPN Client.
Important note: the app for windows is still in the BETA stage, and therefore minorMinor bugs may beexpected.encountered. Report issues to support.

1. The Atra VPN Client can be downloaded from the Atra-RMS dashboard → VPN section → top-right Download option.

Download &Process
Step 1: Access Download
-
After downloading the installer, it will be savedLog inyourtosystem’sAtradefaultRMSDownloads(webfolder.interface)
Navigate to VPN section
Locate theDownload filebutton (e.g.,top-left AtraVPNClientSetup.exe) and double-click to start installation.corner)
TheClick firstDownload time you run the installer, Windows SmartScreen (blue protection screen) may appear.
Step 2: Locate Installer
-
ThisInstallerisdownloadsatostandardyourWindowsdefaultsecurityDownloadscheck for apps that are still in BETA.folder -
SinceFilename: AtraVPNClientSetup.exe
Locate file in Downloads folder
Step 3: Run Installer
Double-click AtraVPNClientSetup.exe
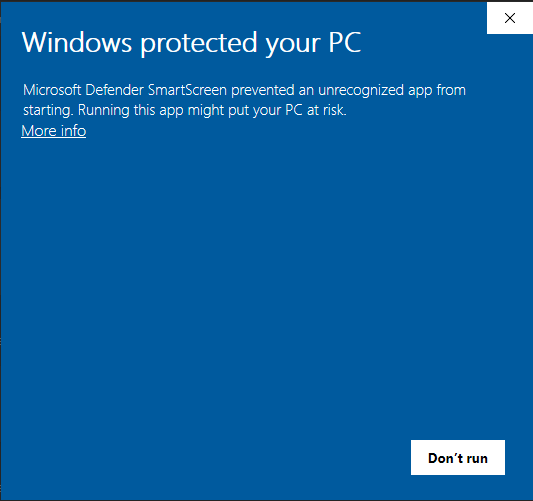
Windows SmartScreen warning may appear.

Windows SmartScreen Warning
Why This Appears:
Standard Windows security check
Appears for BETA apps not yet widely distributed
Does NOT indicate malicious software
Atra VPN Client is developed and signed by Atreyo, Atreyo,you can safely proceed.
How to Proceed Safely:
-
windowOn theSmartScreenwindow:
Click More info.PC"
ThenClick click"More Runinfo" anyway to continue.link
"Run anyway" button appears
Click "Run anyway"
Installation proceeds

Step 4: Administrator Permission
Windows User Account Control (UAC) prompt appears.
-
WhenMessage:prompted,"DoselectyouRun as Administratorwant to allowthethisinstallerapp to makenecessary system changes.changes?" -
FollowClickthe"Yes"installationtowizardgrantstepsadministratoruntil the setup is complete.privileges -
OnceInstallationfinished,wizardthe app will open and display the Login Page.opens
Why Administrator Rights Needed:
Install OpenVPN drivers
Create system network interfaces
Modify network routing tables
Write to Program Files directory
Step 5: Installation Wizard
Follow on-screen installation steps:
Welcome Screen: Click "Next"
License Agreement: Read and click "I Agree"
Installation Location: Use default or choose custom (click "Next")
Install: Click "Install" button
Progress Bar: Wait for installation (typically 1-2 minutes)
Completion: Click "Finish"

Step 6: Launch Application
After installation completes:
Atra VPN Client automatically launches
Login page displays
Ready for authentication
Desktop Shortcut: Installer creates desktop icon for future launches.