Understanding Role Permissions
NavigateClick any role name in the list to open the RolesRole pageDetail Page.

Role Detail Page Shows:
Role name and clickmetadata on(Created anyBy, particularCreated role.On)
Permissions youtable with all sections
Edit button (✏️) to themodify Rolerole
Refresh thatbutton role.(🔄) to update data
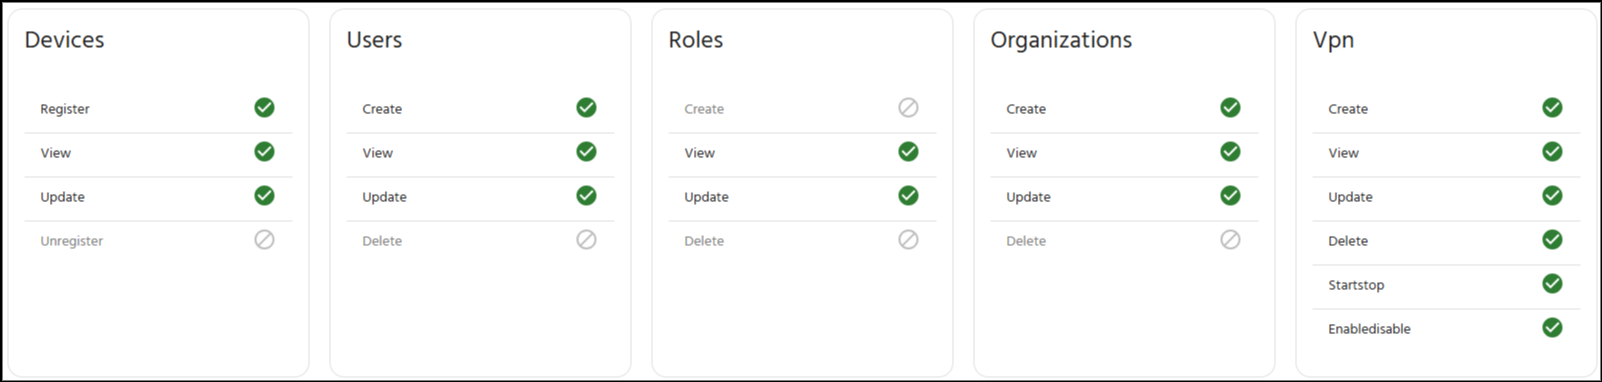
Permissions Table
ThisDisplays page displays the detailed profile for a specific role, showing its assignedall permissions andin creationtable history.format with toggle switches.
Role Header 🏷️

The top section provides key metadata and actionsColumns: forSection the| role:View | Create | Edit | Delete | Register | Unregister | Start/Stop | Enable/Disable
Toggle States:
-
RoleONName:(Teal/Green, right position) -DisplaysPermissionthe name of the role.granted -
Edit Button ✏️OFF (PencilGray,Icon):left position) - Permission not granted
Section-Specific Columns:
Register/Unregister Click- thisDevices button to open the form to modify the role's name or its assigned permissions.only
CreatedStart/Stop, By & On:Enable/Disable Displays- theVPN creator of the role and the creation date/time.only
Refresh Button 🔄Dashes (Circular Arrow):-) Refreshes- theNot page to ensure the displayed permissions are up-to-date.applicable
Permissions
Editing Display
Entering Edit Mode
-
AOpengreenRolecheckmarkDetail Page (✓)clickmeansrolethe permission isallowed (granted).name) -
AClickgreyEditcirclebutton (◯)means the permission isnot allowed (denied).
The page displays all five section cards (Devices, Users, Roles, Organizations, VPN) with their respective permissions, clearly indicating which actions are allowed (✓) and which are not allowed (◯) for the role.
Edit Permissions Dialog Box ✏️
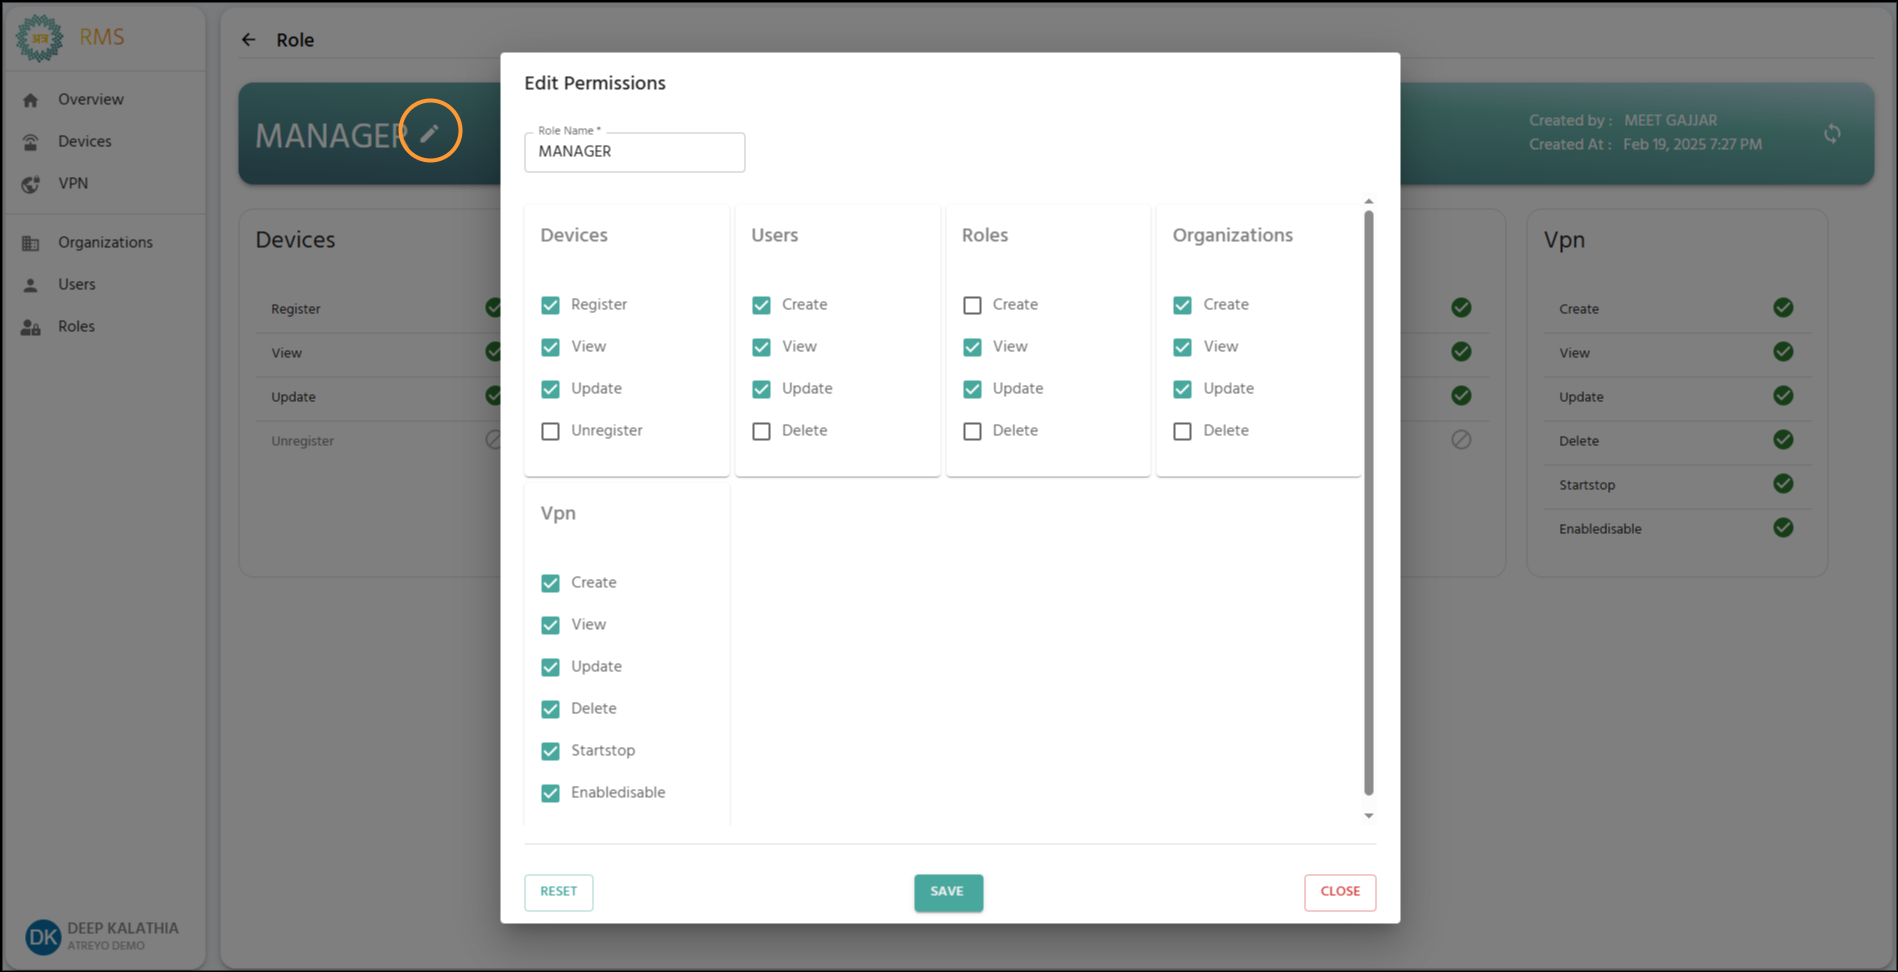
The "Edit Permissions" dialog box is used to modify the name and permissions of an existing role. This form is identical) in structure and functionality to the "Create New Role" form, but it pre-populates with the role's current settings.
Role Details and Editing 🏷️
Role Name*: Displays the current name of the role, which can be edited.header
Rule:Page Thebecomes name must still adhere to the original creation rules (3 to 50 characters, allowing letters, numbers, spaces, hyphens, and underscores).editable

What Changes in Edit Mode
Permissions:Role Name: AllBecomes currenttext permissionsinput are shown via checkedfield (✓)editable)
Toggle Switches: Become active (clickable)
Buttons: SAVE CHANGES and uncheckedCANCEL (□) boxes. You can modify any setting by clicking the corresponding checkbox.appear
Modifying Permissions Configuration
Permissions are organized into five sections: Devices, Users, Roles, Organizations, and VPN.
To Grant Permission:
Click toggle switch (✓).currently OFF/gray)
Switch moves right, turns teal/green
Permission granted when saved
To DenyRevoke Permission:
Click toggle switch (□).currently ON/teal)
Switch moves left, turns gray
Permission revoked when saved
Dependency Enforcement
System automatically maintains dependencies:
View Dependency:
Turning ON any permission → Auto-enables View
Turning OFF View → Auto-disables other permissions in that section
ReminderVPN on Dependencies:Dependency:
-
ViewTurningDependency:ONTheanyViewVPN permissionfor→anyAuto-enablessectionDevicesisrequiredto grant any other permission in that section.View -
VPNTurningDependency:OFFTo grant anyVPNpermission, theDevices Viewpermission→must also be selected.
Action Buttons
SAVE (Green): ConfirmsAuto-disables all changes to the role name andVPN permissions and updates the role.
RESET (Teal Outline): Reverts all changes made since the dialog box was opened, restoring the permissions and name to their last saved state.
CLOSE (Red Outline): Closes the dialog box without saving any changes.
TheSaving Changes
Review all modifications
Click SAVE CHANGES button (teal)
Changes apply immediately to all users with this role
To Discard Changes: Click CANCEL button (red)
Important Notes
Company adminAdmin Role
⚠️ Cannot be edited - System-protected role with full access. Edit button is hidden.
Need custom admin? Create a new role with desired permissions.
Permission Changes
✅ Take effect immediately after saving
⚠️ Users may need to refresh browser to see changes
💡 Best practice: Notify users before major permission changes
Browser Refresh
not⚠️ editableRefreshing browser in Edit Mode loses all unsaved changes.