Overview
Connection
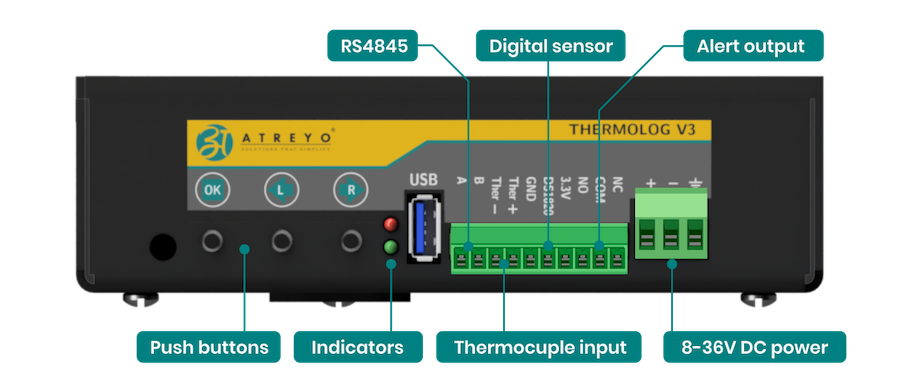
The thermologist on the right has a set of sockets for power and sensor connections. Below is a description of the sockets.
- RS485 is used to connect to a Modbus master, i.e. to an IoT gateway, computer or PLC.
- Push buttons are used to configure Thermolog and change the way the danyuch is displayed
- In place of the digital sensor, depending on the Thermolog version, either a temperature sensor or a temperature and humidity sensor is connected.
- The Alert output is connected to either an optional sound or a sound/visual signaling device. The circuit is in NO/NC form and can control 230V mains voltage up to a maximum of 3A.
- Thermokuple input is adapted to 2-wire PT100 only in the version of Thermolog that supports this sensor
Copy data of Logger
Copying the data of the built-in logger is done with a USB pendrive. To do this, insert a pendrive formatted in FAT32 and restart the device. Thermolog will automatically start copying data to it after detecting the pendrive. The display will show information about the progress of copying.
Once copied, the file on the flash drive will be named Termdump.BIN
To open it you need to use a dedicated PC program - Thermometer.
Firmware update
Thermolog enables firmware updates. For this purpose, you need a flash drive formatted in FAT32. On the flash drive you should copy the firmware to Thermolog. The firmware must be named atgfirmware.bin.
- Insert a pendrive
- Simultaneously press all 3 buttons
- Turn on the power. The display will show Bootloader.
- After a while it will display "press any key" Then press the "L" button
- In a dozen seconds the firmware will update and Thermolog will reboot.